26th June 2010

Bugger

I think it's fair to say that my weekend's racing did not go to plan. In fact, I didn't end up doing any racing at all, due to the fact that I crashed the car while testing on the Friday. And, indeed, crashed it pretty thoroughly. So the continutation of Operation Finish The Bloody Race was hindered by an unexpected failure to complete Operation Start The Bloody Race. The run-up to testing was standard enough - get trailer from garage, load it up, load up the car, sleep, get up early and head down to Brands. The run down was grey and drizzly but the circuit was dry and the overcast skies didn't seem particularly threatening. The first session was spoiled somewhat by yet another bloody braking problem - this time the problem was that I had to pump the brakes up for every corner, which is quite annoying and rather distracting.

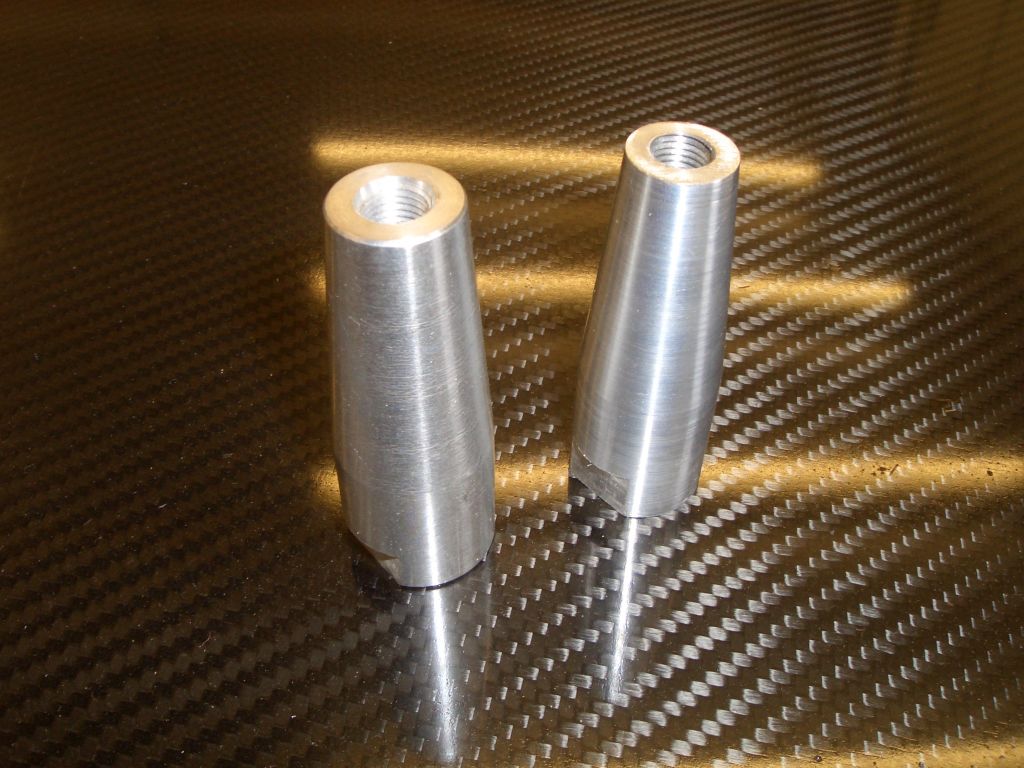
I knew what the cause of this was - when I'd reassembled the uprights after my upright-machining adventures, I'd done it as per the workshop manual - tighten the bearing nut to 27lbft while rotating the hub, then back off 90 degrees. Every time I've tried this previously it's ended up with the wheel bearings being too loose, and this time was no exeption - they were allowing the hubs and brake disc to wobble around, backing the pads off the discs. That was the main braking problem during the first session, but even after I'd pumped the brakes up they didn't feel exactly reassuring. I'd fitted Polymatrix A brake pads to replace the Smart pads I'd fitted earlier. These have a much higher co-efficient of friction and should in theory provide more effective brakes. However, I was finding that they were so aggressive that they were snatching the brakes left, right and centre and it was almost impossible to modulate them - as soon as you even squeezed the brake pedal they just snatched. The car felt deeply unstable under braking, which isn't exactly ideal when your aim is to increase your apex speeds...

During the one hour break between the first and second sessions, I tightened up the wheel bearings and with that done headed out back onto the track. The long pedal issue had largely gone, but the brakes still didn't feel great. Still, they were working, and my lap times were coming down as I started pushing harder, getting back into the 1:54s which I'd managed last time out. Indeed, I could see Phil Alcock, a class C RGB driver, ahead of me and I was clearly reeling him in. However, before I closed up with him, things went rapidly and quite seriously wrong.

I was driving up the hill towards Druids, and had started braking in the usual place - just at the bridge over 
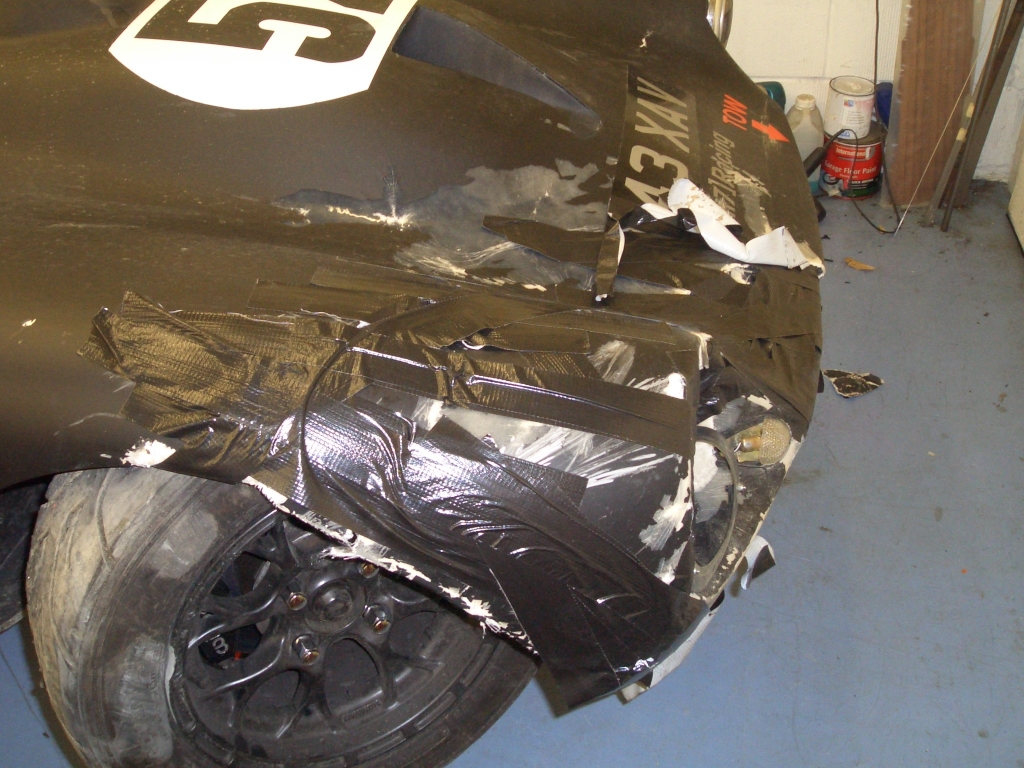
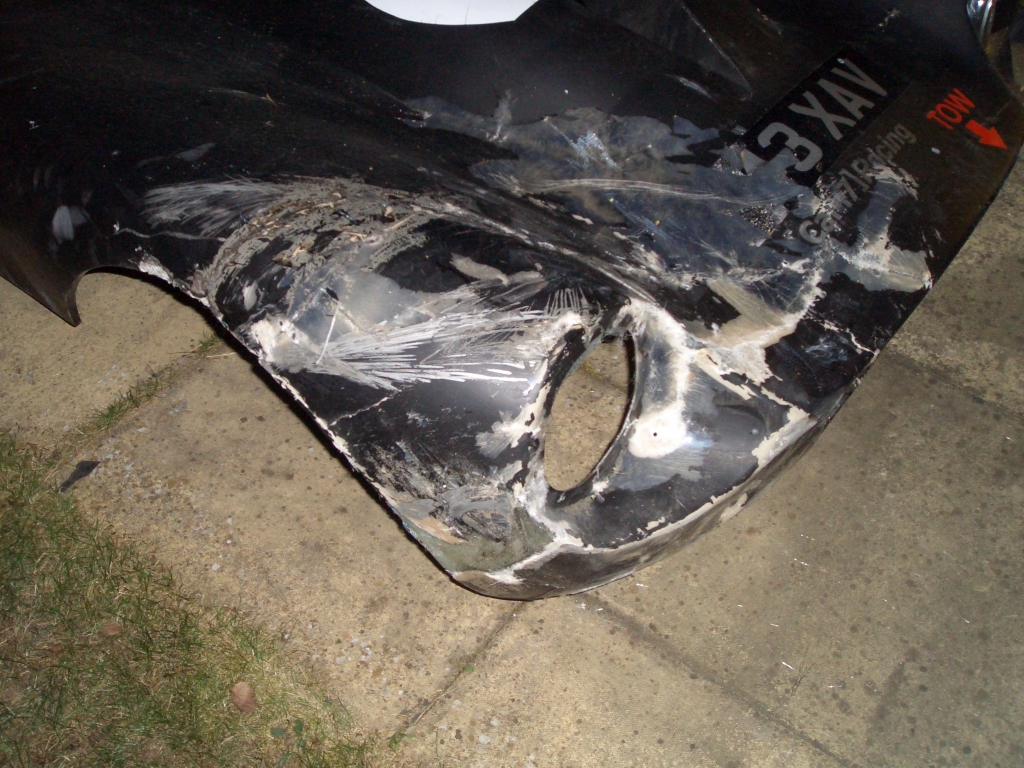
the circuit. Just after I'd started braking, the car suddenly snapped left and started spinning. The front right corner hit the Armco on the left hand of the circuit, which slammed the rear right corner into the Armco, and I ended up nearly completing the 360 degree turn in the gravel. To the right of me there was still tarmac - I'd barely 
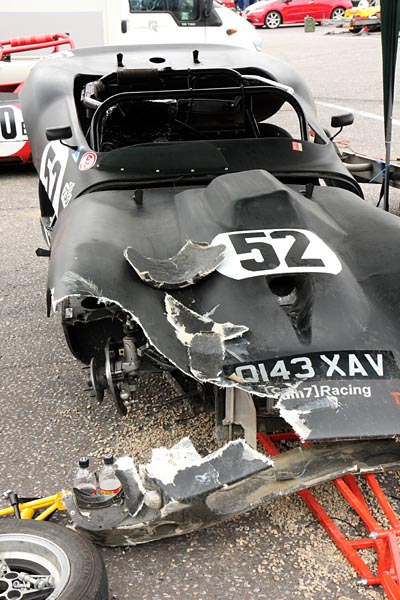
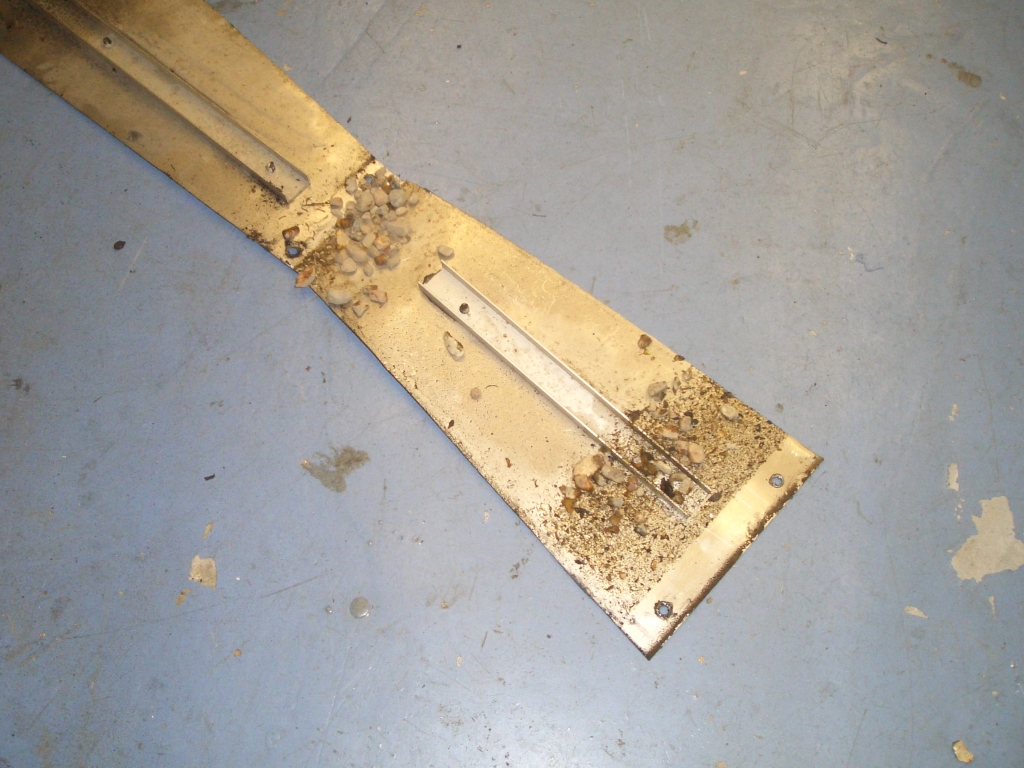
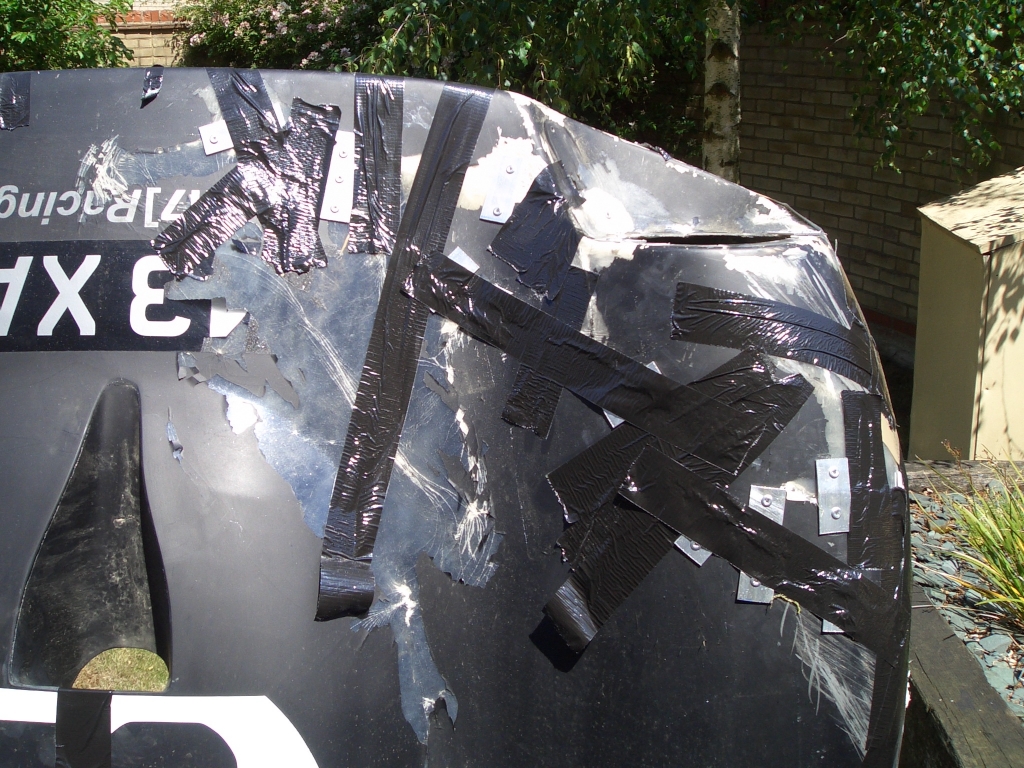
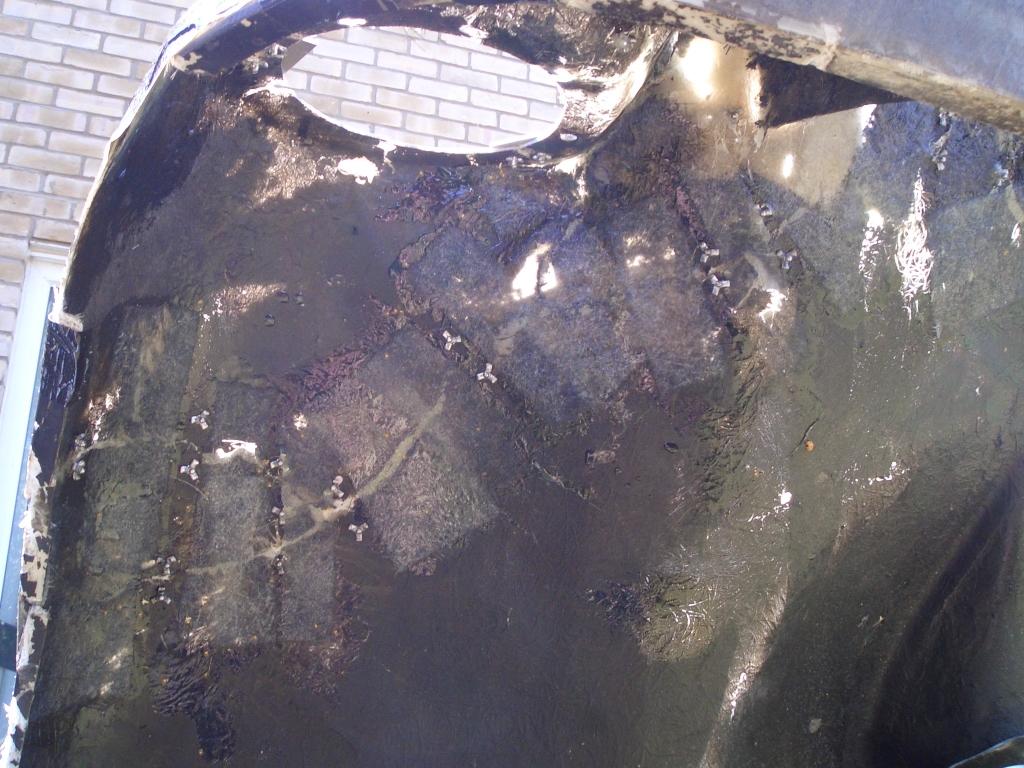
got past the apex of the corner during the entire crash. It was fairly obvious from the loud bangs that the car 
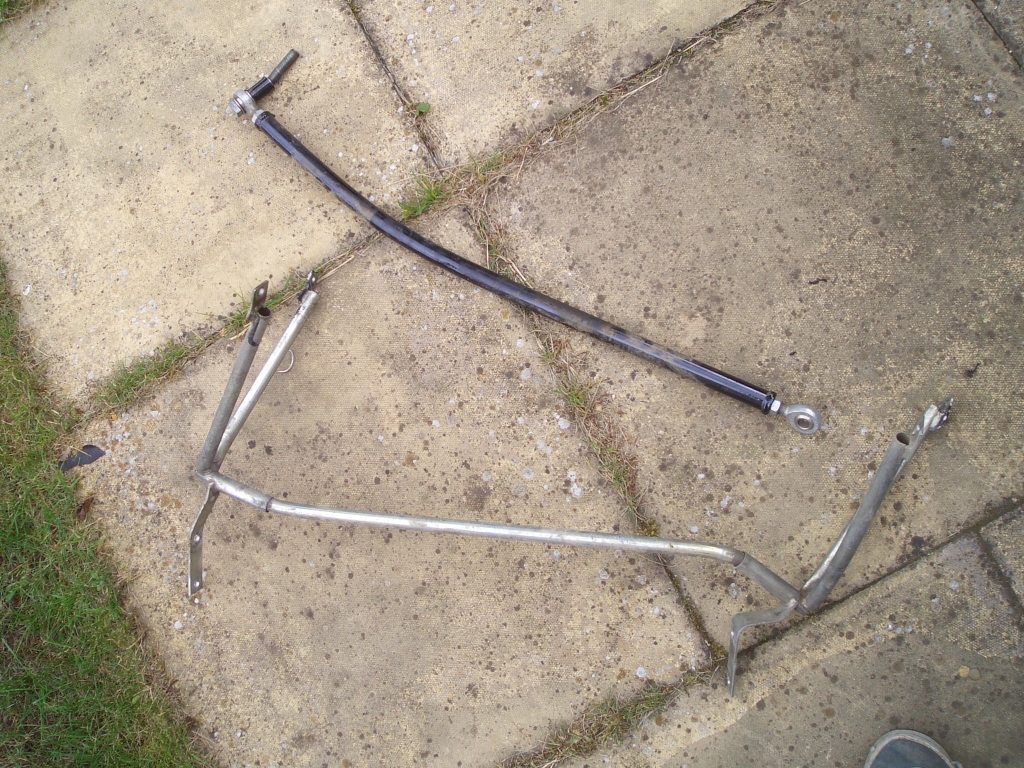
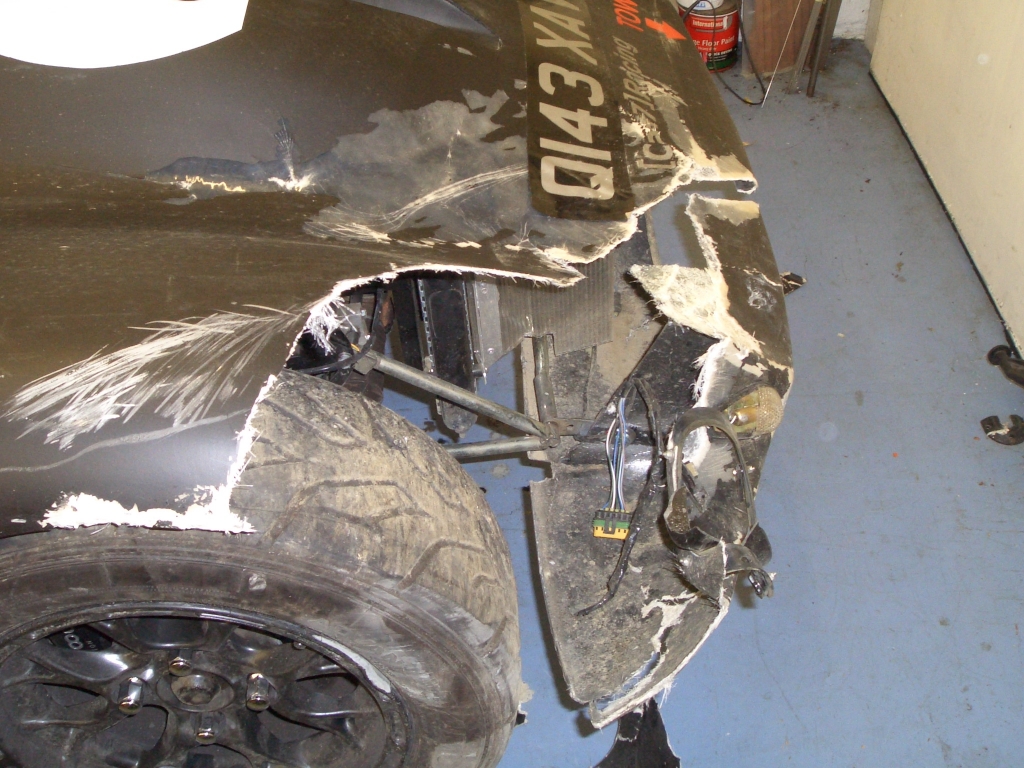
was going to be rather worse for wear. Indeed, the rather jaunty angle at which the front right wheel was lying meant that the suspension and steering linkages had given up the unequal struggle to stay intact. The medical staff asked me if I was OK, I reassured them I was, and the recovery chaps got the car on the low-loader and returned both me and it to the paddock.

To quote, Captain Slow himself, Oh cock...


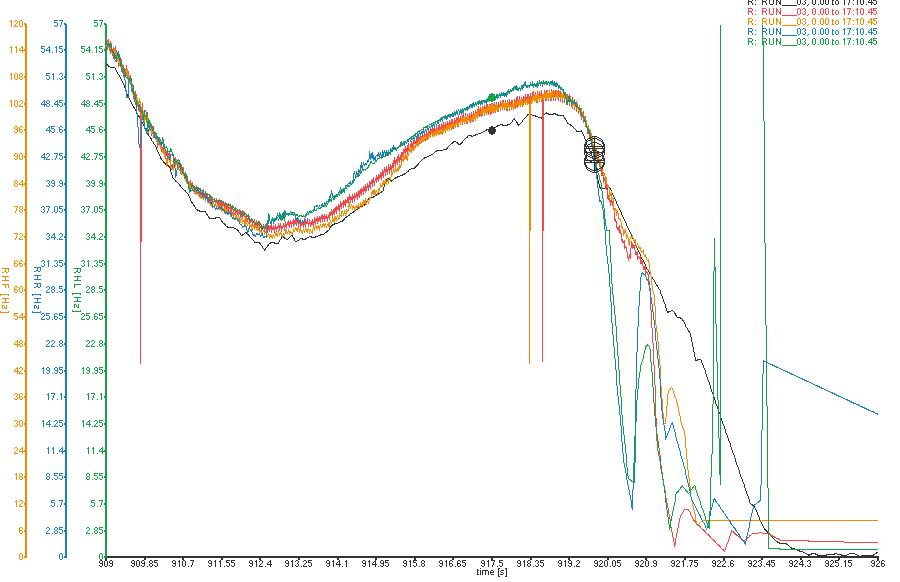
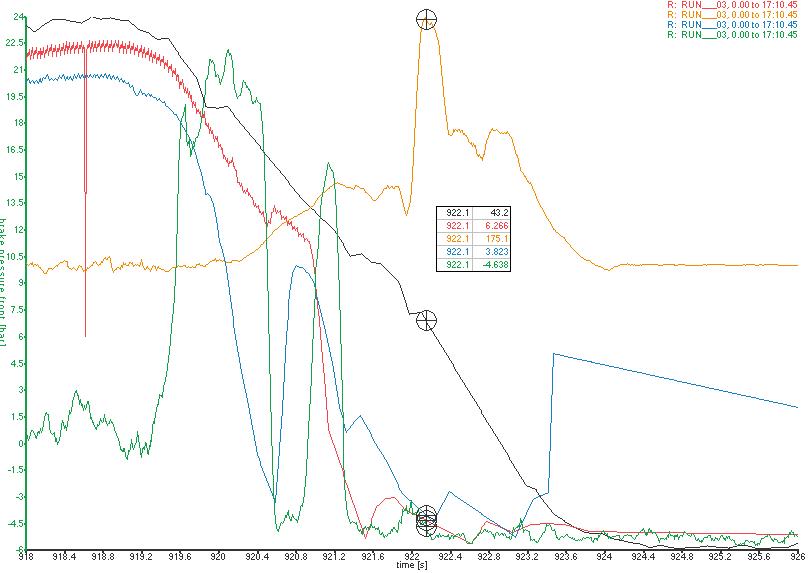
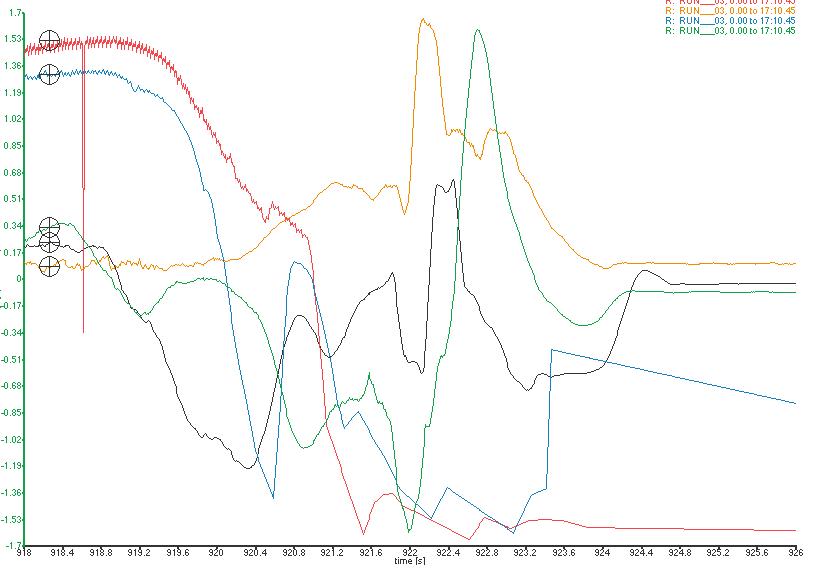
Wheels locked up a 88mph, hit barrier at 47mph - scrubbed some off under braking and while pirouetting along track...
 

Damage


The most obvious damage is the bodywork. The bonnet is missing most of its front corner, although I have collected almost all of the pieces so hopefully I'll be able to stitch it together and repair it.

Less obvious is the suspension and steering damage. The lower wishbone sheared, although rather surprisingly the rod end attaching the lower wishbone to the upright survived unscathed. Fortunate really, as the high-misalignment rod ends I use there are 50 quid each... The top rocker arm is intact, but badly bent out of shape in various interesting ways. The rosejoint connecting the ARB to the lower wishbone sheared in half and the spherical bearing itself is jammed solid. The rosejoint on the upright which does the job normally down by a track-rod end is intact, but managed to pull itself bodily out of the
aluminium adaptor. Sideways. The force exerted in doing so bent the end of the track rod, and the front wheel has a rather mangled bit of the rim where it hit the barrier.

Oh, and the bonnet pin holding the right hand side of the bonnet down onto the sidepod pulled out of the sidepod - it was screwed into a
metal plate, sandwiched between the bottom of the sidepod and some extra CSM I'd added. The metal plate ended up being pulled straight through the (as usual very poorly laminated) sidepod, which didn't appear to put up much in the way of resistance.

So, parts required at the front are: New lower wishbone, new top rocker arm, new steering rack (better safe than sorry), new TRE adaptor, new 3/8" UNF rosejoint, new headlamp and indicator, new 18mm offset 13x6 Compomotive CXR wheel (black) and a new bonnet support frame. And lashings of polyester resin and CSM to stitch the bonnet back together again, and loads of filler and matt black celly to cover up the scars. And a new stick-on number plate and 'cam7 Racing' sticker.

Although the damage to the bonnet makes the front end look as though it took the brunt of the damage, in fact the back end took the biggest hit when the impact between the front of the car and the Armco spun the car round and rammed the rear into the barrier. The force of the impact can be seen from the Panhard rod (the bananananana-shaped black thing in the photo). Once upon a time it was straight, and it's now definitely not. It's made of 22mm OD steel tubing with a 1.5mm wall thickness, and it takes quite a lot to bend it. The half inch bolt at the end is also bent at a jaunty angle.

The other thing is the bonnet frame. This is the third hefty impact it's taken and although I've straightened it out as much as I can, I think that this time its time is up. Of course, I should just be able to go to Fisher Sportscars and get another one, but I've had two on order for at least 4 years now, without any sign that Fisher actually want to provide me with goods in return for money, so I'm not holding my breath on that one. I'll make my own, as usual.

Also taking it for the team at the back of the car was the trailing arm (got wrapped round the chassis), and the rear wheel which has a reasonably large section of the rim snapped clean off. So, parts required for the rear end are a new Panhard rod, a new trailing arm (I was going to make new ones anyway), a new 13x6 12mm offset wheel, and possible a new rear axle casing...


  Yep, it appears that the force of the impact at the back of the car may have been sufficient to bend the axle casing. My first thought, having got back to the paddock, was of course whether or not I could fix it before qualifying on Saturday and go racing anyway. The more I pulled the car apart, the less likely this seemed, particularly with the damage to the top rocker arm - it's a one-off made by Fisher at my request, and while it was only bent rather than broken it was bent in a variety of interestingly complicated geometric ways and beating it straight with a vice and a lump hammer would, I suspect, have been impossible.

However, the real show stopper was the rear axle. The only real way to see whether it's bent or not is to take the rear axle off the car, strip off the brakes and remove the halfshafts, and then see if the mounting faces on the half shafts are parallel by clamping spirit levels to them and measuring the angle between them. However, doing so rough measurements with a tape measure and some straight-edges it looks as though the right rear is toeing in, by about 4mm from the rear of the brake disc to the front. That's equal to a toe-in on one side of about a degree, which is rather a lot, particularly if it's only on one side. And despite suggestions to the contrary involving welders, angle grinders and very very large hammers, it didn't really seem like something that could be sorted out in the paddock. So I went home, made up some new parts, welded broken parts together and hit the remaining parts with a geet big hammer, so that once fitted to the car it would at least be capable of being driven onto and off the trailer under its own power. And then I went home.

Oh, and to cap it all, Operation Continence was an abject failure too. Despite having been completed oil-tight for a week in my garage, after the first test session the sump started dripping pretty rapidly from the drain tube hole, and the car continued where if left of at the last race leaving large puddles of oil all over the paddock.

Yep, I've had better weekends...

Thanks, though, go to Rob and Andy Grant for their help with the investigations of the rear axle and for seeing if Fisher Sportscars had a spare (they didn't) and as ever to Tony Gaunt for his assistance.

Back at the ranch

Having got the car home and up on axle stands it was time to have a more detailed look at the damage and decide firstly how to fix it, and secondly how long it was going to take to fix it - if I'm not going to be able to do Cadwell in three weeks' time (I'm not) then I'll go to Classic Le Mans instead...

The damage to the rear bodywork isn't too bad at all - I think the rear axle took most of the brunt of the impact, and the rear bodywork simply shuftied out of the way. The little
chassis extensions which hold the back of the rear tub in place had bent by almost 45 degrees, but that's a failure mode I'm entirely happy with, particularly since a very little hammer work quickly returned them to straightness.

The rear bodywork should be reasonably easy to fix - there's no major bits missing, all the remaining bits seem to be reasonably willing to line up with each other, and the damage is limited to quite a small area of the main tub really - all the delicate stuff like the catches which hold the main tub onto the sidepods are unscathed. The rear wheel's really broken though...


  The car arrived home with the bonnet looking like this. Swaddled in lashings of gaffer tape, it doesn't look *that* bad. However, with the gaffer tape removed...

...it's rather obvious that there's quite a lot of bonnet missing. I've started patching the bits together using little strips of aluminium rivetted in place, but the little bits of bodywork don't seem particularly keen to line up with each other and to remain flat. One of the problems is, once again, that the quality of the GRP work is absolutely appalling and the resin and glass fibre haven't been consolidated at all - what you really have is a layer of gel-coat, a layer of dry glass fibres, and then a layer of resin on the underside. That's why the edges of the broken bits look so white and fluffy - that's the unconsolidated dry glass fibres. It's also quite noticeable how much filler has been included in the laminate (such as around the edges of the wheel arches) because the laminators could be bothered to consolidate the glass fibre into the corners properly, and slopping a load of filler into tight corners was presumably easier than doing the job properly.  

 
And after four days' (well, evenings') work on the car, I'm still finding bits of gravel everywhere! There's some trapped between the radiator and the rad fan that I can't get at yet, there's some between the rear damper bodies and the springs, and when I dropped the transmission tunnel cover, I found a load more momentos of my wee prang. I was thinking the other day that the paths in the back garden could do with some more gravel on them, so my new gravel-trap collection will provide a useful start.

But I digress. Apart from the question 'How do I mend it', the other question weighing heavily on my mind was what caused the crash in the first place. OK, I'd had a few braking problems previously, and the brakes hadn't felt great all morning, but a spin like that doesn't happen with a reason. The video wasn't going to be any help - I'd killed the power after the crash and so lost the video, but I still had the data from the datalogger. So, yep, it's time for some more graphs...

Crash analysis


The reason for the crash was that the rear wheels locked up at 88mph, pitching the car into a spin. On the graph on the right, the black line is speed, the orange and red lines are the speeds of the two front wheels, the blue and green lines are the two rear wheel speeds. As I hit the brakes, and the speed started slowing down, the rear wheels suddenly rotating much more slowly.

And if you're wondering why the rear wheels locked up, or at least wondering why the car had its brake bias set too far to the rear, it's 100% certified user error. The last time out at Brands I'd fitted a set of Polymatrix E brake pads to the front of the car, borrowed from Tim, in order to try and sort out the problems with the front left brake. In order to compensate for the fact I was still running much softer Smart pads at the rear, I wound on a few turns of rearwards brake bias. And when I fitted the Polymatrix As all round, I didn't return the brake bias to where it had been previously. Cock.


On this one, black is car speed, red is front wheel speed, blue is rear wheel speed, green is pressure in the front brake lines and yellow is the car's rate of yaw in degrees per second. You can see from the relationship between the brake line pressure and the wheel speeds that the rear wheels locked up almost as soon as I hit the brakes - the dip in speed before then is due to me, as usual, fannying about for about half a second between coming off the throttle and hitting the anchors.

The yaw rate shows the car starting to turn as the rear wheels lock up. The big spike in the yaw rate is, I assume, when I hit the Armco with the front of the car, pitching the rear end of the car into the barriers.


Final graph this time - this is wheel speed front and rear (red and blue), yaw (yellow) and longditudinal and lateral G forces (black and green). Despite the fact that it felt like a fairly hefty impact when I went into the Armco, according to the DL1 the G-force loadings only reached 1.7G or thereabouts - perhaps explaining why the damage appears to be limited to suspension and bodywork damage rather than anything more serious.

Anyway, moral of the story is to check your brake bias before going out testing, especially where you've got new pads and you've previously been dicking about with the brake bias...
 

30th June 2010


While I'm waiting to get the steel and parts together to make the new suspension components and rebuild the car's suspension, I thought I might as well get on with repairing the bonnet. The first job was to stitch together all the bits I'd managed to recover (only one relatively small bit was missing) with a combination of bits of ali strip, rivets, and tank tape. The ali strip was necessary as none of the pieces, including the main lump of bonnet left, was the same shape as before. Everything was rather buckled and twisted, not least due to the fact (once again) that the bodywork is so poorly laminated. Because the CSM isn't properly consolidated, all you really have is a layer of gelcoat and a layer of resin, with a dry layer of GRP between them. That means that once the gelcoat cracks and deforms, it's lost the majority of its structural rigidity...


With everything in roughly the right place, the next job was to hold all the bits together with strips of resin-soaked CSM, trying hard not to bond the rivets in as part of the structure as it makes it impossible to put a second layer on top properly if the first layer is all humpy and bumpy.

Some of the bits of bonnet are transparent - that's where the paint's flaked off the outside due to the impact, and where I've removed the black celly paint on the inside with copious amounts of thinners. In my experience GRP sticks very well to paint, but tends to take the paint with it as it falls off...


Once the little strips of GRP had dried, I laid some much larger sheets of CSM over the top of them, effectively covering the front right corner of the bonnet in its entirety. Because the gelcoat is so star-chipped, I suspect I may end up having to sand quite a lot of it off in order to get even a half-decent racer's finish, and having some reasonably well-consolidated GRP behind it will, I suspect, prove helpful in ensuring that I don't end up simply sanding straight through the bonnet in search of something structurally sound to slap some filler on top of.

With everything set, here it is - looking noticeably similar to a Fury bonnet. As ever though, it looks a hell of a lot better in the photo than it does in real life.


Finally for now, this is the bit which was missing from the dB Racing Fury Bonnet Jigsaw Puzzle (the greeny tinged bit in the middle of the photo). Although the marshals and I scoured the Druids gravel trap for bits of bodywork (finding in the process quite a few bits of black-coloured body work which wasn't even off my car) we obviously missed this little bit. Once the bodywork was stitched together, I covered up the hole with some packing tape, with some gaffer tape over the top for a bit of resilience to my none-too-gentle laminating, and laid up a few layers of CSM on the inside.

So that's the laminating done. Next it's off to the Shed with the bonnet, for some intensive sanding, filling, sanding, filling, sanding, filling, sanding, filling, sanding, filling, and finally some painting. Can't wait.