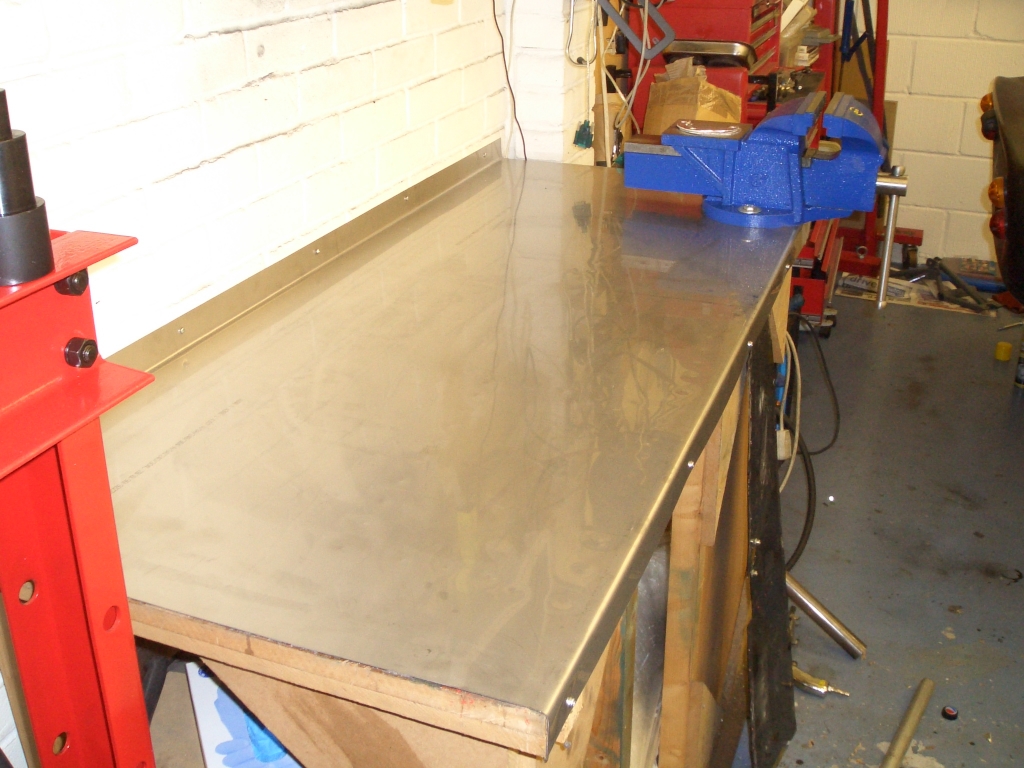
Surprisingly expensive stuff, though, stainless sheet. OK, it's pretty big at 1.5m wide, but even with relatively thin 1mm sheet it was three figures. And sneaking into view on the left is...
|
|
So having trashed my vice trying to use it as a press, I not only needed
a press but also a new vice. The new vice is the biggest non-swivelling vice that Machine Mart had in stock. I
think it should be up to the job, particularly now it doesn't have to be used as a press. I've also taken the opportunity
to do something I've been wanting to do for a long time - put a stainless steel top on my home-made MDF and 2x2
workbench. The trouble with an MDF surface is that if you spill any fluid on it, it soaks in. Also, with the new
stainless steel worktop, I can connect the earth lead of the welder to the worktop and then simply place whatever
I'm welding on top. Hopefully this will help prevent further instances of me forgetting to connect the earth lead
and then ending up with a couple of feet of MIG wire hanging out of the end of the welding torch. Surprisingly expensive stuff, though, stainless sheet. OK, it's pretty big at 1.5m wide, but even with relatively thin 1mm sheet it was three figures. And sneaking into view on the left is... |
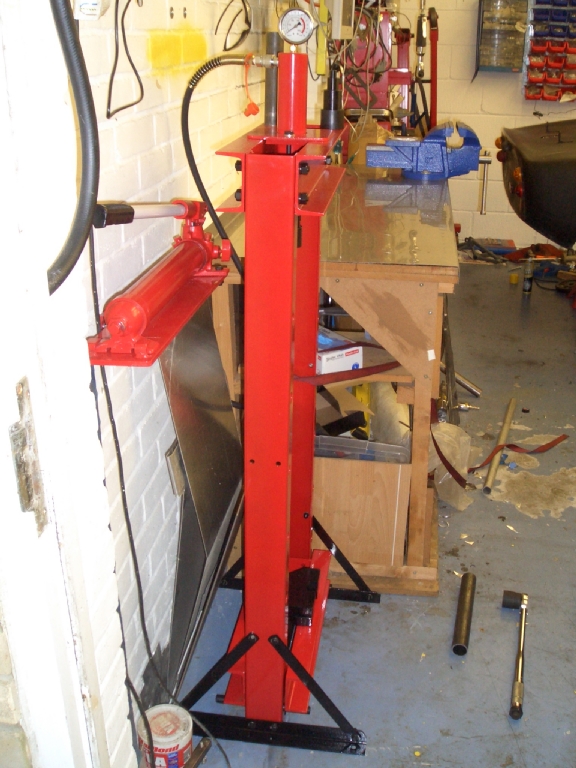
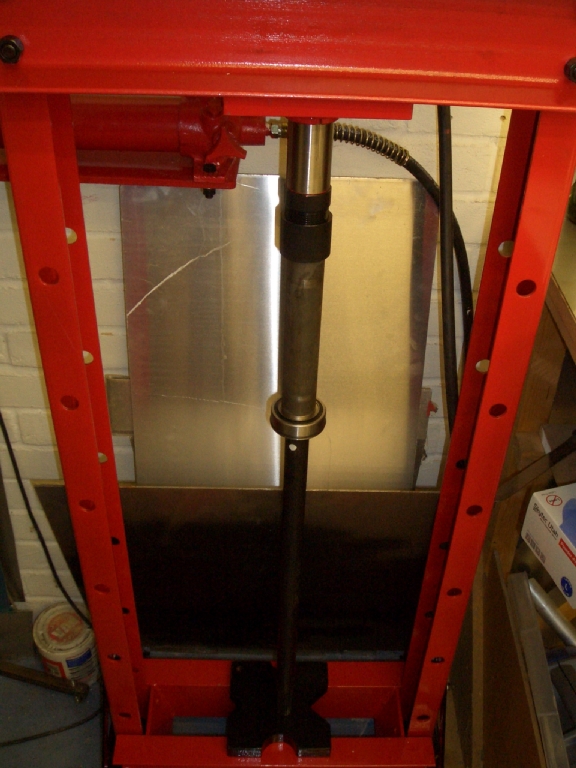
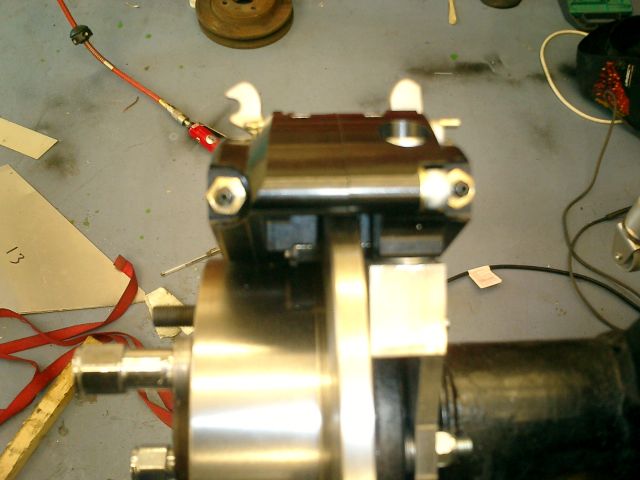
| ...the new press. The pump on the left is designed to fit on the
side of the body of the press, but in order to get the press as close to the wall as possible (and reduce the instances
of me walking into it when entering the garage at night in the dark) I've mounted the pump on the wall with some
seriously heavy duty rawl-plugs. I think the wall will start buckling before the platform the pump's mounted on
comes off. The press works beautifully, and I'm busy kicking myself for not having bought one earlier. Although, in hindsight, it turns out that buying it to do the halfshafts was a bit of a waste of time and effort, but that's not the fault of the press, and I'll come to that a bit later... |
 |
|
|
The press did come in very handy in assembling the halfshafts. Having
used it to press in the new wheel studs into the hubs, I then used it to fit the bearings onto the shafts. To help
things along I heated the bearings up to 70degC, and wrapped the shafts in coolbox freezer bag thingies to chill
it. Probably not necessary though, as the bearings went on fairly easily. The mandrel is just an old length of roll cage material I had left over. Nice thick walls, and the ID (just over 30mm) was just right for pressing the new bearing on. |
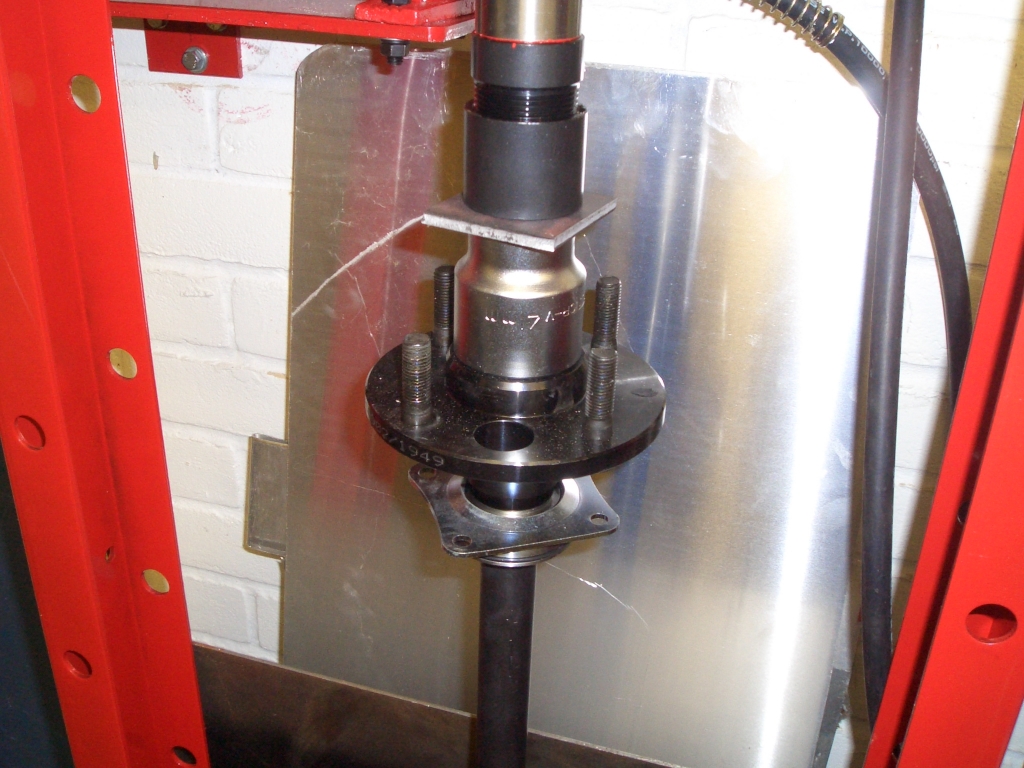
| The press also came into handy for fitting the hub onto the shaft,
this time using a handily sized socket as a mandrel, with a bit of plate steel to spread the load. I suspect the
hubs would have fitted perfectly easily with a soft-faced mallet and some wood, but it much nicer using the press. Oh, and it turns out the hubs aren't aluminium, as I incorrectly claimed they were. At least, not unless someone's invented magnetic aluminium. In fact, I'm pretty sure the Tran-X halfshafts are heavier than the standard Ford ones. Stronger, no doubt, but also heavier. The shafts are a bigger diameter, and the hubs are still steel. I had thought about getting the shafts gun-drilled, given their bigger diameter, but in the end I decided I didn't have time to arrange everything. However, I may still end up doing this because (as will become clear) it's going to be a while before I finally fit the Tran-X shafts - if I ever do. |
 |
|
|
With the hubs and halfshafts and bearings pressed together, and the
conical washer and nut holding everything together, I could fit the halfshafts into the axle casing. They slipped
into place with a few gentle taps from the old hide mallet. I've bought new halfshaft retaining plates, together with some spacers which fit between the retaining plates and the axle casing to replace the brake backplate which would normally be there - just about visible in the photos. The old set-up had a couple of washers between the retaining plate and the axle casing on each of the four bolts, and while they did the job, they let dirt get in between them. This way seems much neater to me. If a bit heavier. |
| In order to eliminate a few more washers, I've also made these four
shims. These go between the rear axle casing and the rear caliper bracket (to centralise the caliper) and between
the rear caliper bracket and the nuts holding it (and the halfshaft retaining plate) in place. The washers between
the rear axle casing and the rear caliper bracket are visible, albeit rather blurry, in this picture. Nothing wrong with using the washers per se, but it was a right faff having to get 12 washers (each with a little cut away section on one side) in the right place before torquing up the nuts (which process invariably moved the carefully-located washers). Took an age to make, of course, but having these shims should make re-assembling the rear brakes rather more straightforward. And it would have been pleasingly straightforward, if it wasn't for the fact that the rear halfshaft ARE THE WRONG FECKING LENGTH. 250 quid for some replacement halfshafts, and they don't even bloody fit. Before engaging in <rant> mode, let me explain. |
 |
|
|
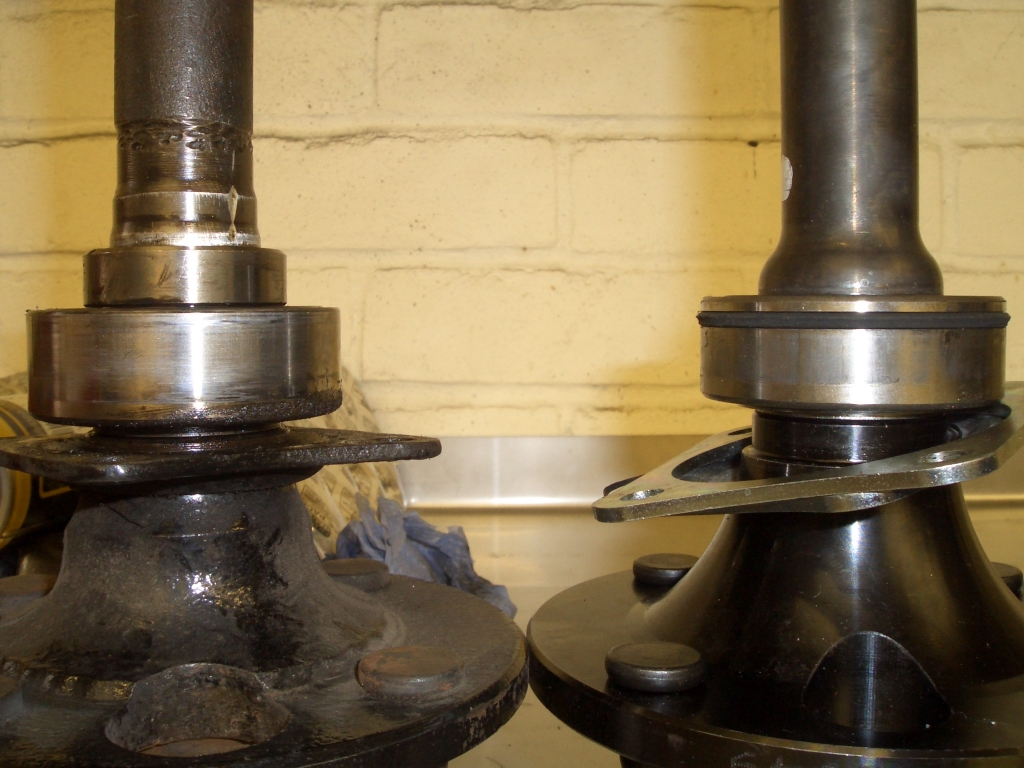
Ford halfshaft's on the left, Tran-X one is on the right. Although there's not *that* much in it, the top of the bearing is slightly higher on the Tran-X unit. |
| On the faces of the hubs, however, the opposite is the case. Again,
Ford on the left, Tran-X on the right. Quite clearly, the face of the Tran-X hub is lower. Net result is that the
space on the Tran-X halfshaft between the inner face of the bearing (which sits up against a shoulder machined
in the end of the rear axle facing) and the face of the hub is about 4.5mm longer than on the Ford unit. Which
means that the brake disc or drum is 4.5mm further outboard. Now if you're using lug-mounted calipers that's not an issue - just bung in 4.5mm of washers between the mounting points and the caliper lugs. However, the Wilwood Powerlite HB calipers I'm using as part of the Rally Design kit are radial mounted so you can't do that. And due to the way the calipers mount onto the rear axle casing, if you add spacers between them it makes the problem worse not better. OK, so if I remove the 2mm spacer I so carefully made the difference goes down to 2.5mm, but it still means the caliper's sufficiently off-centre that it would be impossible to fit new and unworn pads into the caliper. It's tempting, of course, to lauch into another HiSpec-esque rant asking the rhetorical question about why British component manufacturers seem incapable of performing the relatively simple task of copying existing parts accurately. But frankly I can't be bothered. I'll e-mail Rally Design and point out the problem, but ultimately if Tran-X are as incapable of using vernier calipers as they appear to be, I can't imagine that they're going to suddenly start producing parts that fit. Let's just say that insofar as Tran-X Escort Group 1 halfshafts are concerned (part numbers 10607, 10902, 10903 and 10904) are concerned, if you're thinking of buying some, I'd recommend not doing so. Setting fire to 250 quid and hitting yourself in the face with a morningstar will be more enjoyable and cheaper. Anyway, net result is the Tran-X calipers are coming out to face some serious surgery to MAKE THEM BLOODY FIT, and it's back in with the Ford units. |
 |
|
|
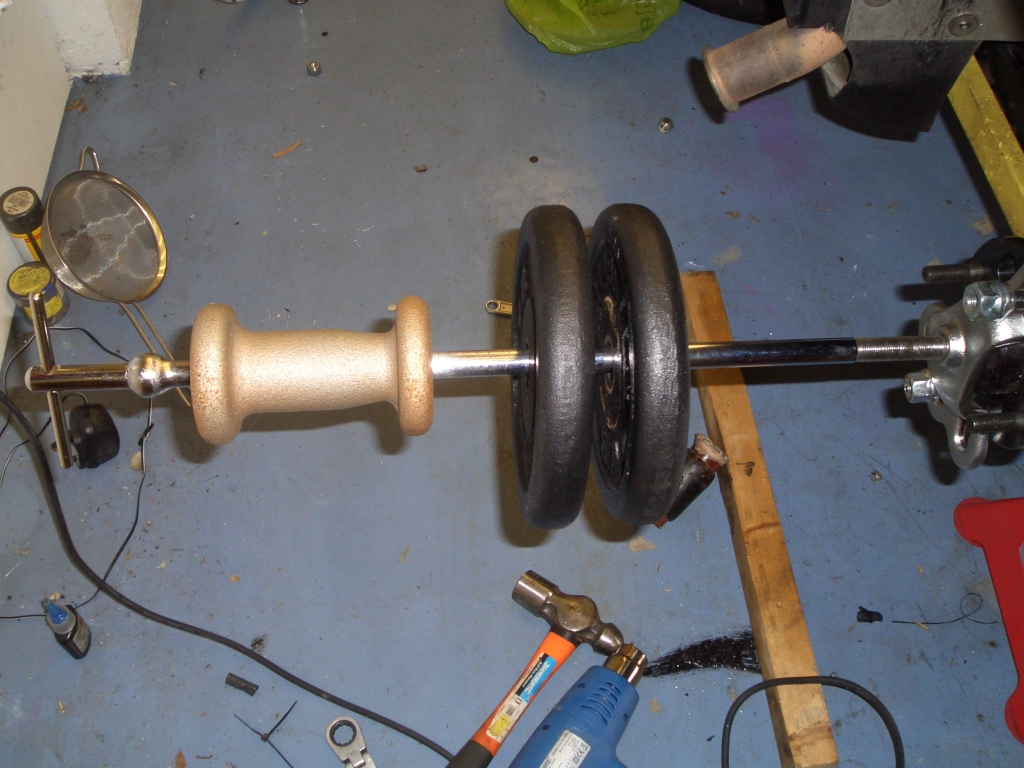
Except one of the Tran-X halfshafts is proving exceptionally reluctant to move. The other one came out with some enthusiastic use of my 6kg slide hammer. The nearside one proved capable of resisting the dynamic urgings of a mere 6kg, so I resorted to adding another 10kg in the form of two weights from my big weights bar. After half an hour of weight clanking, a very sore hand and wrist, and (probably) some neighbours wondering when the appalling racket was going to end, I conceded defeat. This halfshaft was not coming out merely with the persuasive forces applied by a 16kg slide hammer. |
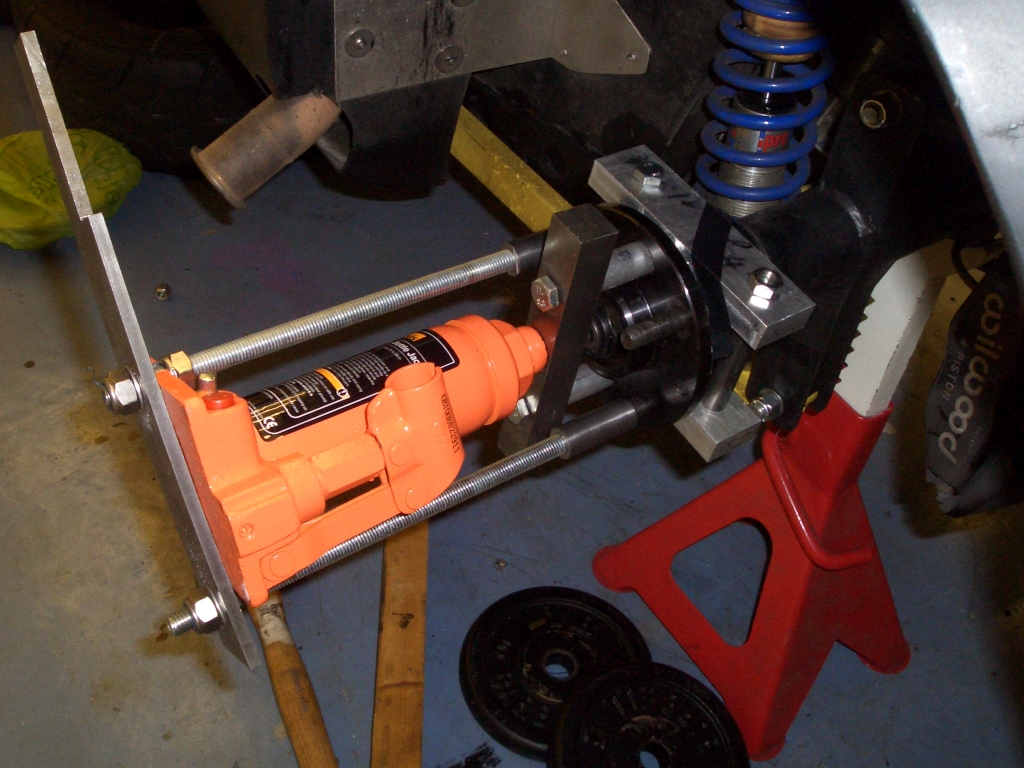
| So I'm busy making a special hydraulic halfshaft removal tool. This is the beginnings of it - two large lumps of ali pressed lovingly against the rear axle flange. Of course, matters are complicated by the presence of the halfshaft retaining plate and spacer, but there's still a little bit of axle casing to press against. The remainder of the tool, of which I'm sure Mr. Heath Robinson would approve, will be constructed from steel, lengths of studding, and a bottle jack... | 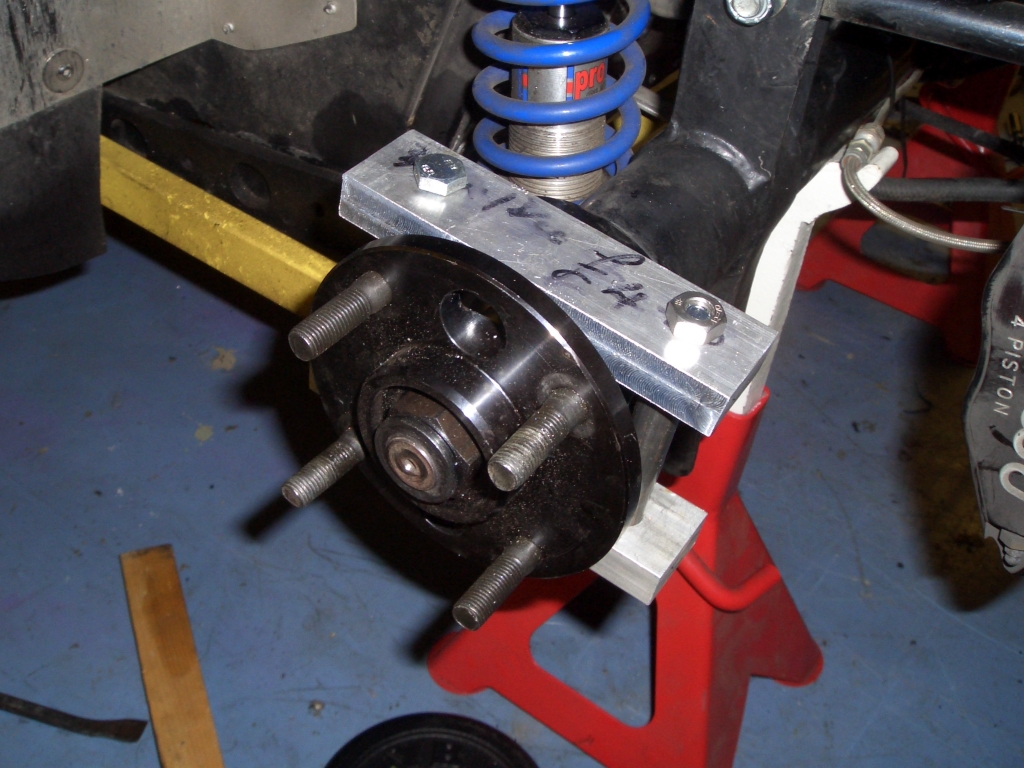 |
|
|
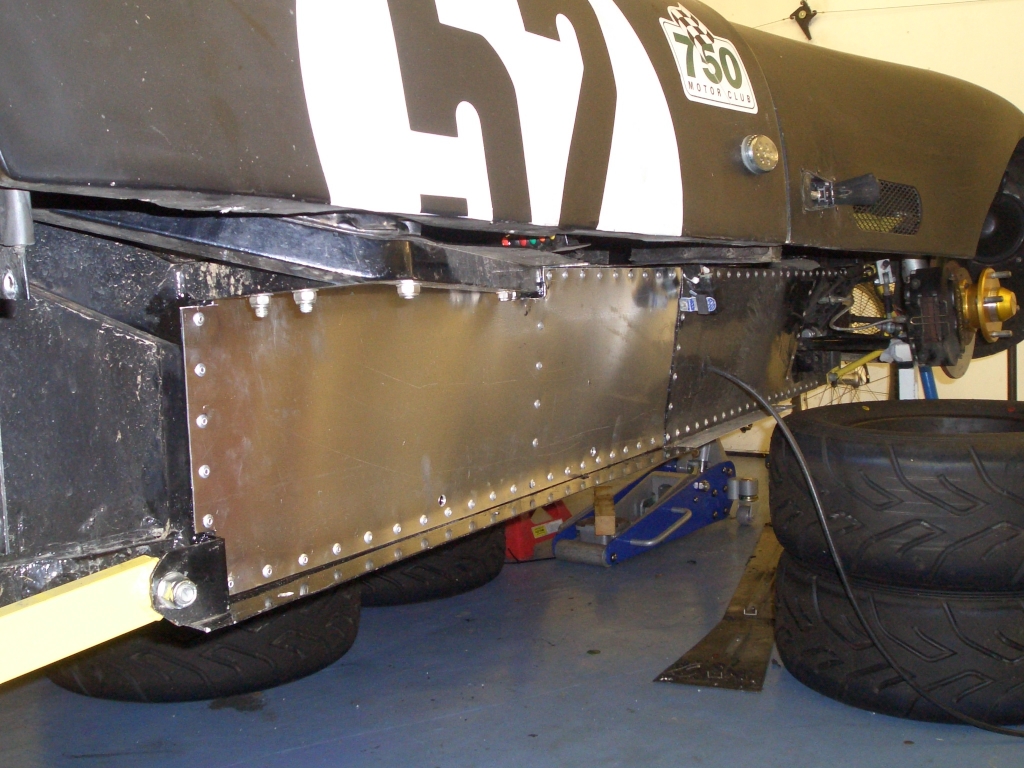
Finally, I've replaced the side panel I had to remove in order to weld
one of the new harness mounts into place. Eagle-eyed viewers will note that this one's shiny ali rather than covered
in black powdercoat. That's because it's a new one - I've made this one from 0.8mm ali rather than the 1.6mm stuff
the old one was made of. Seeing as there's a 1.6mm panel on the other side, a thin panel seemed adequate and it's
surprising how heavy all the panels are when you add them up. I'll be replacing a few more panels with thinner
ali ones or carbon panels in the next few months. But first, I've got to shift this twatting PoS halfshaft... |
|
|
And this is how I removed the halfshaft in the end. The blocks of aluminium
are bolted together with spacers, and rest against the end of the axle casing, with the halfshaft retaining plate
and spacer resting between them. The ali blocks have M10 threaded holes in them, and the steel square bar is bolted
to them through 2 aluminium round bars with M10 holes in them. The bottle jack is held onto the halfshaft using
some tubular steel adaptors, tapped to M12 x 1.5 on one end so they screw onto the wheel studs, and M12 x 1.75
on the other end so a length of M12 steel studding can be screwed into them. There's then a length of 5mm steel
at the other end, bolted into place to hold the bottle jack in place. Worked beautifully. Bit of a faff to assemble, but pulls halfshafts out pleasingly easily. |
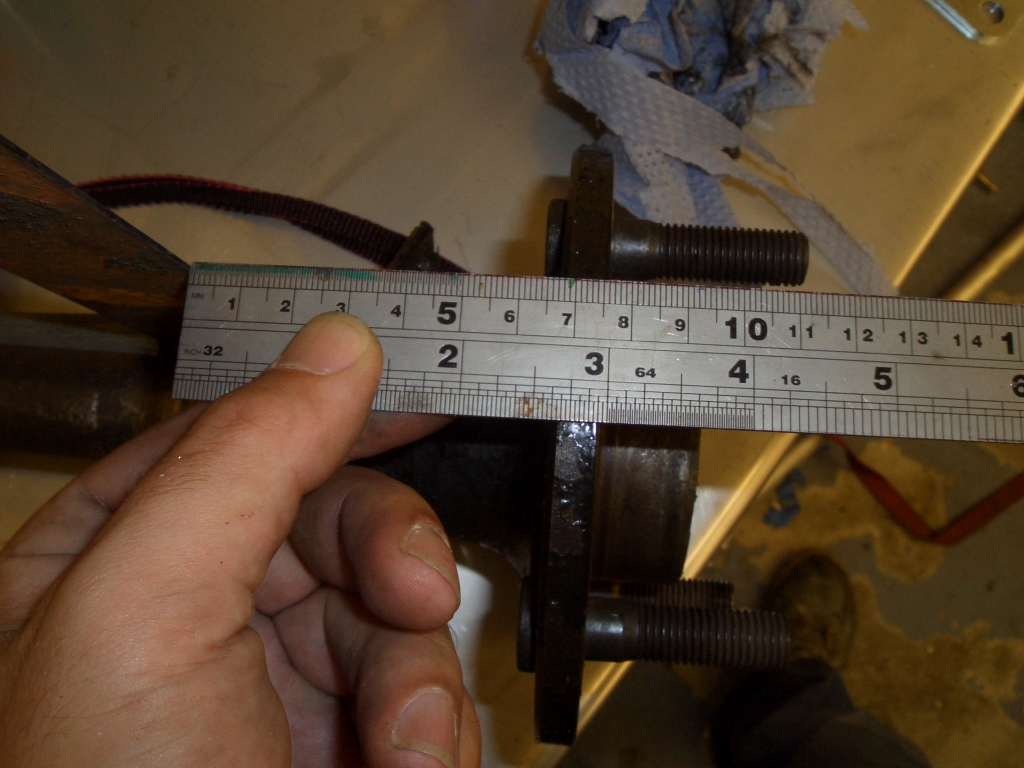
| And just to check that the Tran-X halfshaft really is the wrong dimensions, I've measured from the inside face of the bearing (there's a right angle set square just visible on the left which is butted hard up against the bearing face) and the face of the hub. As you can see, on the Tran-X halfshaft the gap is 80mm... |  |
|
|
...while on the original Ford items it's 76mm. That's consistent with the extent to which the calipers didn't line up. Time to start disassembling the Tran-X halfshafts and making them fit. Which is, apparently, more than Tran-X are capable of doing... |
| While I do Tran-X's job for them, the old Ford halfshafts are going
back in. However, as I suspected at Snett, the bearing on the left hand halfshaft had seen better days and had
noticeable play in it. So, time for a bearing change. And, thanks to now having an air-powered cut-off tool, and
cold chisel and a press, I can do halfshaft bearing changes myself. Here's how. The retaining collar (on the left) I removed by drilling two 10mm holes into it on opposite faces, most of the way through the collar but not into the halfshaft, and then splitting it using the cold chisel. The bearing itself I removed by cutting slots in the outer bearing race (visible on the right) on opposing faces and then breaking it open with the cold chisel. With the bearings out, I could then do the same on the inner bearing race and remove that. |
 |
|
|
With the old bearing off, fitting the new bearing and retaining collar was easy with the new press. I made up a wee tool to help support the bearing and collar as they were being pressed into place - it's the thick steel plate just below the bearing, which I drilled a 32mm hole in using a hole saw. The halfshaft easily passes through the hole, but it allows the inner bearing race and the collar to be properly supported by the bed plates. |
| With the Tran-X halfshaft out, and the Ford halfshaft fitted with a new bearing, I could finally finish off installing the halfshafts and start reassembling the rear brakes. However, in the process of putting the left hand rear brake caliper on the bracket, I noticed that all was not well with the caliper. | 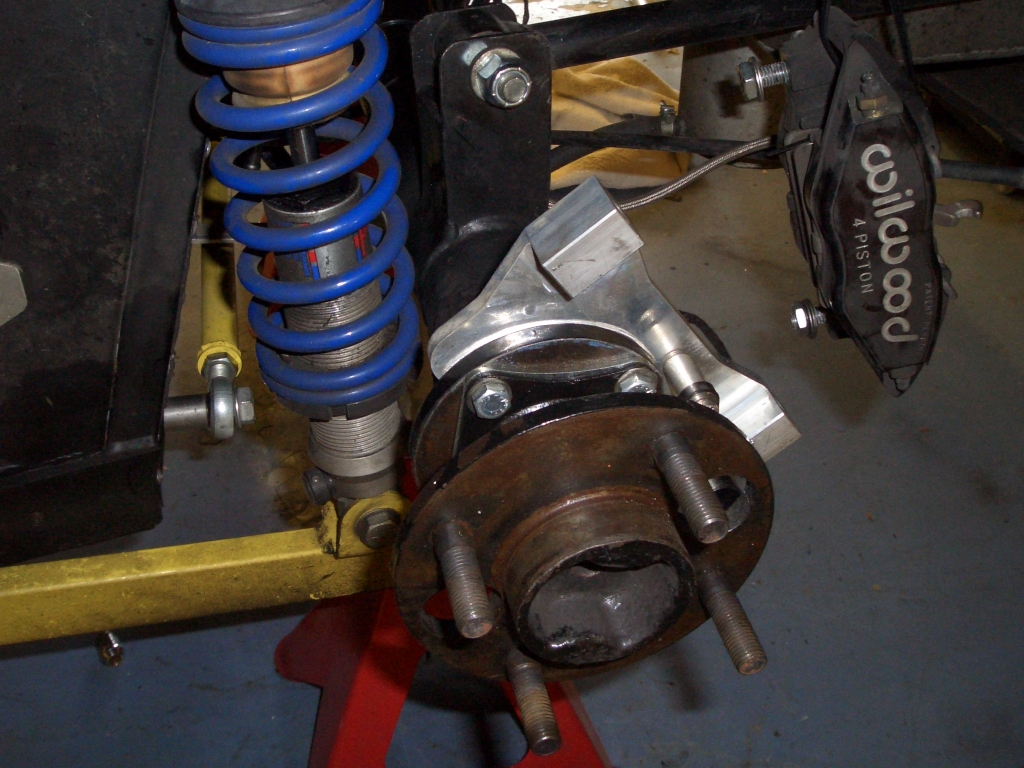 |
|
|
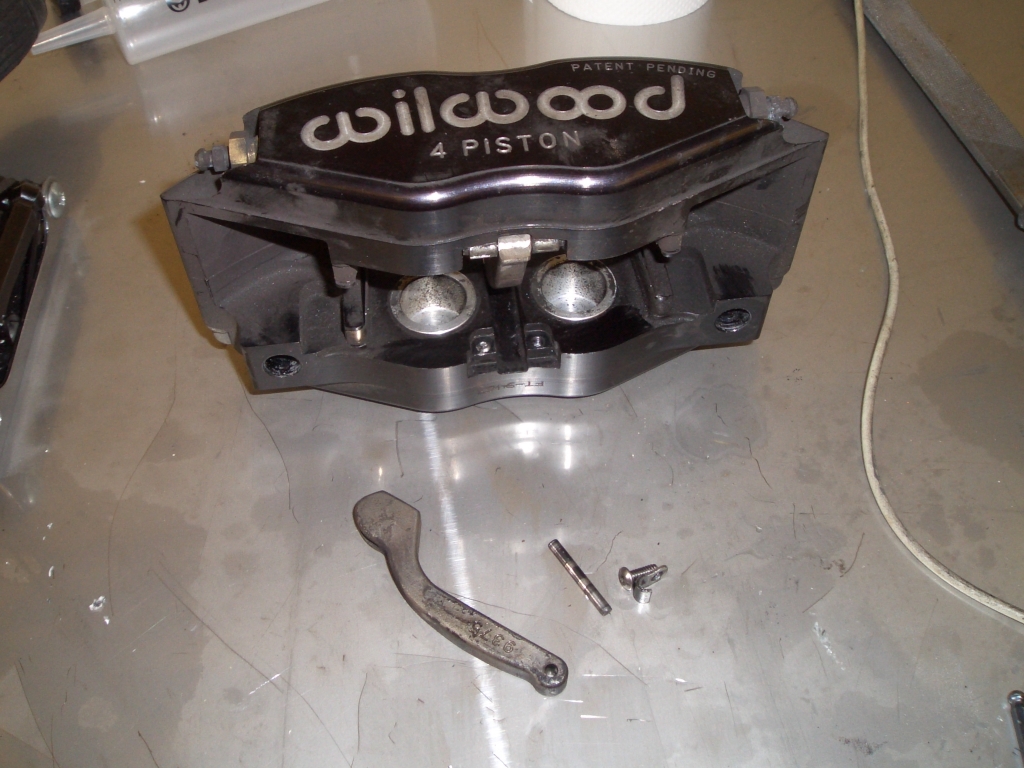
Basically, the handbrake mechanism on the LHS rear caliper has broken.
The handbrake system on the Powerlite HB calipers isn't particularly subtle - there are two arms which pivot on
either side of the caliper body at the bottom of the caliper, and the handbrake cable runs between the ends of
the arms at the top of the caliper. When you pull the cable, the arms get pulled together, and press the pads against
the disc. It's a bit like a V-brake system on a bike. The bottoms of the handbrake arms pivot on little pins, which are held in place by some small pressed steel brackets bolted into the caliper body using M4 button head bolts. Beneath the caliper, from left to right, is the actuating arm, the pivot pin, and one of the bolts, together with the little pressed steel bracket. Unfortunately it appears that the bolts holding the little brackets in place have come lose on the inside handbrake arm. One was loose but still present, while the other has sheared leaving its remains unhelpfully stuck in the caliper and the little bracket nowhere to be found. I'll try and get the parts to repair it, although getting the brocken bolt out will be fun given that it's tiny. But for the meantime I've simply bought a new caliper (160 inc VAT and P&P - ouch) and fitted that. |
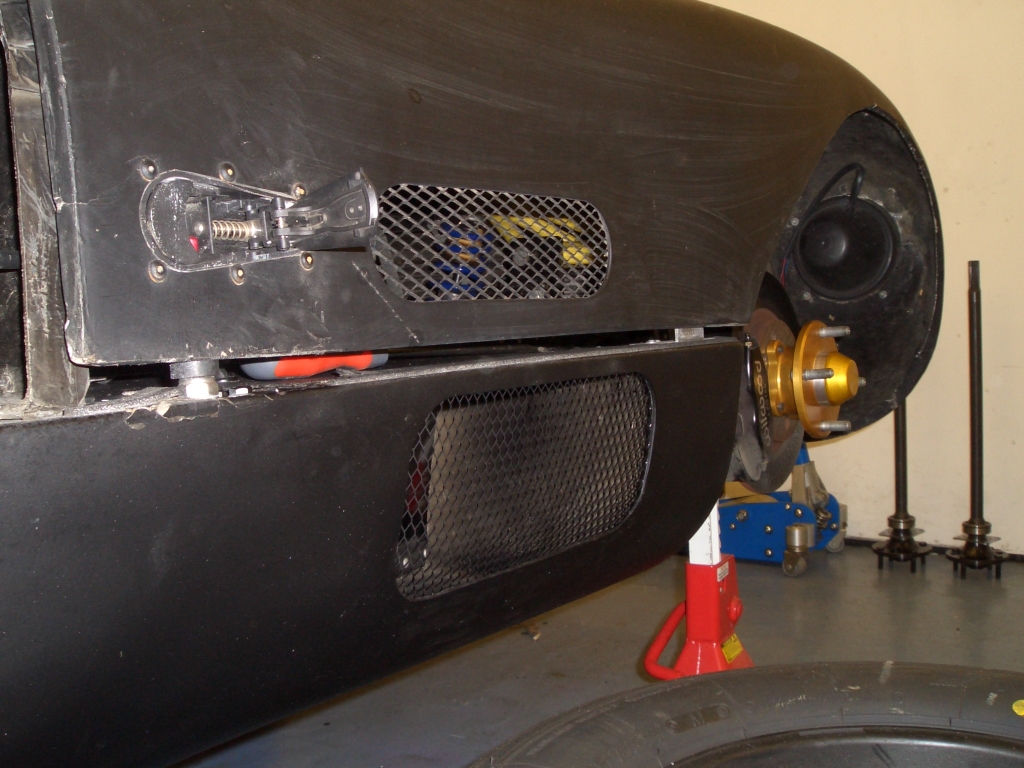
| Although the modifications to the car since the SVA test means that
temperatures during races are OK, they're still higher than I'd like. Ideally I'd like to have oil temperature
at 90-100degC and water at 80-85 degC. Instead, I'm hitting 125 for the oil and 100 for the water. The rad is big enough to cool the engine if the airflow's good, as is the oil cooler. And there's plenty of air going into the engine bay. The problem, as ever with a Fury, is where the air can go after that. Normally I suspect it would go out through the engine bay floor, but with a fully panelled floor it can't do that. The transmission tunnel is full o restrictions and is largely covered at the engine bay end by the engine and gearbox. So the air is left with few options for escape. In order to help it find its way out, I've added a new vent in one of the side pods. There was already a hole in the top of the sidepod, where the air filter used to be mounted. I've opened that up a little, and cut a new hole in the side of the sidepod. The photo shows the process of bonding some mesh over the new hole - the mesh is held in place by short lengths of bike gear and brake outer cables, zip-tied into place. This holds the mesh in place against the wall of the sidepod, so you can run a bead of PU adhesive round the inside edge of the mesh. |
 |
|
|
Hopefully the new vent will provide a further path for airflow from
the engine bay, and supplement the rather smaller vents in both sides of the bonnet. For those wondering why I
simply didn't make the vents in the sides of the bonnet bigger, while they could be longer, they couldn't be any
taller - the RGB rules restrict the extent to which you can have holes in the bodywork higher than the tops of
the wheels. The hole in the sidepod of course avoids these rules. It remains to be seen if the new vent will have any effect and, if it does, whether it's a worthwhile difference. But hopefully it will cool things down slightly until this winter's aero development work, which will hopefully solve the problem once and for all... |
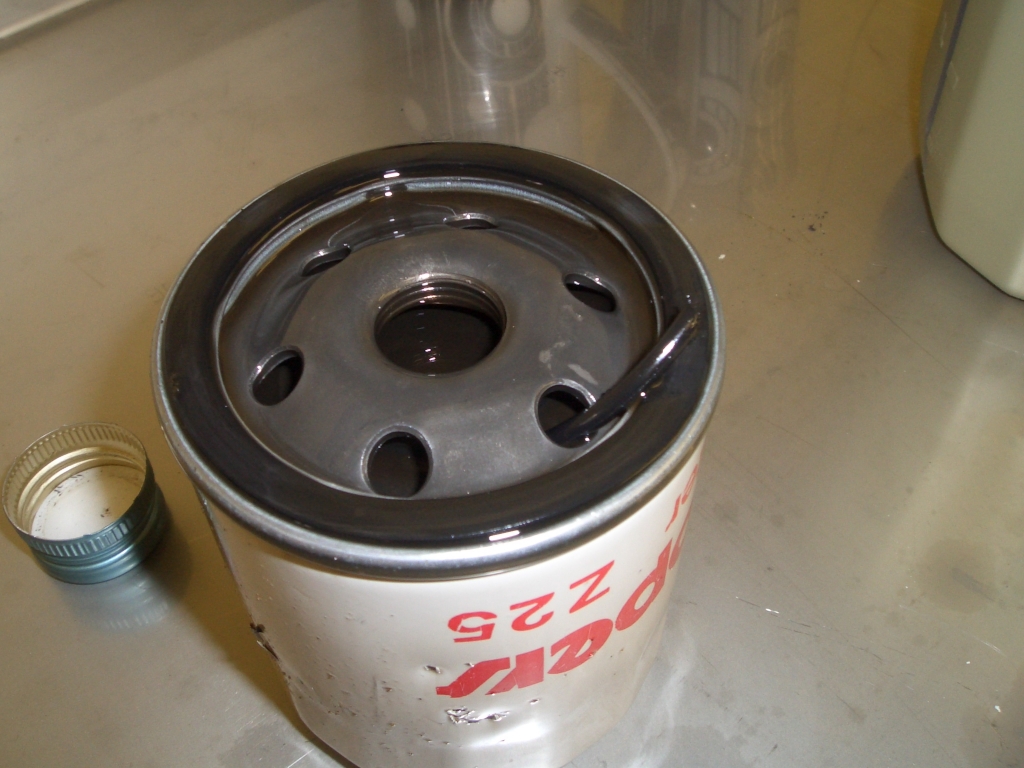
| Finally, I've also done an oil change and filter change. Not usually
particularly newsworthy, I accept, but for two things. With the help of the nice chaps at the local motor factor,
I found an oil filter which is slightly shorter than the Mini one I'd been using previously and which is much easier
to fit. It's from a Skoda Favorit 1.6. Cool. The other notable thing was what I found in the oil filter. It had what looks like a long length of O-ring material stuck in it. No idea where it's come from, but the engine seems to run OK. Well, it does now I've put the coil packs for cylinders 3 and 4 on the correct spark plugs... So, all I need to do now is fit the new harnesses, practise using a HANS device, and I'm good to go for Snetterton. |
 |
| Since I had only a few things left to do on the car, what with the installation
of the rear axle finally done and the front hubs fitted, I had a cunning plan on the Wednesday to head home from
London first thing, work on the car in the morning and early afternoon finishing off the few little jobs I had
left, and then in the afternoon go for fuel and a quick test drive to make sure everything was working OK. As things
turned out, as usual, I didn't finish working on the car until very late, so the test drive idea went out of the
window. This was, to a considerably extent, utterly self-induced. Because I'd done a filter change as well as an oil change, I thought it'd be a good idea to spin the engine over to get oil pressure before firing it up. So, ignition coils out (the R1 runs coil-on-pack ignition), spark plugs out, turn the engine over until the DASH2 registers some pressure, plugs back in, ignition coils back in, and fire the old girl up. After much popping and banging I eventually got the engine to fire, but it was running so rough it made your average tractor sound like a sewing machine. After much cussing, swearing and head-scratching, I eventually worked out that I'd put the coil packs on cylinders 3 and 4 the wrong way round. Cue much embarrasment... The only other largeish job left was to fit my spangly new Schroth harnesses and test out my new HANS device. Because I've added two new harness mounts I needed to chop away some of the base of the seat to allow clearance for the eye-bolts and the harness fixtures. Quite a lot, in fact, but eventually that was done and I could try out the new harnesses with the HANS device. |
|
|
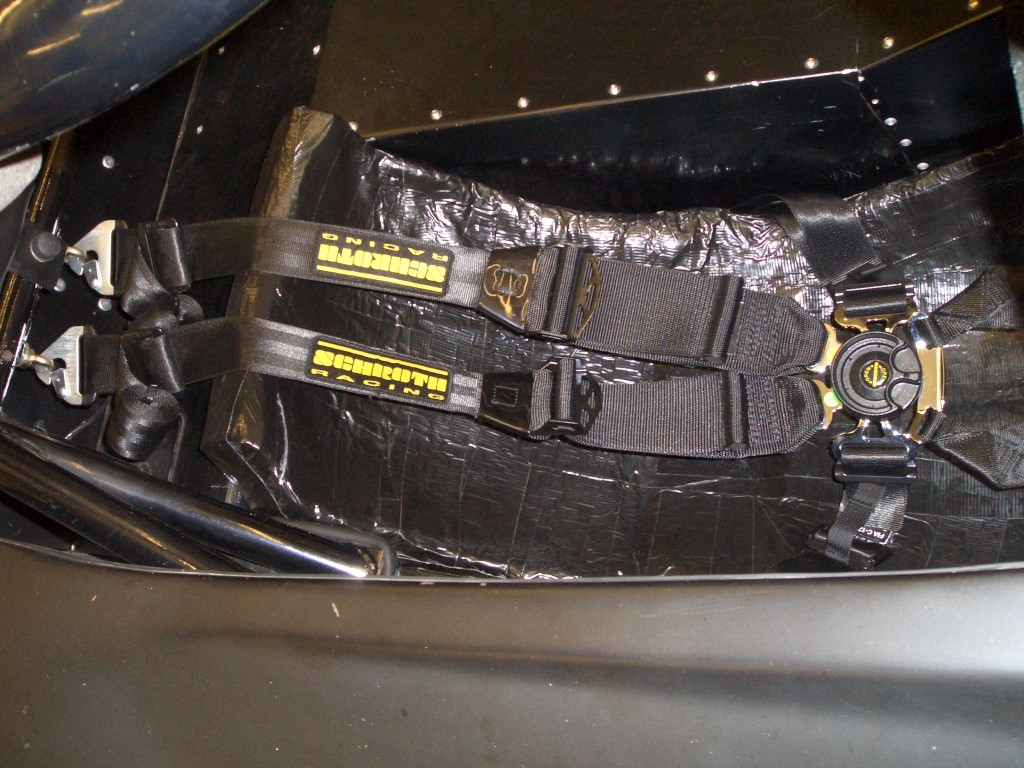
The new harnesses are rather nice, and I particularly like the fact
that unlike with the Willans harnesses it's possible to adjust the crotch straps with the seat and harnesses in
place - with the Willans units you could only adjust the crotch straps by removing the seat and fiddling with the
adjusters just by the harness clips. So it didn't take long to get everything adjusted nicely. Getting the HANS device in place took a bit more time. No matter what I did, the back of the HANS device was pushing my helmet forwards to the point where I could no longer comfortably look in the rear view mirror. At first I thought it might be because I should've bought a 20 degree model rather than the 30 degree one I'd got. However, it turned out that the problem was that the top of my foam seat was pushing the HANS device forwards and creating the problem. A bit more seat butchery with my seat-fettling bread knife, and some more black gaffer tape, and everything was ready to go. |
| For once, despite the rather late finish to Wednesday's fettling session,
I managed to get to the circuit in time for the first test session. I went out with the intention of taking things
nice and easy while the newly-installed CWP bedded down. Naturally, after a few gentle laps I started chasing the
cars in front of me, and by the end of the session, while I wasn't flat out, I was making reasonable progress round
the circuit. The good news was that the rear axle seemed fine - the bad news was that my dodgy brakes problem was
worse than previously, with noticeable shudder through the steering wheel under braking and a very variable brake
pedal. The chaps at Competition Transmission Services had suggested that I should give the nuts holding the diff into the rear axle casing a quick tweak after my first drive, so took off the rear transmission tunnel cover and went round checking them. Happily the axle casing was dry as a bone and all the nuts were still tight. The third session was made more interesting than it otherwise might have been by a total absence of brakes at one point. About halfway through the session we got red-flagged. I saw the red lights just towards the end of a lap, so had to head straight into the pit lane and stop. I think that stopping with the brakes still hot much have boiled the brake fluid, as when I went out after the restart, I had no brakes at all heading into Riches. Made it round OK, as I wasn't up to full speed, but it was an exciting moment. Weirdly, once everything had cooled down and the brakes were back, the brakes seemed better than they had been previously. I must remember to boil all my brake fluid before using it... Other than that, the only interesting bit of the third session was following Ben Butler round Coram in his Westfield as he went wider, and wider, and wider, and then off onto the grass. Happily it was towards the end of the corner so there was plenty of run-off and he didn't hit anything. In the fourth session I decided to try and see how much fuel the car was actually using. This is tricky since the fuel gauge doesn't read below 10, or sometimes 9, litres. For future reference, 30 minutes at Snetterton used 16 litres - I was getting fuel starvation on the last lap and the fuel pump was definitely grumbling at the lack of liquid. That's rather less than a lot of other RGB racers use, but I suppose it's just because I'm not using enough right foot. Generally, the day's testing went well. I concentrated on getting the power on early, particularly at Murray's and Nelson (Russell and 'the second bit of the Esses' as was). Seemed to be working, although I was a bit frustrated that although I could now do low 1:22s repeatedly I couldn't quite get down into the 1:21s no matter how hard I tried. Still, the car was great (apart from the brakes) and I definitely felt my driving was improving. |
| Scrutineering was pleasingly uneventful and the scrutineer confirmed
that it was OK to cut the excess webbing off the harnesses - the harnesses are intended to be used on saloon cars,
so have masses of spare webbing left over when installed in a Fury. Qualifying was, erm, interesting. Lots of traffic,
and some fast cars playing silly buggers. Tim Pell appeared to have adopted a policy of nailing it down the straights
but then doing a sterling job of holding everyone up round the corners. He qualified way ahead of me, and is quite
clearly faster, so I'm not sure what that was in aid of. Gary Goodyear came tanking past me into Montreal and straight
past the apex as well, and we then both had a bit of an 'after you, no after you' session on the exit of Chapman.
The brakes were still a bit variable on the biting point but seemed to be working pretty well. Happily, I finally managed to finally get into the 1:21s on my only proper clear lap, with a 1.21:43, a full two seconds faster than I went in May. That was good enough for 15th in the first race and 16th in the second. Even more notably, that put me only one and two places below Tim in the qualifying table - considerably closer than I'd ever got previously. OK, so Tim was grumpy about his new engine not producing the goods, but it's only slightly slower than Tim was going in May, so I'm pretty pleased with that. |
 |
|
|
With the unaccustomed sight of Tim right in front of me, I got a reasonably
good start in the first race. Unfortunately, Tim didn't, and stalled. That caused a moderate amount of carnage
behind, resulting in Colin driving into Bob on his way to the pitwall. Bob's afternoon got even more interesting with
a collision with a spinning Sam, followed by a full-throttle impact with the armco on the back straight. This all
resulted in the race being red-flagged, so it was time to trundle round slowly back to the grid. After a few minutes wait while the damaged armco was replaced, we had our second start. This was no less eventful, with one car stalling and Derek's car stripping its TRT in the propshaft leaving him with no drive whatsoever. I was left with only one place to go, which was between Tim Pell's stranded Genesis and the pitwall. Happily, despite having a fast-approaching Ben Butler behind me, having had one of his usual good starts, Ben backed off and gave me room to squeeze through and off towards Riches. |
| The start isn't on the video as I forgot to switch the video on until
after the first lap - it's surprising what suddenly occurs to you while driving. After an eventful first lap, I
ended up in a three car train behind James Walker (white Phoenix) and Rob Grant (purple Phoenix). It was fun watching
them battle it out, although I never quite got close enough to have a good go at Rob. Seemed like pretty close
racing from where I was sitting though. After a few laps, my brakes went from being a bit intermittent to pretty much not there, which perhaps unsurprisingly slowed me down a bit. For no discernable reason the brakes then came back again, so I sent off back in pursuit of James and Rob, and within another few laps had caught up with them. Although I was gaining on them fairly rapidly, I was still a fair way off at the beginning of the last lap. However, James tried an ambitious move on Rob, got it wrong, and I was able to slip up the inside under braking into Montreal. But try as I might, I couldn't get past Rob in the half a lap left. As it turned out, Rob came third in class - if I had been able to get past him I'd have got my first trophy. Ah well, next time. Still a good race, although the worsening brake situation was rather concerning. Especially as this was the first race I'd ever had where I didn't get lapped by anyone, which is a rather nice milestone. |
|
|
Race 2 started with another pretty rubbish start. I lost quite a lot
of ground, and Ben got through on the entry to Riches, and James managed to follow him through rather to my surprise.
Richard Wise had qualified out of position, so I let him through without too much of a struggle on the way into
Brundle. He then went past Ben at Murray's, and since Ben had a car on the outside of him this compromised his
exit so I was able to get past on the pit straight. I then, once again, set off after Rob and James. Rob was obviously having problems in the corners, although he seemed fast enough down the straights, but I managed to get past under braking at the end of the back straight. That wasn't before I had a slightly interesting moment due to a rather half-hearted attempt to get past him at Riches. James was next, and I again managed to get past him under braking into Brundle. I think it's fair to say the car was on the edge of the limits of adhesion here, as is clear from the amount of steering wheel movement on the video. However, I managed to keep it on the track (unlike when I tried a similar move on Bob last year), and we got round Brundle and Nelson side-by-side. Thanks to a better line through Nelson I managed to get out in front, only for James to get me straight back into Riches. |
| Without seeking to make excuses, my brakes were still pretty awful.
I was busily tapping away on the brake pedal with my left foot down the straights, in order to ensure I had a
decent pedal at the end of the straight, but I didn't really fancy trying that round the right hander at Coram.
After James got past me, I went for the brakes coming out of Coram into Murray's, but by the time I'd pumped them
up, I was running rather short of braking space. As a result, I went off at Murray's and had a rather slidey moment across the grass. No damage done, but by the time I got back on the track, James was well off into the distance. I then, of course, started over-driving to an improbably extent, including a big slide at Montreal. After a few similar moments I spotted the two MNRs closing in on me, which provided the impetus necessary for me to get my head together and just concentrate on bringing the car home without losing any more positions. Net result, a rather lonely second half of the race enlivened only by being lapped. Still, I finished fifth in class, which is not a bad result at all. And a moral victory in that my fastest lap was half a second faster than James's fastest... |
| So, a good weekend. I'm now only one place behind Tim in the championship
standings. Now all I've got to do is finally sort out the sodding brakes... Oh, and thanks to DH2 for the pictures. |


