28th February 2007

More chassis welding

Quite a lot of early February was taken up either skiing or doing the rest of the ali panels. There are 19 major panels, excluding the top of the transmission tunnel (which I did later). This is rather more than you'd usually find on a Fury chassis but I've decided to add a few extra panels. Two of these are the panels round the outside of the engine bay - a lot of Furies don't have these panelled in, but I can't see any good reason not to. If the ali panels do add stiffness to the overall structure (debatable, but they might help a bit) then the engine bay may as well have the benefit of this.


Also, I've double panelled the parts of the chassis running alongside the driver's legs and the passenger's legs (given a hypothetical passenger) on the outside of the chassis, as well as the rear bulkhead. Again, this is on the possibly misplaced assumption that they'll help stiffen up the chassis (and, indeed, that this will make any sort of difference).


However, there's only so much you can say about panelling a chassis and only so many photos you can take of ali panels held onto the chassis with cleckos, so I'll spare you that and get straight onto some cutting and welding instead.

  I thought I'd done all the welding needed to the chassis, but a wee bit of a problem arose. Fortunately, I tried fitting the rear trailing arms before fitting the ali panels to the chassis - I needed to work out how much to cut and shut them by to get the ride height to the correct settings so that the car will run at a 75/80mm ride height with my old Nitron dampers.

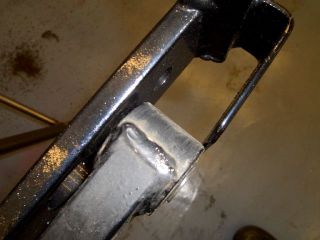
As you can see from the photograph on the left, the brackets on the chassis to take the trailing arms aren't nearly wide enough. The one on the left of the chassis wasn't quite this bad, but as you can see there's not enough space for the trailing arm itself, let alone the metalastic bush. And since the bracket's made on 3mm plate, it's not the easiest thing in the world to gently reshape into the correct dimensions.
 

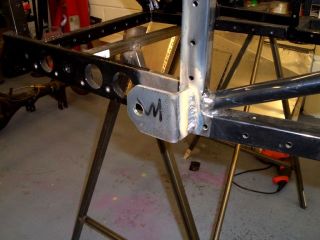
What I ended up doing, of course, was grinding off the old mounting plate and welding a new one into place. Like the old one, it's made of a piece of 3mm bent plate, welded onto the chassis. Bending 3mm steel plate through 90 degrees wasn't the easiest job in the world, and neither was doing the weld on the inside of the bracket. Got there eventually, however.   

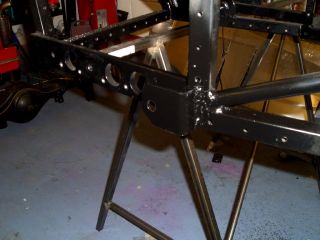
  A couple of coats of etch primer and a couple of coats of Plastikote gloss black paint, and the job's done. And the trailing arms now fit the chassis.

Pedal box - phase 1

  As part of the original order in which I ordered the chassis and a few suspension components, I'd ordered a Fisher pedal box. While the standard Fisher pedal box isn't the most elegant in the world (especially since the price isn't that far off a rather nice Tilton unit and very close to a pretty pimpy Wilwood one) I thought that it would make the build easier as it should be a simpl question of bolting it in place. As I mentioned earlier, the pedal box wasn't ready for collection when I picked up the chassis.


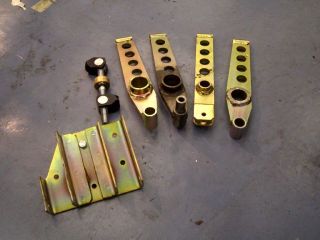
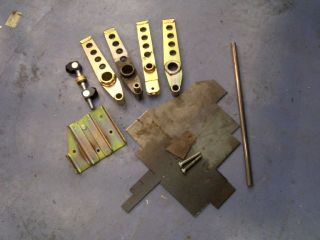
Then Martin Bell, the proprietor of Fisher Sportscars, had a serious illness and couldn't work. To cut a long story short, he eventually sent me the parts on the left. From left to right we have

1. A pedal box mounting plate cut down for use with a hydraulic clutch

2. A balance bar

3. A brake pedal that the balance bar doesn't fit into

4. A half-plated brake pedal that the balance bar fits, but where the mounting bush which connects the pedal to the mounting plate (you can see it pointing out of the pedal) won't because the bush is larger than the tube at the bottom of the pedal

5. A clutch pedal for use with a cable clutch that won't fit the mounting plate because the mounting plate's been cut down

6. A brake pedal with the balance bar tube ground down almost flat, for reasons which are still entirely beyond me.

So, all in all, not as bad as it could be (which would be paying for a pedal box and getting sweet FA) but a fair bit to do. The base plate needs extending upwards to take a clutch pedal which has the pivot higher up so that it can operate a cable clutch. The brake pedal needs fettling so that the brake bias bar runs more smoothly and so that the lower pivot bush fits at all. Also, the pedals have threaded tubes welded on the tops with an M8 thread which is designed to take the pedal pad - these aren't fitted so I'm going to have to make them.


Which meant that I was going to have to do a little more fabrication than I'd originally intended - so much for my plan for an easy life. These are the bits which I'd got to make a pedal box from. You can see that I've already cut out the extensions for the base plate - these are from 2mm steel. The rest of the pedal box base plate is made from 3mm steel, but I really can't see me bending two 2mm steel plates with my clutch foot. If I do then something is badly wrong with the clutch...

The other plate of steel is 3mm steel to make the pedal pads with, and the bolts are M8 machine screws to make up the threaded part of the pedal pads. Needless to say, I wasn't really looking forward to the prospect of trying to bend 3mm steel into a shallow curve for the pedal pads. Yup, time to bend some more 3mm steel.
 

  Actually, bending the 3mm plate wasn't too bad with a combination of a big hammer (and no, Tim, it wasn't a claw hammer), the vice and some welly. I welded the bits of bent 3mm plate onto the M8 bolts (remembering to clean off the zinc plating on the bits to be welded first) and gave everything that needed painting a lick of the now-traditional ICI etch primer and gloss black plastikote.

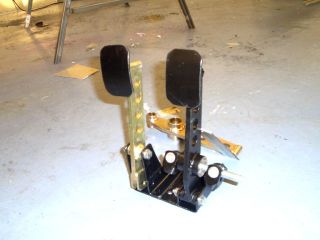
The pedals are now essentially done, bar the accelerator pedal (bit of bent tube with a pedal pad on it) and the actuator on the brake pedal for the brake light switch. I've decided to go for a microswitch-based mechanical switch for the racer on grounds of simplicity and reliability - the FuryBird2's got a hydraulic switch but they are a source of endless pain, and it'll have a mechanical switch too. But that's still to do.