![]()
| With the car safely through SVA, I could now start removing all the
bodges required to get it through SVA, and start making it ready to race - thereby making it an infinitely safer
and more road-worthy car than that required to get it through SVA... The jobs required were largely as follows: |
| 1 | Remove GRP shell seats, and 2" seatbelts, and replace driver's seat with foam/GRP seat and fit 3" drivers harnesses |
| 2 | Remove headlamps-on-stalks and indicators and refit headlamps and indicators in proper positions |
| 3 | Remove roll pins from bias bar and refit brake bias adjuster cable |
| 4 | Remove dummy reverse lever and replace with proper one, including wiring it up to the relay |
| 5 | Refit airbox, secondary throttle servo and change bonnet |
| 6 | Remove trim from exhaust tip |
| 7 | Remove internal trim pieces along cockpit sides |
| 8 | Remove centre mirror and replace with race-spec panoramic mirror on roll cage |
| 9 | Replace exterior mirrors with Racetech units |
| 10 | Make and fit flyscreen |
| 11 | Fit fire extinguisher and pull handles |
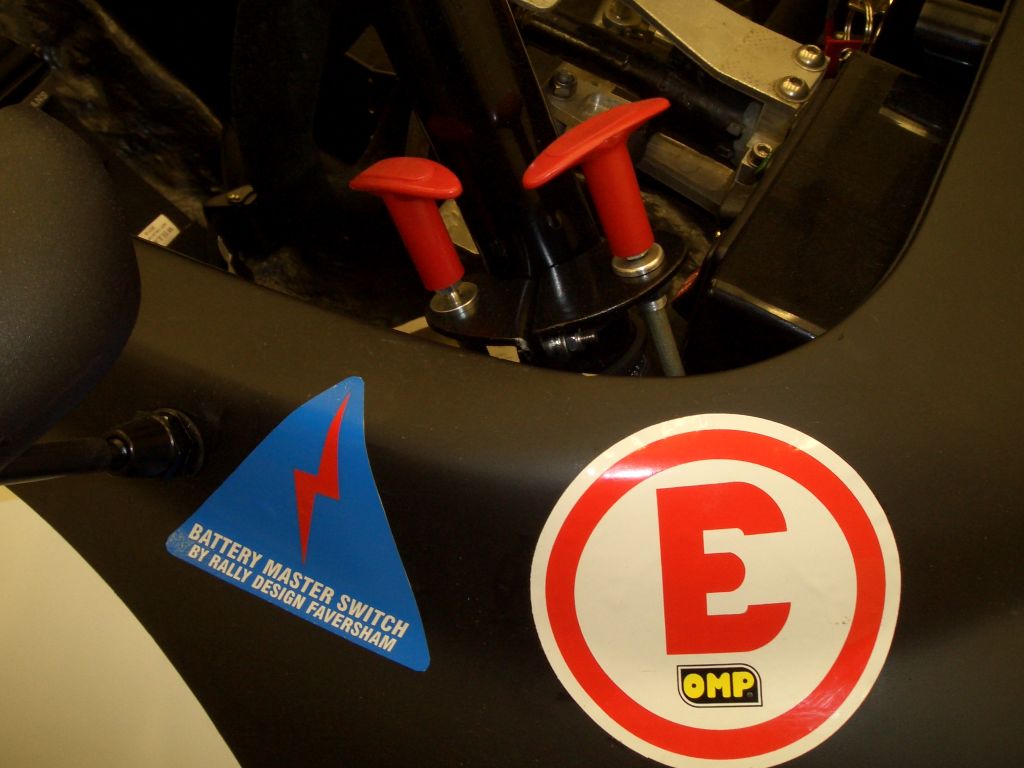
| 12 | Fit external pull-handle for FIA cut-off switch |
| 13 | Fit roundels and other required stickers to bodyshell |
| 14 | Fit aerocatches to the rear deck of the main tub to latch it to the rear bulkhead |
| 15 | Fit rear rain light and GPS receiver on a mount on the back of the roll cage |
| 16 | Fit roll-cage padding around the headrest |
| 17 | Remove padding and quick-release lock-out device from steering wheel |
| 18 | Fit towing straps to front and rear of chassis |
| 19 | Fit undertrays to engine bay and transmission tunnel |
| 20 | Reflash DL1 and DASH2 to allow 12 channel logging |
| Obviously some of these jobs are necessary in order to go racing (such as the fire extinguisher, the pull-handles and the rain light), some are just to make the car more suitable for racing but aren't essential (mirror changes and undertrays) and some are as a result of things I had to do to get the car through SVA (googly-eyed headlights and the bonnet). |
 |
A nice easy start, then, with installing the fire extinguisher. Given that the bottle itself doesn't have to be anywhere convenient, since it's plumbed in, the passenger footwell seemed as good a place as any - central and low down for weight purposes. The cables for the pull-handles are on the right hand side, while the red tube on the left hand side is the tube that the extinguishant goes through when it's triggered. |
| There are of course two pull-handles to trigger the fire extinguisher. One is down in the side of the cockpit, on the little sub-dash which is also home to the brake bias adjuster and the buttons for the DASH2. |  |
 |
The other is on the outside of the car for use by the marshals. There's
an obvious problem regarding the mounting for the external pull-handles, given that both the bonnet and the whole
of the main tub pivot out of the way. One option is to cut a hole in the main tub or bonnet and mount the pull-handles
on a plate attached to the chassis or scuttle but which lies underneath the hole. I've taken another option - I've
made up these brakets which mount onto the front leg of the roll-cage by way of two rubber-lined P-clips. The cables then run along the top of the stays which hold the dashboard in place, just underneath the main tub, behind the dashboard, and then down to the fire extinguisher. The other pull-handle is of course for the FIA master switch - there's a cable stop underneath the master switch, so that when the cable is pulled, the FIA master switch clicks off. Due to the angles involved, turning off the FIA switch involves a fair amount of grunt to be applied to the handle, but it certainly does work. |
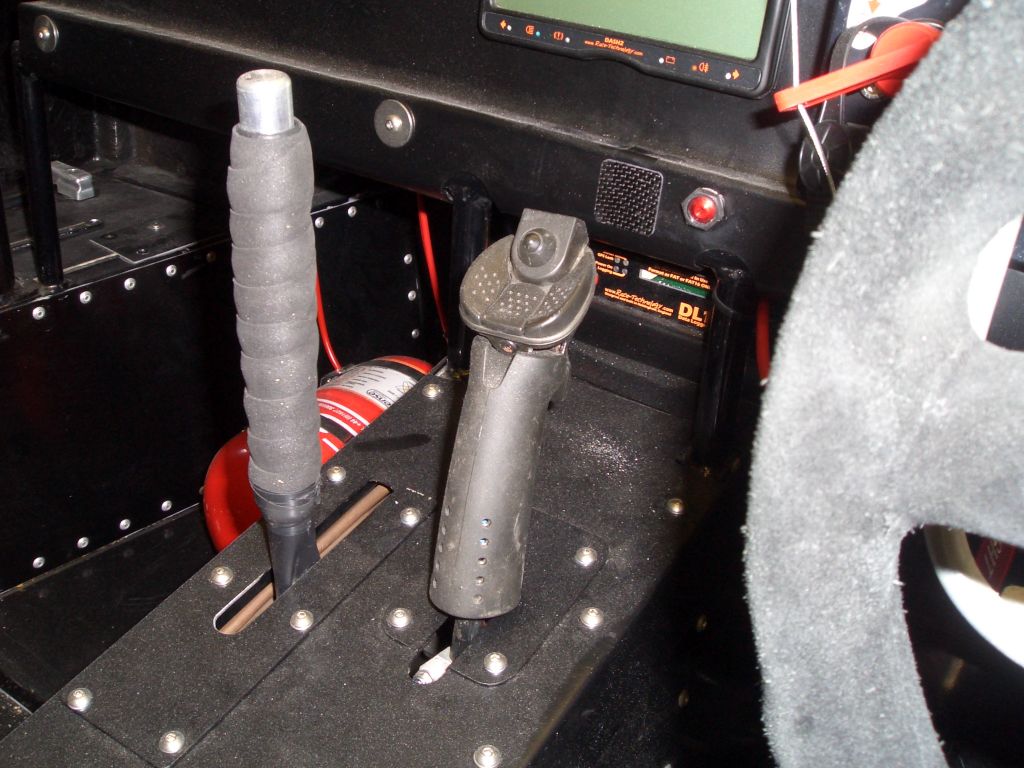
| The RGB regs require that a working reverse mechanism is fitted. My
car has the reverse mechanism fitted, and I think it'll work (although I haven't tested it on the ground yet, only
with the car in the air) but in order to work it needs a proper lever with a switch on it rather than the dummy
lever in place for the SVA test. And here it is. Yes, it's a joystick handle - the index finger trigger is used to fire up the reverse mechanism, and the whole thing's mounted onto a carbon fibre rod which goes into the rest of the lever. One of these days I will find things for all the other buttons to do, particularly the top-hat switch on top... |
 |
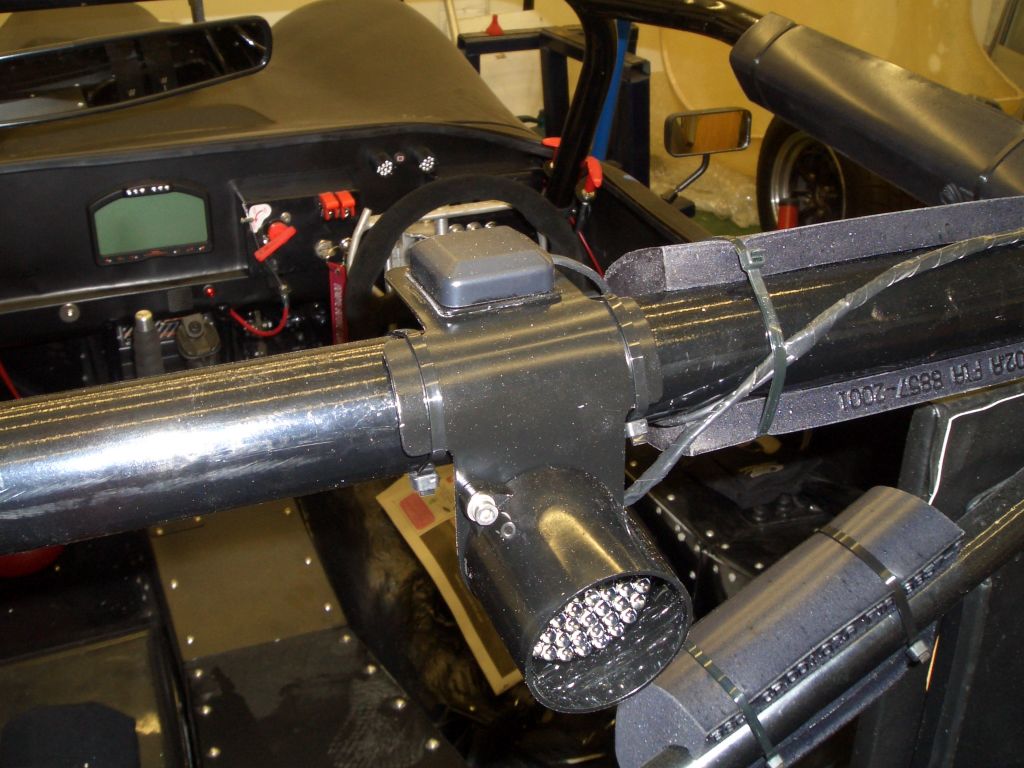 |
The rules also require an MSA-approved or FIA-approved rain light to be fitted, and the GPS receiver for the DL1 logger needed to be put somewhere sensible - i.e. preferably high up and with a clear view of the sky. Combining these two is this little bracket. The bracket itself is made of ali, but it's got a small, thin steel plate bonded to it for the GPS to stick itself to through the mysterious and magical forces of magnetism. |
| Finally on the race mods, I've liberally covered the roll-cage with padding. This is proper FIA-spec padding rather than the pipe-lagging in pretty colours which is also sold as roll-cage padding. It's surprisingly stiff, but given that it could end up with my helmet-clad head heading towards it at considerable speed, I suppose it needs to be reasonably stiff in order to put up any appreciable resistance. It does look quite exceptionally fugly, especially with the cable-ties, but not having it in place would be a really really bad idea... | 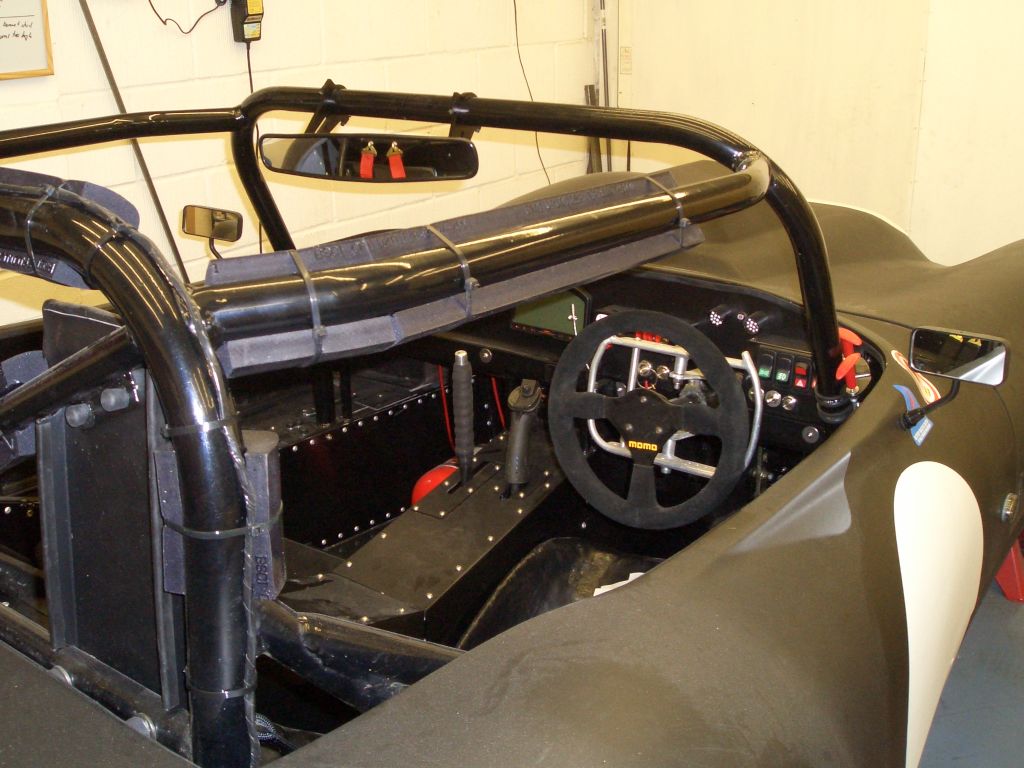 |
 |
The 2004 to 2006 R1 engine has something of a reputation for spewing
all its oil out. This has happened on a number of engines being run on a track, both longitudinally and traversely
mounted, yet doesn't seem to happen if the engine's left in a bike. It seems, based upon the most convincing hypothesis
I've heard to date, that the engine is so tiny that there's precious little space left inside the casings that
aren't filled up with engine internals. As a result, the engine breathes rather heavily, as it can't absorb the
pressure variations internally, and occasionally in doing so will lob all its oil out. Of course, if this goes
on un-noticed then it could well lead to oil starvation and a blown engine. In order to try and prevent the latter I've fitted a level switch in the oil catch tank - if the catch tank gets more than 3/4 full, then the oil pressure LED cluster glows orange (rather than the red it goes if there's low oil pressure). In order to try and prevent the former, I've already fitted a home-made air/oil separator in the standard breather line which goes from the gearbox casing. In order to help it along, and on the advice of Andy Bates of AB Performance, I've added another breather in the camshaft cover. The fitting is of course home-made - just a length of 1/2" ali tube welded to a bit of 5mm plate. It's sealed in place with an O-ring running in a machined groove on the bottom of the adaptor, and held in place by 2 M5 capheads. |
| In order to try and stop all the oil splashing about merrily underneath the cam cover from heading straight up the breather, I've fitted this little baffle plate over the end of the adaptor. It bolts onto the same bolts holding the adaptor into place. The baffle plate is rather narrow, but that's necessary as it's sitting in between two of the cam lobes on the inlet camshaft and even at that width there's less than 2mm clearance between the lobes and the baffle plate. | 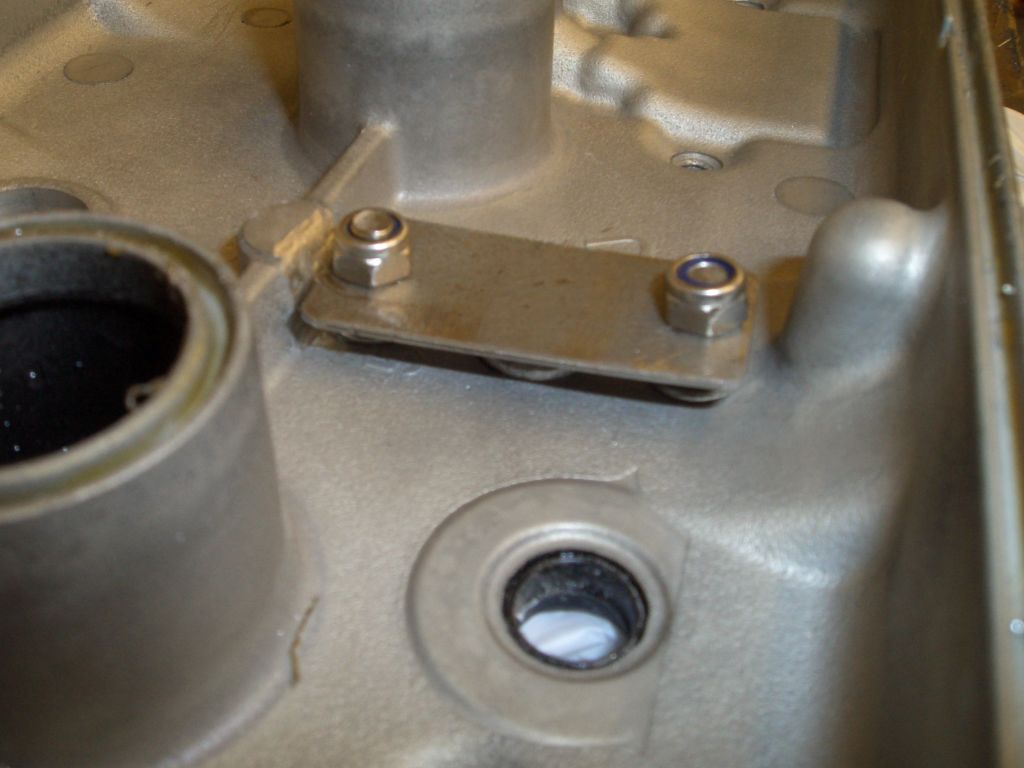 |
 |
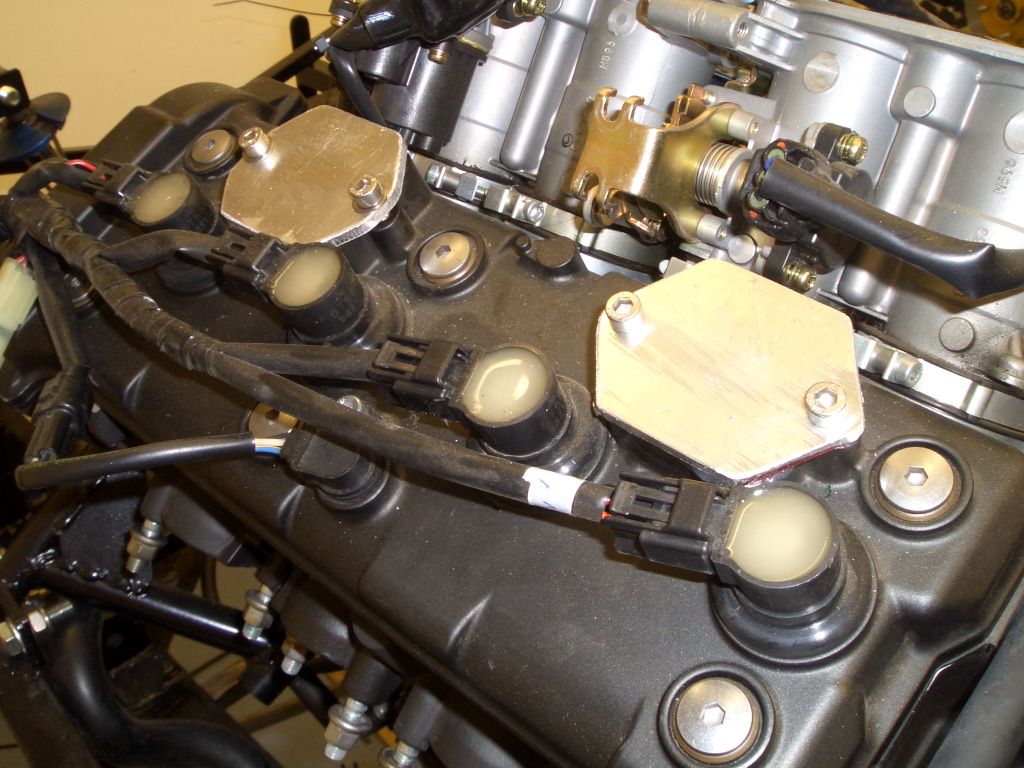
While the cam cover was off, I also carried out a bit of a belt-and-braces exercise regarding blocking off the AIS ports. The Yamaha AIS is a system for injecting air into the exhaust ports in order to burn off unwanted hydrocarbons. It's the same as the Honda PAIR system, only with a shorter but equally silly acronym. I'd already blanked off the AIS ports by capping the outlets in the top of the camcover but it appears that the 'proper' way of doing this (at least according to the Yamaha race kit instructions) is to use bungs in the airways in the camcover. Yamaha want a moderately obscene amount of money for four little tubes of aluminium, so I made my own, as usual - 7.95mm diameter and 8.6mm long. |
| These were a pretty good interference fit in the AIS ports in the cam cover, but just to be make sure I glued them into place with a thin smear of JB Weld. | 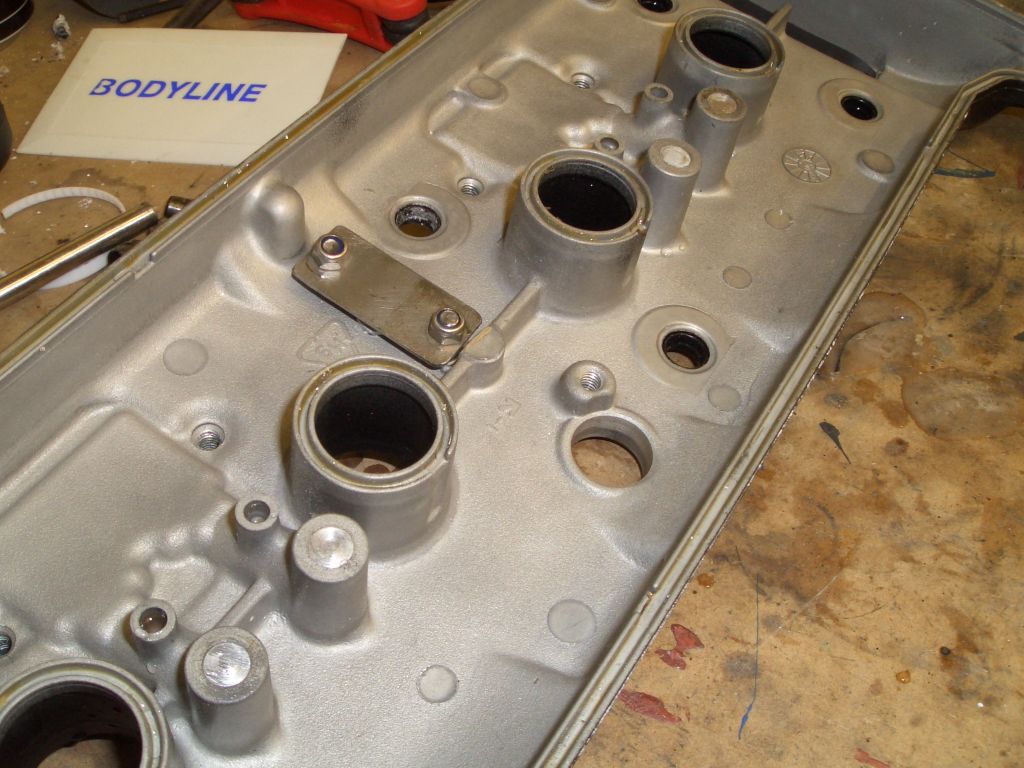 |
 |
With the cam cover back in place, I could add a cut-down 13mm bit of
Samco 90 degree angle onto the new fitting. The observant will also note that I've tidied up the AIS port covers.
Now that the AIS ports themselves are blocked off the port covers are unnecessary (hence the belt and braces observation
above) but I think it's still worth having them as I know it sounds like when a PAIR valve/AIS system bung stops
sealing, and it's not nice. Farmer Barleymow and his tractor is a reasonable approximation. I have however cut
the AIS port covers down so they sit inside the port housings rather than on top of them, if only because I finally
admitted to myself that the old AIS port covers were basically damned fugly. The orange goop round the edges of the port covers is some more of the obscenely expensive copper-laden lambda-sensor-safe RTV Hi-Temp silicone. Just to be on the safe side. |
| The ali tube then goes from the extra breather in the cam cover into the breather system, where, hopefully, an oil gets separated out in the air/oil separator and the air whistles safely through the catch tank. |  |
| And today I had my inspection at the DVLA in Peterborough, so I should have the registration documents by the end of the week... |
| True enough, on Friday an envelope arrived with a tax disc and a permit to get some number plates made up. The V5 will follow in due course once the good DVLA people in Swansea have finished another bout of toe-counting. So, the FuryRacer is now Q143 XAV. Still haven't actually driven it though... |
| I've been having a few problems with the DL1/DASH2 combination. Not
as bad as some others I've heard of - mine does seem to mostly work,albeit with some remaining quirks and glitches.
The one remaining real issue (as far as I'm aware) is that either the DASH2 is refusing to output the serial data
relating to the 4 analogue chnnels which go into the DASH2 rather than the DL1, or alternatively the DASH2 is busy
sending serial data to the DL1, which is steadfastly ignoring it. I sent an e-mail to Race Technology's support people, my attempts to raise the issue on their Support forum having been met with silence. The answer I got was that I needed to reflash the firmware in the DASH2 and DL1, as the feature to log the 4 DASH2 channels wasn't incorporated when I got my DL1/DASH2 combination. I was slightly sceptical of this for 2 reasons. Firstly, the manuals wich originally came with the DL1 and DASH2 specifically refer to their ability to do this. Secondly, 'reflash the firmware' seems to be a stock Support response, used where it appears the 'Have you tried turning it on and turning it on again' line is unlikely to be sufficient. When I opened the .zip file containing the new DL1 driver my fears were far from assuaged, given that it came with a text file explaining that frankly this version of the firmware was a bit bug-ridden. Hardly the kind of thing you want to hear just before installing it... Anyway, having no better ideas myself, I decided that with the SVA test and DVLA inspection out of the way, I'd try reflashing the two units. |
With the DASH2 unit this was fairly simple - just put the new firmware
on a CF card and insert it in the DL1 with both units turned on. The process for updating the DL1 is a little more
involved...
This is largely because it involves a PC. And not any old PC - it must have a serial port. Now as far as I can
recall, serial ports on laptops went out at about the same time as the puffball skirt and red braces. So, taking
Race Technology's advice, I bought a USB/serial adaptor. Which arrived without any drivers. Having found the drivers
on the 'net, and installed the adaptor, I then discovered that despite the fact that Race Technology illustrate
their 'How to survive without a serial port' help page with a picture of an adaptor with a male serial connector,
this is completely useless.
So I got a female-female gender adaptor and tried again. No joy. To reflash the DL1 you fire up the reflashing
software and then turn on the DL1 within the 20 seconds it gives you. Every time I turned on the DL1 Windows decided
that the USB-serial adaptor was/had found a new device and the reflash programme promptly borked itself.
So I ended up firing my old garage computer, which is blessed with a genuine serial port, and concocted the long
daisy chain of serial cables (1 from the DL1 box, 1 from the DASH2 box, and one from my stores) shown in the picture
on the left. After providing a bit of strain relief to the DL1 (gaffer taping one of the cables to the rollcage
to stop the weight of the cables being taken by the DL1's serial port, I had managed to link the garage computer
and the DL1. Finally, the reflashing programme worked, and confirmed that the DL1 had been properly updated.
| And after all that effort, the net effect was... Nada. Nothing. The
DL1 was still steadfastly ignoring whatever the DASH2 was or wasn't sending out along the serial port. So I went
back to Race Technology, and they've suggested using their Monitor Lite programme to see what the DASH2 is sending
out down its serial port, if anything, as channels 17 to 20. Which means buying another serial to serial extension
cable, as of course now I need one with a male end to connect to the DASH2 rather than a female end to connect
to the DL1. I'm starting to get really fed up of serial ports, and I'm wondering if I can buy some sort of serial cable splitter so that I connect a serial port on the dashboard for all these DASH2/DL1 interrogation sessions and leave the DL1 and DASH2 still connected. Although, thinking about it, what I really need is a hybrid cable, with a straight through connection for the DL1/DASH2 to talk to each other, and then a splitter cable at both ends so that I can jack into either the DL1 or the DASH2. Or I could use a single splitter cable and then use a serial extension cable or null modem cable depending which I want to connect to. Hmm, this'll need some pondering, especially as I'm not sure the DASH2 would like having anything talking to it at the same time as the DL1. In fact, I'm pretty sure it wouldn't. I'll ask [cam7]... |
| Armed with a tax disc, a V5, and a set of number plates, it's time to drive the car on the road for the first time. But before that, there were a few last minute jobs to be done to finish the race preparations. |
| When I'd panelled the bottom of the car originally, I hadn't panelled underneath the engine bay or the transmission tunnel. On the basis that I'd want to do so at some point (in order to make the bottom of the car as smooth as possible in order to reduce drag), now seemed as good a time as any. The engine bay and transmission tunnel are panelled with two separate sheets of 1mm ali, held in place with M5 plastic bolts. The transmission tunnel panel, which isn't pictured, as a length of shallow-section aluminium U-channel running down it, as otherwise it's too floppy and vibrates excessively. It was, of course, a horrible job (lots of lying underneath the car and drilling holes) but it's now done. | 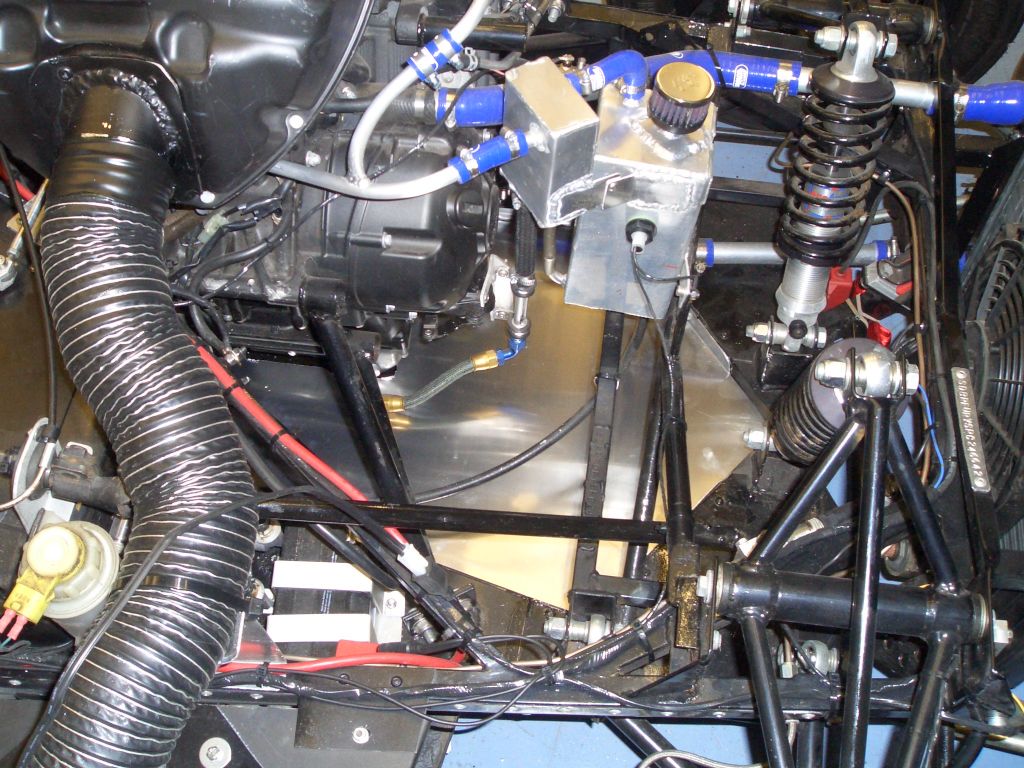 |
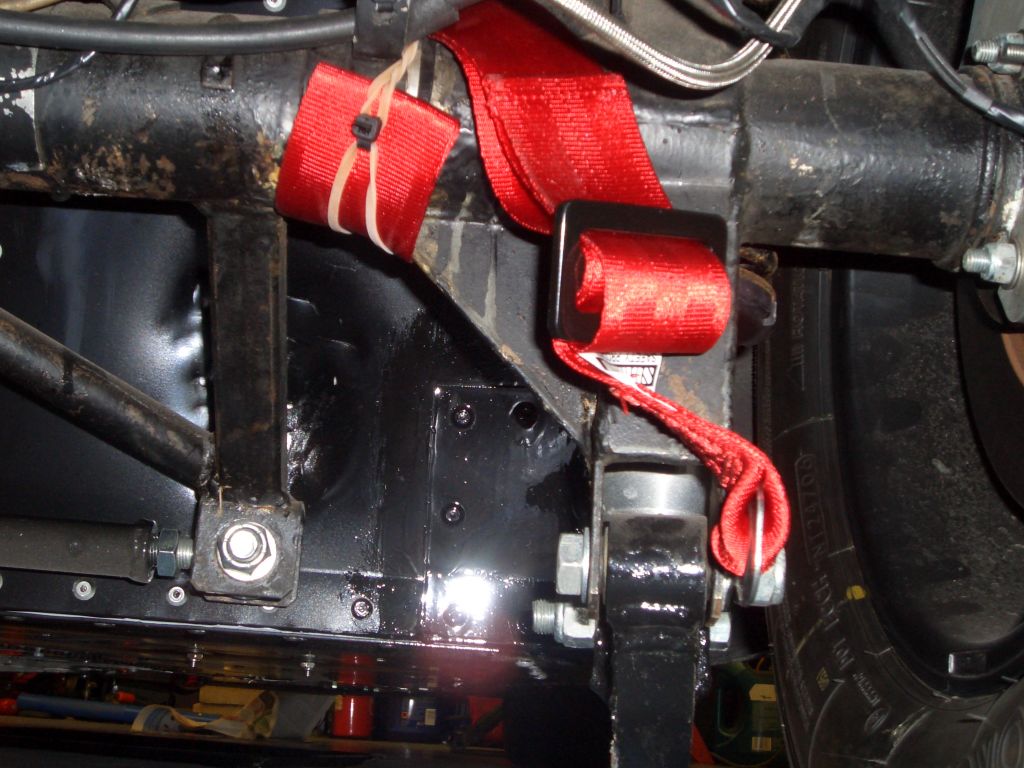 |
Another race regulation is that the cars have to have towing loops front
and rear. The Fury has, as supplied, a towing loop at the front of the chassis, but it's not the requisite 60mm
diameter and is so far back from the front of the bodywork that any attempt to use it would inevitably mean the
bonnet being ripped off. So I've fitted two fabric loops (made by Schroth, and which I bought from Demon Tweeks), one front and one rear. This is the one at the back of the car - I've mounted it onto the bolt holding the rear trailing arm onto the axle, and the strap is just held in place onto the axle by a rubber band. If it needs to be used, the marshals can simply pull it out of the rubber band and attach the tow rope to it. The strap at the front is looped around the existing tow hoop (I've chopped off the metal fitting at the end since it's not necessary) and again held off the ground by rubber bands. |
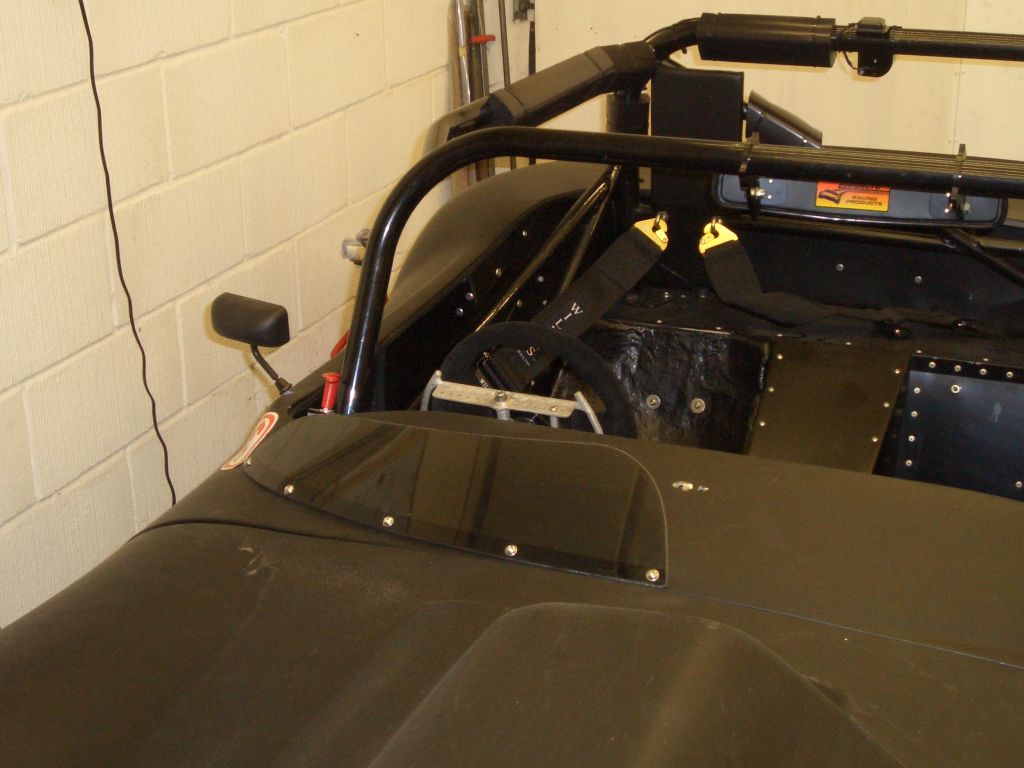
| The final bit of race preparation for now was to install an aeroscreen.
Again, this is a requirement of the rules, which says that an aeroscreen or windscreen at least 75mm high (from
the point at which it mounts onto the bodywork) has to be fitted - although looking at pictures of RGB races in
the 750 Motor Club Bulletin, it's difficult to see any visible presence of an aeroscreen on some of the cars, particularly
the mid-engined ones. This aeroscreen's actually made out of the original aeroscreen I had fitted to the old Furybird, which I then ruined by trying to clean it with solvent. However, there was enough left which hadn't been crazed by the solvent to produce this aeroscreen. It's made from polycarbonate - acrylic/Perspex is a far from ideal material for aeroscreens given its propensity to shattering into sharp shards of material. It's a surprisingly easy material to work with, as it cuts very easily using a coarse wood blade in a jigsaw. If you use a fine-toothed blade it just melts the plastic which then resolidifies behind the blade, which is not ideal. Although it is quite diminutive, the aeroscreen does satisfy the race regs - it's mounted at the bottom of the screen using the M6 button head bolts you can see, and it is over 75mm high from that point, and at least 250mm wide, so it's compliant with the rules. Admittedly, when I'm sitting in the car I can only just see the very top of it, but frankly I'm so low in the car - and the bonnet bulge is so humungous - that I don't really want anything interfering with my field of vision, even if it is supposed to be transparent. Oh, and yes, the aeroscreen is indeed tinted a dark grey - tinted windows, innit... |
 |
| So, with the car race prepared (ish) and road legal, there was no reason not to go and take the car for its first drive. Which means starting a new section of this website. |