Garage doors

5th January 2007


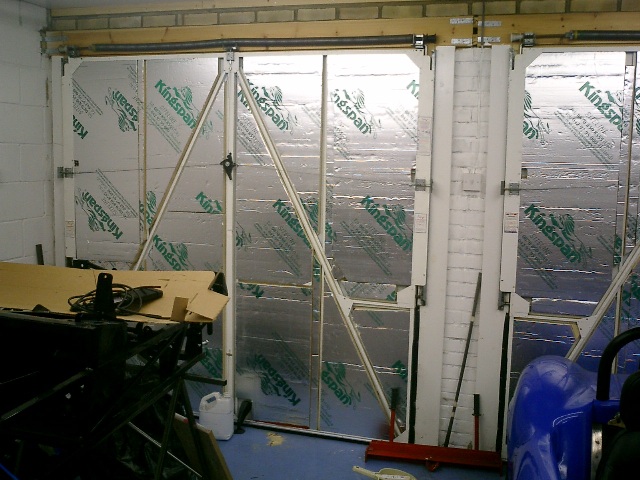
Well, over Christmas I didn't actually get that much done on the Fury. Instead I made sure that I'd be nice and warm during the winter months spent hunched over a half-built racer by insulating the garage doors. I got 2 packs of 40mm cavity wall insulating foam from a place in Essex (I was in the area anyway picking up a load of car paint) and stuck it to the inside of the garage doors using silicone sealant.

This was after I'd fitted a pair of Autolock Stoppa door locks (you can just about see them at the bottom of the door in the middle). These are intended to stop someone from bursting the garage door open. They were a total swine to fit and seem to rely on the garage door material being rather more robust than the tin-foil that mine are made from. Still, they may have some kind of a deterent effect...

Welding

15th January 2007


With the housework out of the way, it was time to start wielding the welding torch. The first new chassis members I added were these diagonals on the rear bulkhead. To be honest, I've never really worked out why these aren't included in the chassis normally.


The standard (i.e. non-lightweight) version has this part of the chassis boxed in with steel sheet, welded to the chassis members. Now it's easy to see how that's going to give it a reasonable degree of torsional stiffness. Replacing the welded steel panels with bonded ali panels, without making up for the loss of torsional stiffness, seems a less than wonderful idea. So, I welded them in.


I also welded in the short upright you see here. The large round tube just above it is the front hoop of the roll cage. Presumably if the worst does happen and you roll the car, the loads through the front hoop of the roll cage will go down to where the two diagonals meet. Now the rather slender triangles the two diagonals form might be enough to stop the chassis simply folding in two at this point. But then again, if it is, why does
Tim's car have them?

For the sake of 6 inches of 1 inch ERW, it seemed worth adding them. I didn't bother on the passenger side. For one thing, it's a racecar and so is only supposed to have one person in it. Anyway, I'd run out of 1 inch square ERW...

 
Quite a few extra chassis tubes here. The diagonal on the right is just to give the chassis a bit more torsional stiffness, like the ones on the rear bulkhead. On the Furybird I this was panelled in steel - again, bonded 16 gauge ali seems a rather flimsy replacement.

The horizontal tube at the bottom of the transmission tunnel is usually present on most Fury BEC chassis but for some reason it was left off on mine (and indeed, it was left off the Furybird I too). I can't see why you wouldn't want it - there's a rather large hole in the chassis if it's not there, and as there's no gearbox to get in the way on a BEC it's not going to interfere with anything.

The one slightly higher up is for the electric reverse mechanism to sit on. Because the car will have a live axle, putting the reverse mechanism at the rear end of the prop, while possible, is only going to increase the unsprung weight of the car in a rather unwelcome manner. On the R1 the output shaft is quite high up on the engine, so the extra bar is there for the reverse mech to sit on. Despite the way it looks, it's not actually wonky - the chassis rails it's attached to aren't perpendicular. No, I don't know why either...


Once the new chassis rails were welded in, it was time to paint them. The first coat was a coat of ICI twin-pack etch primer which I got from an autojumble. You can tell it's good stuff - makes your eyes water when you use it, even when only painting it with a brush. I suspect if I ever get round to spraying it I'll need some seriously heavy-duty breathing equipment. Once the primer was dry I went over the primed sections with some black gloss Plastikote - it does a pretty good impression of black powder coat.

You might notice that in the background the garage doors are no longer silver - I skinned each of them with 2 sheets of 4mm ply held in place by pop-rivets and painted white. They could do with a second coat - they don't look quite as white as that in real life.

Panelling


  The bit that any kit car builder dreads (unless you're building a Ginetta G20 or a Caterham. Or a Quantum. Or a Libra). Endless ali panels to be trimmed, marked, drilled, deburred, bonded and rivetted. Or, in this case, trimmed, marked, drilled, deburred, sent to the powder-coaters, bonded and rivetted. Yes, my one concession to pimpiness on this car is getting the internal panels powder-coated.

As usual the first thing to do was turn the chassis upside down and drill the floor panels. I'll be panelling the whole of the underside, but rather than doing the whole thing in a single sheet of 8' x 4' ali and then cutting lots of holes in it, I've used the standard floor panels that come with the ali set and then added extra panels for the rear. The engine bay and transmission tunnel floor panels will be removable for access.

Rolling the chassis other is of course a 2 person job - in this case the GF lent a hand. Cue random pic of her painting the chassis.


The panelling took the usual course - trim the panels to shape, clamp them using vice grips, mark where the chassis rails are, marks out where the rivets should go, centre punch the holes, put it back on the chassis with the vice grips, drill a few holes, hold the panel in place with Cleckos, drill the rest, remove it and debur the holes. Incredibly dull, but it has to be done.

At first I was quite impressed by the Fisher Sportscars ali panel set. When I built the Furybird most of the panels for the lightweight chassis came in the form of a single sheet of 8' x 4' ali which you had to cut yourself into panels. These came pre-cut, with a couple of sheets showing where they went, and some of them (like the panel on the left in the piccy) was even pre-bent where the panel needed to have a sharp bend in it.

  Of course it wasn't all sweetness and light. The panel set obviously contained some panels which were designed to fit the IRS chassis, like these outside quarter panels. In order to fit the live axle chassis the panels need to be trimmed quite a lot and to have a 90 degree bend in them to go onto the chassis rail on the rear bulkhead. Fortunately I bought a sheet metal bender when I was building the Furybird I, so adding the necessary bends was pretty straightforward.

And of course in hindsight I should have made the build stands a bit wider, because as you can see they're not quite wide enough to go all the way acress the chassis at the rear...


And after only a couple of days, quite a pile of drilled ali panels was forming on the other side of the garage. All that's left (once I've finished the few remaining extra panels I'm adding) is to debur them (can't wait) and then they're ready to go off to the powder-coaters with the engine mounts. But before they do, I've got to finish the steering column on the Furybird II because that's going to the powder-coaters too.