To be honest, this job wasn't exactly vital. However, I really wanted to do it. The manifold on the car seemed to be a cut'n'shut ZX9R manifold and while it worked it was hardly a thing of beauty. Also, the primaries entered the collector at some fairly funky angles, which I wasn't sure would be terribly good for its efficiency.
To the right is a piccie of the manifold - you can see the way the primaries curve round in a huge arc out of the
bodywork, and then dive precipitously into the collector...
The trouble was what to replace it with. Since the ZX9R installation in the car was a homebrewed one-off, it wasn't
just a case of ringing Raw Engineering and asking for one of their standard ZX9R manifolds. Also, if it was to be fitted at the
great DH2 fettling session, I needed it in a week, and my experiences of Raw are that while they're lovely people,
they're not exactly efficient or speedy.

This seemed as good an excuse for any for an extensive web-browsing session to see what else was available. I looked
at ZX9R manifolds from Tiger and Stuart Taylor (for their Locost) but it didn't look like any of them would fit.
However, I know that Stuart Taylor
do a ZX9R manifold for the Phoenix, which is basically just a Striker with full bodywork.
One Monday morning I was driving down the M1 from my girlfriend's place to London so I dropped in one Stuart Taylor
(I know Ian Gray, the man behind Stuart Taylor reasonably well) to see if he had any I could poke and prod.
On the left at the bottom is the ST Phoenix manifold and at the top is the ST Locost ZX9R manifold. The Locost
one clearly wouldn't fit - it would leave the can about a foot clear of the car. However, the Phoenix one looked
more promising.

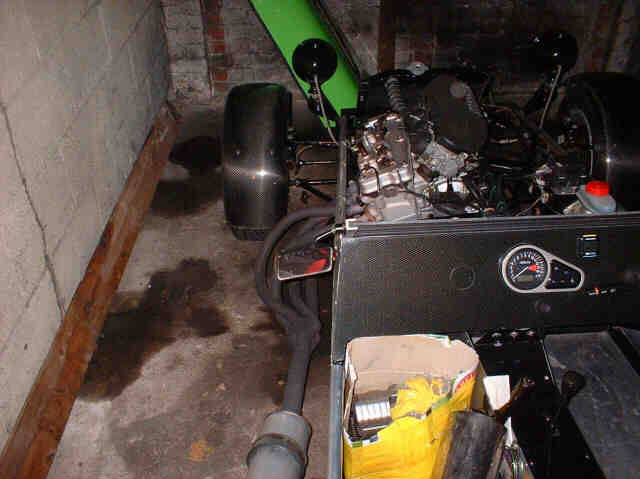
One of the main potential difficulties in fitting the new manifold was always going to be whether or not it would
clear the diagonal in the engine bay. The picture on the right just about shows the primary on no 4 cylinder squeezing
past the diagonal in the engine bay. It has to take quite a sharp and immediate turn to do this and I wasn't sure
the Stuart Taylor one would.
 As you can see from the piccie on the left,
the Stuart Taylor manifold also takes a rather sharp turn after it leaves the head. I was still unsure about whether
or not it would clear the chassis rail, but decided to go ahead anyway. I asked Ian Gray if he could get a manifold
to me by that Friday - he said he could, and true to his word, a nice shiney stainless manifold arrived on my desk
at work on Thursday.
As you can see from the piccie on the left,
the Stuart Taylor manifold also takes a rather sharp turn after it leaves the head. I was still unsure about whether
or not it would clear the chassis rail, but decided to go ahead anyway. I asked Ian Gray if he could get a manifold
to me by that Friday - he said he could, and true to his word, a nice shiney stainless manifold arrived on my desk
at work on Thursday.
The next question was how to attach the manifold to the can. The manifold is designed to take a standard slip-on
exhaust can, whereas the 2 cans I had which came with the car were intended to be bolted onto a flange with 3 bolts.
So I bought a stainless steel flanged plate from Milner
Offroad with a view to cutting a hole in the middle and welding it to
the manifold.
So, armed with all this kit I went off the DH2's place to get it all in place. That's me trying to see if I can shove my head underneath the car - needless to say, I failed. Thanks to DH2 for allowing me to pinch the picture off his site.
Although the photo shows me working on the car, it was in fact Tim who did a lot of the work on the manifold. He did a sterling job and I was (and still
am) really grateful for his help - it makes you realise that there are still some great people around. You can
see the new shiney manifold in place, and you can also see that it does point rather high up the side of the car.
In the end we did have to chop the chassis tube to get the manifold to fit, but welded a new kinked section of
tube in to replace it. The new section of chassis is made from larger sized square tubing than the section it
replaced and is made so that it has nice long welds to hold everything together. It's never going to be as strong
as the original, but then the Furybird had a bolt in chassis member in this location, which is going to be even
worse...
Net result - a nice shiney manifold. It blew like a batsrad at first, and I had a few problems keeping a bung
in the lambda sensor hole, but a bit of mild fettling soon sorted all that out. The only remaining issue as that
as mentioned above, the exhaust can does end up mounted rather high on the side of the car and my girlfriend found
that it was making her arm rather hot when she was in the car. As a result, I made a small heat shield which protects
the passenger from the exhaust can while he/she is in the car - we used this on the Le Mans trip and it worked
well.