![]()
| Having decided that an engine change would be necessary, the next task
was of course to source a new engine. I've got a spare
2005 lump sitting in The Shed but it's missing its generator
cover and starter motor and really needs a good strip down as I'm not entirely convinced that some swarf didn't
get into it while it was sitting on the garage floor at the beginning of the build of the FuryRacer. Eventually
I'll source a spare generator cover and starter motor for the spare and get it built up as my proper spare spare
engine. But that isn't something to do now, so my need for a replacement engine remained. I rang Malc at Yorkshire Engines to see if he had any 2004-2006 R1 engines in stock, but he said he'd just shipped every one he had to a chap in Spain who uses them in a race series. Apparently the drivers lack a certain amount of mechanical sympathy and they tend to get through rather a lot of them... He thought he might be able to get hold of one for 1250 quid, but for a bare engine (no CDI/ECU, TBs, loom etc.) that seemed a bit steep to me. And, indeed, I found a low mileage 2004 engine on eBay for £995, which, I estabished, was complete with all its covers but again without the CDI/ECU, TBs or loom. Even better they would deliver for £70 and reassured me that their delivery chap was reliable and would turn up on the specified day. On that basis, I bought the engine via eBay and said I'd call them the next day to arrange for delivery. Things went badly from the off. The number they'd given me wasn't their phone number, but the phone number of a very irrascible old man (who, he assured me, was 85 and his wife was 90, although why he felt the need to tell me this wasn't clear). After being shouted at for a good 10 minutes on the phone, I managed to explain to him that I had a wrong number which he accepted with a remarkable lack of good grace. I'm always amazed at how 'young people' (not that I qualify under that heading any more) get criticised for a lack of manners - my experienced of dealing with the more mature sections of society doesn't suggest that in general their social graces are any more polished. Anyway, I eventually found on the correct number for the bike breakers, rang them, and agreed that the engine would be delivered at my house (not my usual Paypal address which is my work address) on the Friday. Having waited at home all day on Friday, no engine. So I rang the breakers. 'Ooooo', they said, 'we may have sent it to the other address'. Marvellous. The clerks are going to love having an entire engine delivered to work. Feeling kind, I rang the clerks to let them know a bike engine might be heading their way, assuring them it was light enough for 2 people to carry, and asking them to leave it in my room if it did arrive. Then over the weekend I got an e-mail from the breakers. Nope, they said, the engine hadn't gone to my work address so they assumed it would arrive on Monday morning at my house. Which it didn't. However, at lunchtime on Monday I did get another e-mail from the breakers asking me when I was going to pick the engine up... It turned out that the engine had never even left their premises. Not wanting to trust their organisational and logistical skills any further, I arranged to pick up the engine myself from their premises near Colchester, and for a refund of the £70 delivery charges I'd already paid for. Happily, it seems that the whole episode was a cock-up rather than a conspiracy, and when I collected the engine the chap at the breakers was very apologetic about the mix-up regarding delivery and promptly refunded my delivery charges via Paypal. So, one new engine obtained. On the way back home I also picked up the spare gaskets and O-rings I'd ordered from the Yamaha dealer (which came to a frankly unbelievable 172 pounds). And some new wheels and tyres from George Polley, so I now have a set of wets, thereby guaranteeing no wet races this year... |
| With a quick application of Engine Be Gone cleaning spray, the old engine magically disappared. OK, not technically true - after a day of swimming through lakes of spilt oil and coolant, the engine came up with surprisingly little fuss. However, it did reinforce a lesson I learnt long ago - the most important tools for any engine change are not an engine hoist, or spanners or a socket set, or even my favourite tool, a 2 foot long pry bar. Nope, it's an industrial quantity of kitchen towels to soak up all the fluids which, despite being drained from the engine's lowest point, will still be retained in all the hoses you've disconnected, ready to dump their contents all over the floor as soon as you look at them. | 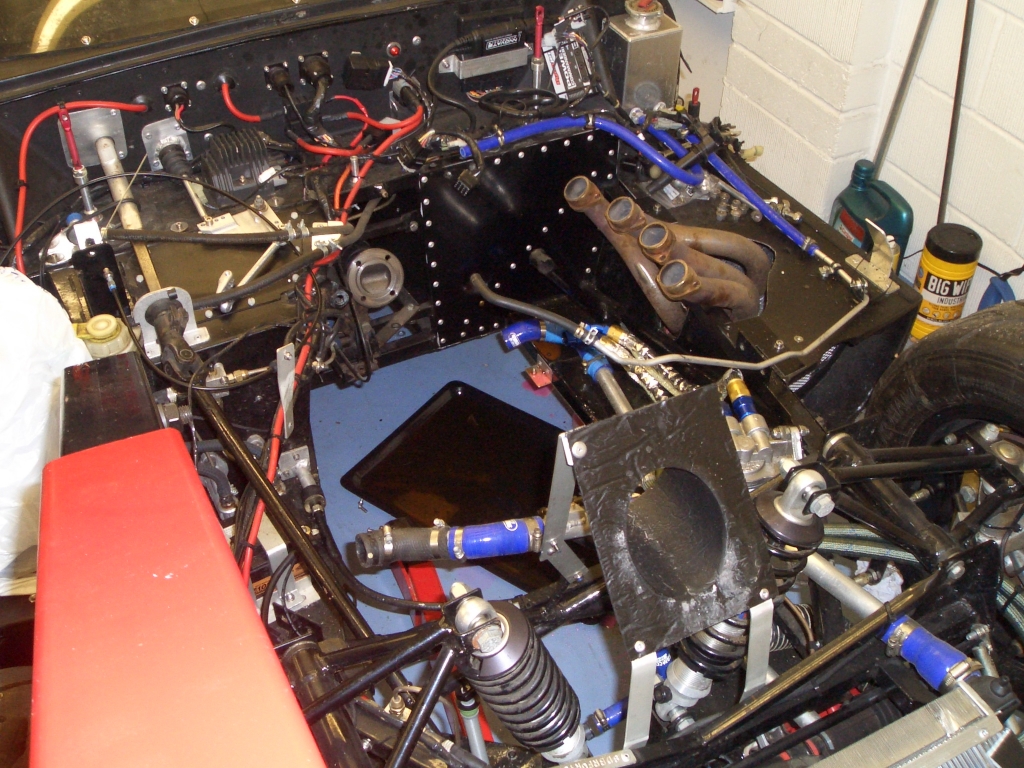 |
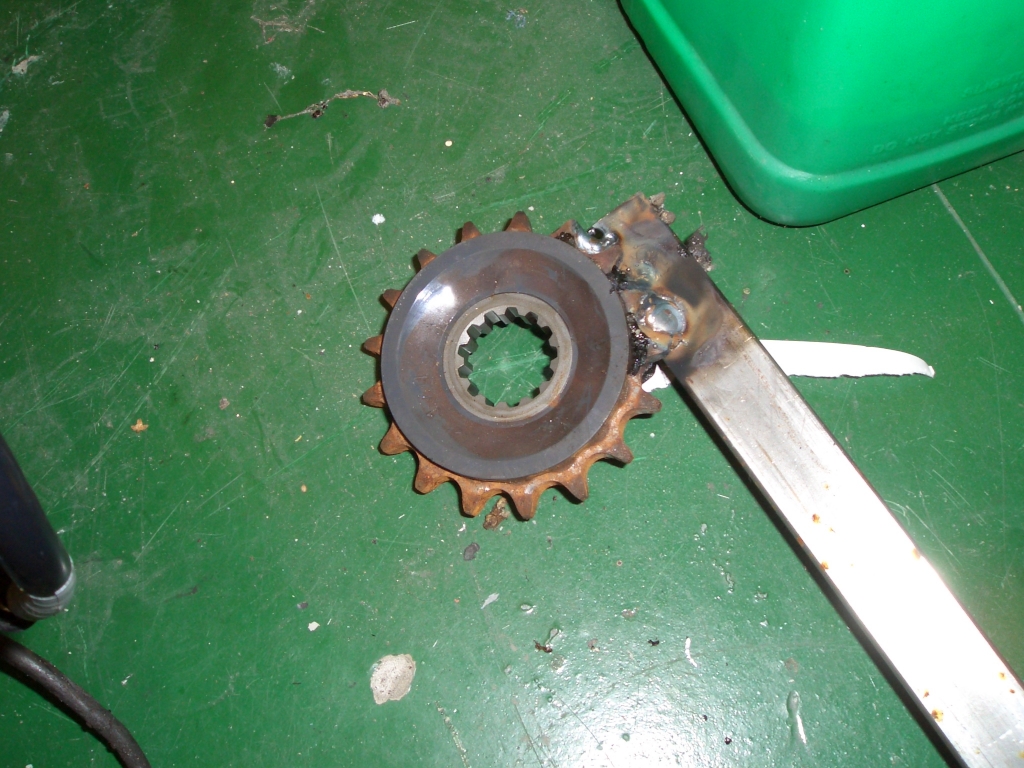 |
One of the less than entirely straightforward jobs in an engine swap
is removing the front sprocket from the new engine. Sometimes the breaker has removed the spocket already, but
generally it's in place. The problem is that the manual says that in order to remove the nut or bolt holding the
sprocket in place, you should put the engine in top gear, hold on the rear brake, and this will lock the sprocket
in place. Once, of course, the engine is no longer in the bike and therefore there's no chain, rear wheel or brakes,
this plan doesn't work. One alternative way of removing the nut or bolt would be to use a chain whip to immobilise the sprocket. However, I don't have a chain whip for a sprocket with this size teeth - mine fits mountain bike rear cassettes, which are slightly more delicate. So I used my now-standard practice in order to get the job done - choose a nice long length of reasonably sturdy steel, fire up the MIG welder, and weld the sprocket to the length of steel. The only downside with this tactic is that the sprocket usually has years of grease soaked into it, so when you weld it, it catches fire. Only a small one though. |
| The same problem of course applies when removing the propshaft adaptor off the engine that's just come out of the car. In this case it's rather easier than with the sprocket, since the propshaft adaptor has conveniently threaded holes to attach a long lever to it, so the welding bit isn't necessary. There generally tend to be two sizes of propshaft adaptor, depending on which type of propshaft yoke they're designed to be attached to. This one has bolt spacings of around 45mm and 52mm (the bolt holes aren't quite equidistant from each other, forming a slight rectangular shape) and using M8 bolts. The other type, which uses an English axle type propshaft flange and uses M10 bolts, has a different bolt spaces. The bolt holes which suit the latter type of adaptor are on another bit of studly angle iron, welded to the other end of the length of ERW in the photo... | 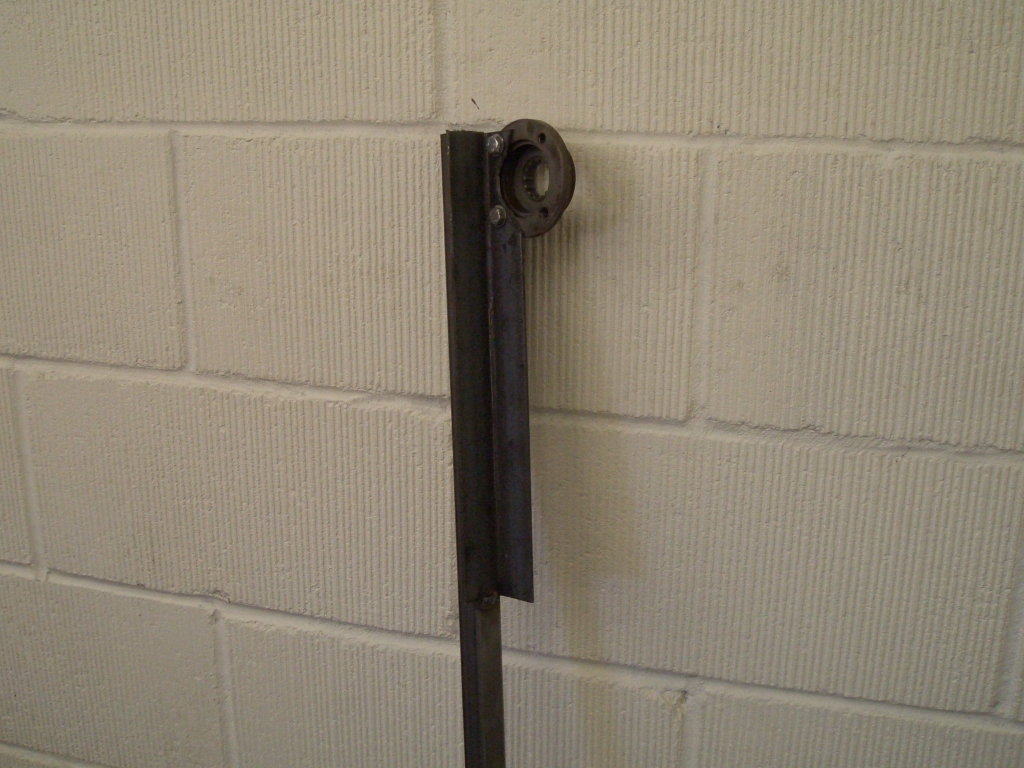 |
 |
It's rather hard to see knackering the Furyracer's engine, and failing to finish the race, as a good thing. However, it seems that things could have been worse. This is a photo of the propshaft adaptor, before its removal. One thing I noticed, to my considerable alarm, when removing the propshaft was that the ends of only two bolts were visible from the other side of the propshaft adaptor. In fact, it turns out that one of the two bolt ends was just that - the end of the bolt you can see sheared off in the propshaft adaptor in the top-right bolt hole. Which left only one bolt, and one none-too-tight bolt at that, holding the propshaft on. Having seen the products of flailing propshafts previously (Tim's Fury Flambé being a memorable example) it may be that a mildly badgered engine is the lesser of two evils. |
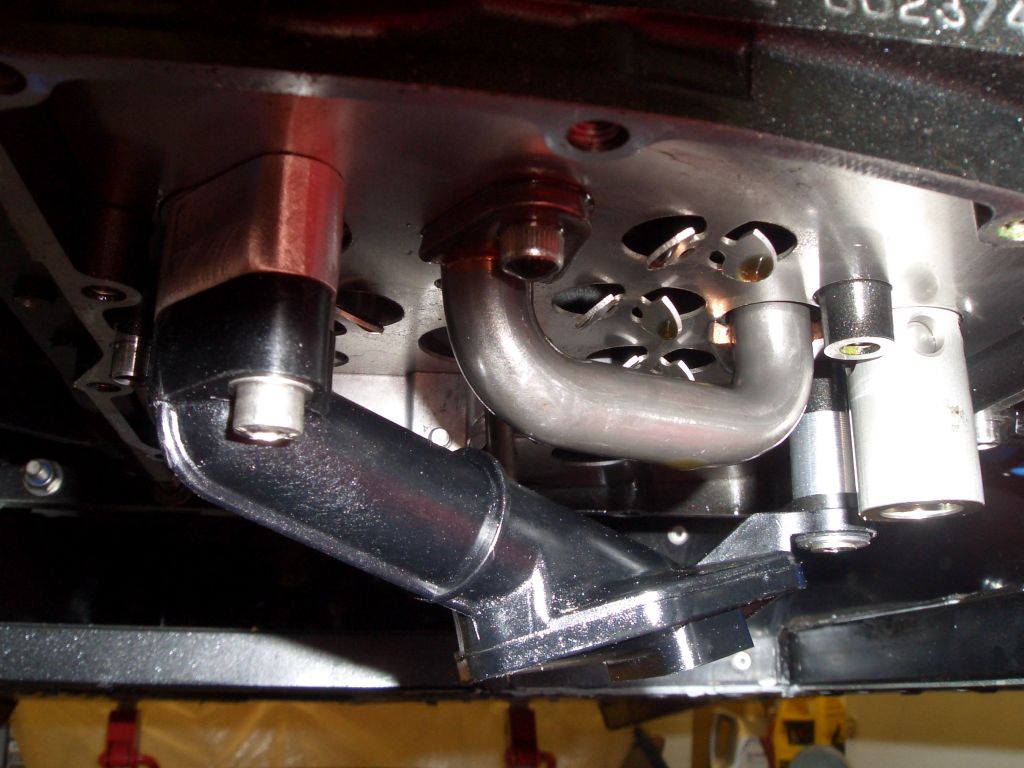
| The FuryRacer has never been the oil-tight of cars. This has been due to various factors, such as the wonky V1 take-off adaptor, the heavily modified sump and, in its latest guise, weeping unions on the remote oil-filter head. The oil-filter head has 5/8" BSP threaded ports, which then have adaptors in them to convert them to a -10 JIC male fitting. These are supposed to be sealed by the O-rings between the adaptors and the oil-filter head, but as you can see the O-ring on the right hand fitting has started breaking up. This resulted in a slow but persistent oil-leak which covered quite a bit of the engine bay in oil, together with the underside of the chassis and half the nearside sidepod. |  |
 |
I've now replaced the O-rings with a couple of these bonded washers, which have a rubber sealing ring bonded to the inside of a plated steel washer, the sealing ring being slightly thicker than the steel washer. The advantage is that of course they're much tougher than O-rings and much less likely to snag and break up. They're now very much my sealing option of choice, and I've started replacing all similar seals on the car with bonded washers wherever possible. |
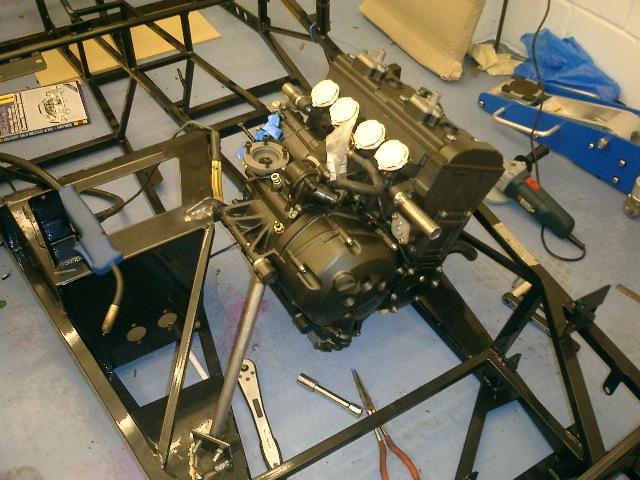
| And so, having transferred over from the old engine onto the new engine the engine mounts, propshaft adaptor, oil-filter take off plate, oil temperature sender equipped oil cooler bolt and the adaptor to allow the oil pressure sender to be fitted onto the end of one oil gallery, I could insert the new engine into its new home. This is quite tricky, because the mounting plates for the engine mounts on the front left and front right corners of the engine are both vertical - this means the engine has to be dropped down absolutely straight and lever, as if it's at an angle then the engine mounts won't fit between the mounting points. It turns out that the easiest way to do this was actually to use only one strop to attach the engine onto the engine hoist, attaching it at the front and rear of the engine but allowing it to swing about that axis. Because the engine mounts are quite high up, the engine naturally stayed upright, and it was then easy to adjust the angle at which it was dangling in order to ensure that the engine mounts slotted into place. | 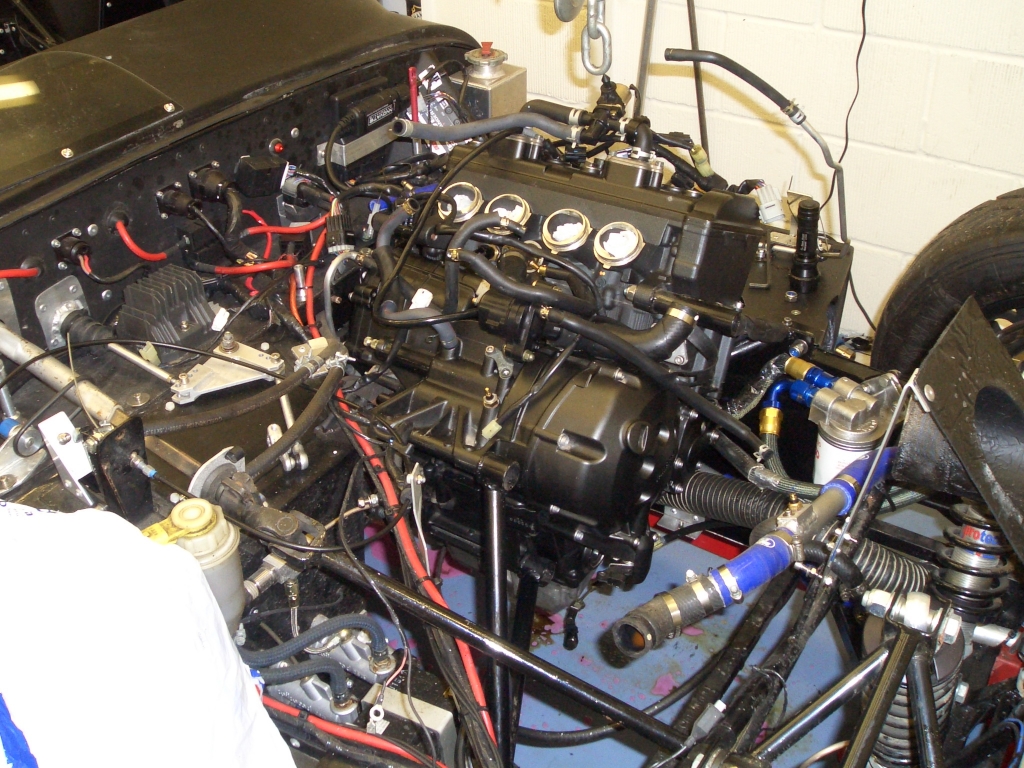 |
 |
While the sump I've modified worked OK, it has two issues. First, no matter what I do, I can't get it to seal properly around the drain from the space between the oil and water pumps, so it slowly drips oil. Not at a great rate, but it's annoying. Secondly, there's something of a lost opportunity, as if it was a consistent depth then it could hold at least another half a litre of oil. Happily, a friend of mine, JB7, owns a CNC router which can do aluminium. JB7 (aka Jonathan Rarity) is a se7ens lister, three-times Scottish Hillclimb champion and multiple se7ens list tour organiser. So he's a pretty busy chap. I've sent him one of my spare sumps, and he's put it on a scanner to work out where the bolt holes go. To test they're in the right place, he sent me this sheet of plastic with the bolt holes in it, along with the space of the outside of the sump. As you can see, it's spot on. Well, OK, it's not that easy to see from the photo because the plastic sheet is transparent, but trust me, it's spot on. |
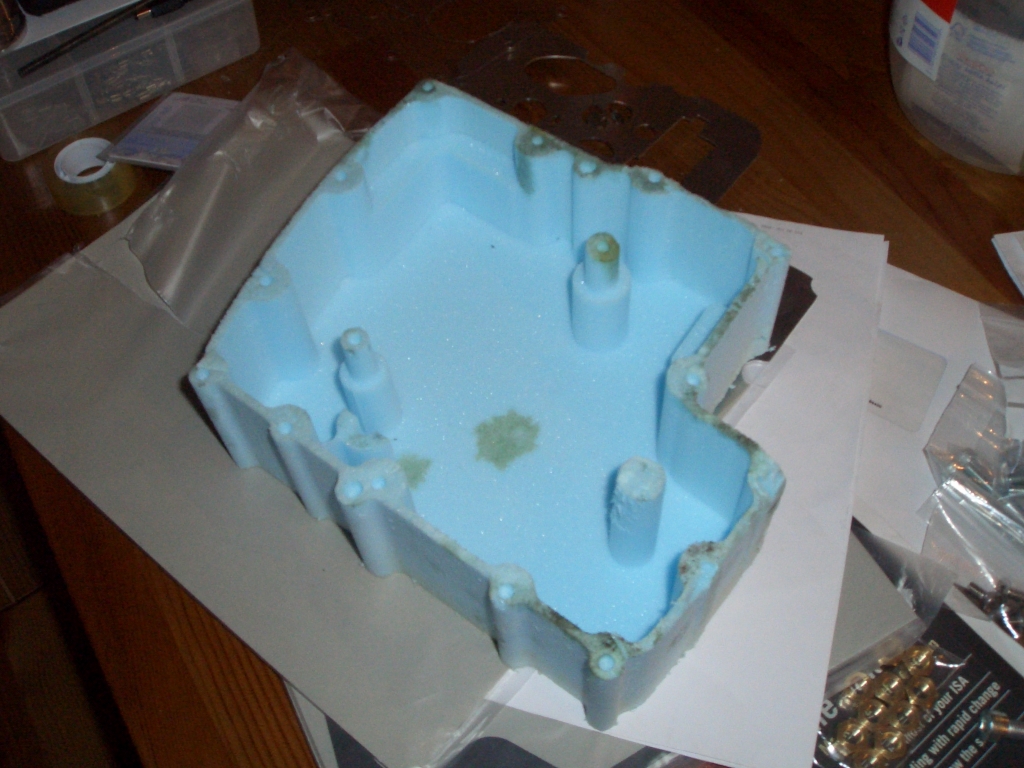
| This is the next stage in the process of getting the new sump made -
this is a foam prototype of the sump, made from foam on the basis that it's cheap and easy to machine so if there
is a problem with the design it can fixed relatively easily. The idea, I think, is that JB7 will provide me with
the sumps like this. I can the drill the mounting holes and machine the backs of the holes to form the recesses
the bolt heads will fit into, although with machining the tapered hole that the oil-pump drain tube fits into.
I'll also add the holes for the drain plugs, the return line from the air-oil separator/sight glass and a new cunning
plan to make oil changes less unpleasant... The internal depth of the sump is 65mm, which is the depth of the oil pick-up once it's been dropped by 19mm, plus a couple of mm clearance room. The closest thickness of ali plate is 3" or 75mm, and I've asked JB7 to leave the 10mm base as it is - what I'll then do it machine a series of 6/7mm deep 6mm slots in the base to act as cooling fins. If finned sumps are good enough for Abarth, then they're good enough for me, and in my experience the bottom of the sump has the potential to be a fairly effective heat exchanger. However, for now I've just replaced the old modified sump, as it'll take a while to finish off the machining once I get the new billet sump. Especially as I've asked JB7 to make two, one for the engine in the car and one for the spare, which will of course double the machining I have to do as well. |
 |
| With the new engine in place and bolted down, it's really just a process
next of connecting up the oil, coolant and electrical systems, connecting up the propshaft and reverse mechanism,
and adding the induction and exhaust systems. Then, with the oil and coolant systems filled, it'll be time for
the new engine's first fire up. Hopefully this should take place within the next few days. So, based on the TTD
list I did before starting the engine swap, this is where I've got to at the moment: PRE-PREP Jack up car onto axle stands Remove engine undertray and tx tunnel undertray Clean both of debris Disconnect battery negative lead CHECK FOAM SUMP BLANK Drain oil from engine Remove and clean (a bit) sump Check foam sump for clearances and locations of everything Temporarily refit sump PREP ENGINE FOR REMOVAL Drain engine coolant Undo oil lines from take-off plate and cap ends Undo exhaust nuts, remove exhaust and rest to one side Undo coolant pipes (particular care of small pipes at bulkhead end) Undo oil pressure sender pipe from adaptor into block and seal off end Remove airbox and place to one side (seal up face of airbox) Undo wires to engine and place out of way Remove TBs including coolant pipes Remove oil return pipe from sump Remove oil catch tank/air-oil separator/pipework (seal up ends) Remove front transmission tunnel panel Undo centre bearing mounting bolts Undo propshaft bolts on front fixing Undo propshaft bolts on axle and slide propshaft clear Take off clutch actuating lever (use circlip pliers) Remove clutch cable from engine mounts REMOVE ENGINE INTERMEDIATE PREP WORK Clean up oil mess ENGINE PARTS SWAP Remove oil gallery adaptor from old engine and place in new engine - use new sealing washer Fit new baffle plate onto engine, including drilling and taping hole for new mounting point Refit old sump for now Take propshaft adaptor off old engine (will need bracing tool) and fit onto new engine Remove reverse mech stay plate from old engine and fit on new Replace smaller coolant feed to water pump at the same time as the reverse mech plate Remove oil filter take-off plate from old engine and put onto new engine FIT NEW ENGINE Threadlock all bolts and replace all nylocs connect water hoses to engine block bolt aluminium coolant bypass hose to chassis using nyloc Fit TBs and airbox Refit exhaust using new gaskets connect fuel lines - check correct way round connect electrics inc. starter motor and earthing strap connect water hoses to TBs, modifying outlet to take bleed point T fit reverse mech spur gear to propshaft adaptor, fit propshaft, bolt into place - lashings of threadlock + Schnorr washers Reattach propshaft centre bearing - may need jack to spread bearing supports Reattach propshaft flange to diff - studlock Fill coolant system - remove header tank and lift to purge Fill oil system Fit new spark plugs - while plugs out turn over engine and get oil pressure Fire up engine and run up to temperature Refit transmission tunnel floor and engine bay floorpan panels Getting there. Still got to find that spare oil temp sender though... |
| Well, I still haven't found that spare oil temperature sender, so I've ordered a new one. Other than that, all of the jobs above have been carried out (except for the modification of the water hoses to the TBs - I decided that this wasn't such a good plan after all). In light of the problems with the bolts holding the front end of the propshaft onto the propshaft adaptor, I decided that further measures to make sure they stayed in place were desirable, beyond threadlock. So I've used some Schnorr washers on Hugh's advice - these are conical Belleville washers with serated faces which supposedly work in the way that spring washers are supposed to work, but don't, by gripping the bolt head and the surface to which it's being bolted. And just in case the combination of threadlock and Schnorr washers wasn't sufficient, I've also lockwired the bolts in place. |
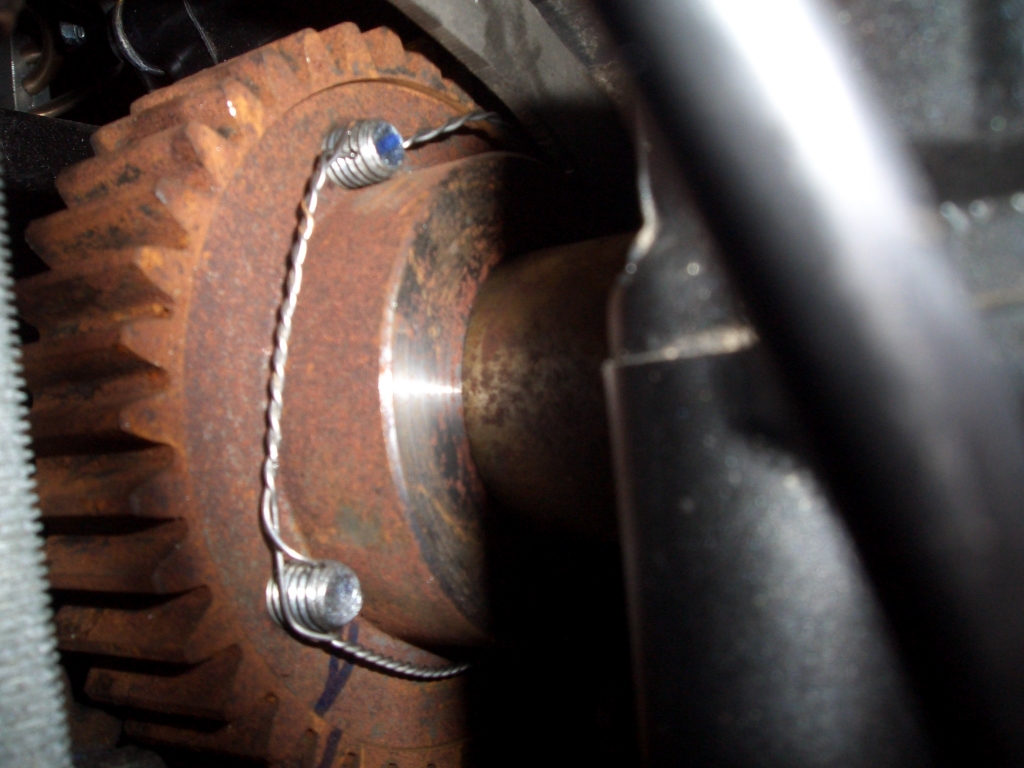 |
On the front end of the propshaft it's not really possible to lockwire the allen key bolts in the conventional manner - by drilling the bolt heads - since the bolt heads are recessed into the spur gear for the reverse mech and access is obstructed by the UJ on the propshaft. So instead I've drilled the ends of the bolts which protrude through the propshaft adaptor and used them to lockwire the bolts together. Drilling lockwire holes is a pretty horrible job - 1.5mm drill bits are unpleasantly easy to snap. But it's a lot easier than it would be otherwise with the milling machine, used as a drill press. Of course, I could use the drill press, but the drill press chuck seems to have developed a troubling amount of run-out, which rather defeats the purpose of using it with a 1.5mm drill bit. Actually putting the lockwire in place was an equally horrible job, given the difficulties in getting access to the back of the propshaft adaptor. However, it's now done, and I'm hoping that the combination of lashings of threadlock, Schnorr washers and lockwire will ensure that the bolts stay in place. Oh, and that's not rust on the propshaft adaptor and spur gear. Nope, it's 'patina'. Very different... |
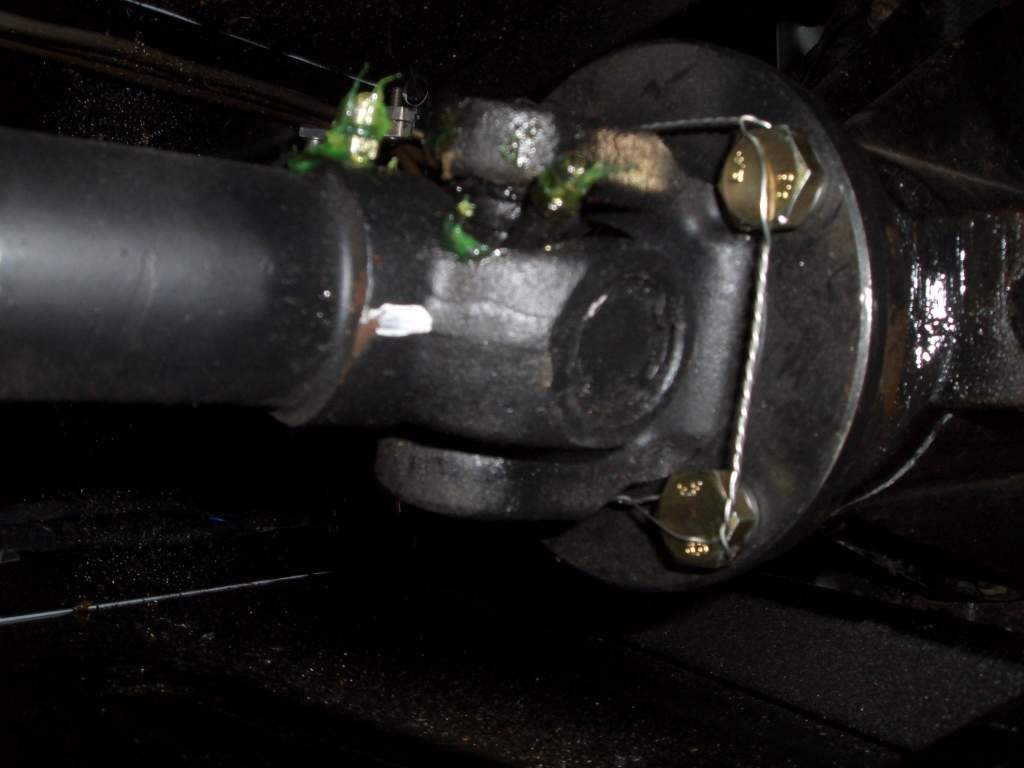
I've also lockwired the bolts on the back end of the propshaft - while they weren't loose, I couldn't really think
of any good reason not to, especially as they were much easier to do than the bolts on the other end of the propshaft.
As you can see, I also took the opportunity to regrease the propshaft UJs.
Having taken all reasonably practical steps to ensure that the propshaft doesn't wander loose, the rest of the
engine installation was the usual dull-as-ditchwater jobs of reconnecting all the electrics, the oil and water
systems, filling both, and refitting the TBs and airbox. Unfortunately it then took me the best part of 3 hours
to get the engine up and running.
As usual, I took the plugs out and turned the engine over on the starter in order to get some oil pressure before
starting it for the first time. Unfortunately, I forgot to turn the fuel pump off (the engine will turn over with
the fuel pump disengaged but not the ignition) with the result that quite a lot of fuel got squirted into the cylinders
- albeit most of it got immediately ejected from the open spark plug holes by the engine's compression strokes.
This meant when I fitted the nice new spark plugs and tried to fire up the engine, the plugs instantly fouled.
As did the old set which I'd just taken out from the 'new' engine. Unfortunately bike plugs, for some utterly mysterious
and unknown reason, object very vigorously to being truly and properly fouled, and tend to simply stop working.
Fortunately, I am unable to pass an open branch of Halfords and hoovering up as many CR-9EK spark plugs as they
have available, so I had a spare spare set. But on a purely superstituous whim, I ended up putting in the ones
I'd used in the 'old' engine, and the engine fired up just fine. Admittedly, I'd wired open the throttle bodies
and used a hot air gun down the inlet ports to try and get rid of any excess fuel first.
| So the car is once again blessed with an engine that works. All I have to do is take it for a shake-down run, do a few practice starts to see if I can get the hang of it, wash it (natch), put on a roundel and race numbers on the nose and give it a proper once-over to make sure everything's straight. Oh, and modified the Power Commander map as it's running at an AFR of 17:1 at idle (the old engine was too, it's not caused by the new engine). Oh, and rewire the fuel gauge so it's useful. And reprogramme the DASH2 accordingly. Peasy... |
| Well, I did rewire the fuel gauge. The plan was to use the 5A regulated
supply (actually 5.4V) used to power the Neuros rather than the DL1's meagre 50mA reference voltage. This is because
the fuel sender's resistance goes from 2 ohms full to 60 ohms empty - all fairly low values. This means that ideally
you'd have a fairly small value resistor to make up the potential divider so as to produce a decent spread of voltages
over the sender's operational range. However, do that and you'll exceed the DL1's maximum current draw with the
fuel sender alone, since of course the current draw is inversely proportional to the resistance of the potential
divider as a whole. Great plan, very poorly implemented - I inadvertently rewired the fuel sender into the 12V
supply to the camera and mic rather than the 5V supply to the Neuros. The 12V supply isn't really a 12V supply,
at least not when the engine's off, since the difference between the input voltage and the expected output voltage
isn't sufficient. I'll try to fix that tonight if I get time. Mysteriously, it also appears that the resistance between the fuel sender output and the chassis earths changes depending on whether the engine's running or not. It doesn't at the sender itself, which suggests to me that it may be an earthing issue. Won't have time to fix that, so I'll put it back on the list of things to do. I've taken the car out for a quick spin around the block and went and practised some starts on a quiet back road. The first was pretty good, the second less so, and then they got worse from there... The trouble is, I could spend all afternoon practising starts but I wouldn't have a clutch left at the end of it - with the ZX9R and 'bird engines you can get a good start by dialling in a certain number of revs and then side-stepping the clutch. With the R1 engine this approach results in either violent wheelspin or bogging down/stalling - you need to slip the clutch and feed in the power in order to get a decent start. Might have to start saving up for a new set of clutch plates... |
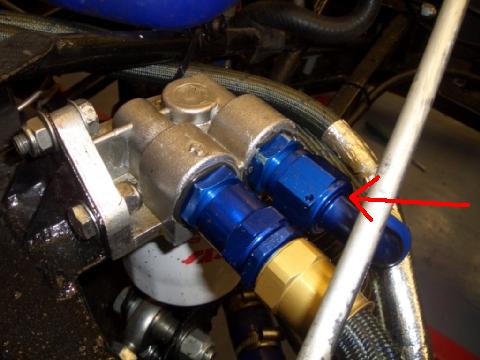
Rather annoyingly, it turns out that Operation Continence had not succeeded.
Despite the switch from O-rings to bonded washers, the remote oil filter head was still leaking. I've investigated
it, and it looks as though the leak is coming from the back of the female swivel on the 135 degree fitting, as
indicated by the red arrow. I'll try dissembling it, giving it a squirt of brake cleaner, and then reassembling
it. If that doesn't work I can only assume there's a defect with the fitting (it should of course seal when the
union's tightened). I think I've got another fitting of this type on the Furybird, so I might pilfer that and take
it with me to Brands.
If nothing else works, I'll just have to zip-tie a load of kitchen towels around the fitting before each outing
onto the track and hope that they absorb the oil leaking from the fitting...
Finally, I've been trying to get the video recording system working
properly, or at least better. I've reset the Neuros so it records at 640x480 in high quality rather than 320x200
'economy' quality. I also tried using Tim's system, at his prompting, to turn the Neuros on and off for recording,
by adding a switch into the power supply to the camera, and setting the Neuros to 'auto record'. In theory this
means that the Neuros starts recording automatically as soon as it senses an input signal due to the camera being
turned on, and stops recording once it's turned off. Nice theory, doesn't work in practice for me - well, it works
precisely once, but then when you try and get the Neuros to start recording again by turning the camera back on
again, it just sits there doing nothing and claims that 'auto record' is now off. I know the Neuros turns auto
record off if you use the buttons to manually stop the recording (or start it) but on my unit the auto record feature
appears to be a one-hit option even if you don't touch the remote.
I think I may see if I can pick up a cheap Archos 605 wifi from eBay - they're nice little units which will record
in 640x480 with an adaptor (which I have) and have a built in screen so you can see what they're doing. And they
take a 5V power supply...
However, it may be that I'm not running the latest firmware - I know one of the firmware updates Neuros introduced
featured Auto Record so that's one thing to check.
Right, off to testing...
| After a horribly early start to a Friday morning, I made it to Brands
for about 8 o'clock, and parked opposite Tim with his extensive motorhome + trailer + awning encampment. I'd forgotten
my awning. And my collapsible chair. Still, provided it stayed sunny and I never felt the need to sit down, it'd
be fine... I'd driven Brands, and the Indy circuit, once before - but this was on a driving experience day about 10 years ago when you get to do 5 laps in a BMW saloon and then 5 laps in a Formula First with a rev limit barely above idle. Not exactly the best training for making one's way around the circuit in an RGB car. In fact, I suspect that of all my attempts to learn the circuit the most effective was, as usual, a combination of rFactor and the Circuit Guide book, the former in particular. After having checked with Tim about how you got onto the circuit, and having filled the car up with fuel, I trundled off for the first session of testing. The RGB cars had been put in with the 'sports' session, which seemed to consist almost exclusively of RGB cars, lots of rather slow Morgans, and a single old Corvette which was quite amazingly slow everywhere around the circuit. As a result, it was pretty difficult to get a clear lap in, since almost every lap would involve navigating past a Morgan which might, or might not, stick to the racing line or might instead take some other bizarre line in a misguided effort to keep out of your way. Still, overtaking other cars is always good for the soul, even if I did end up concentrating rather too hard on getting past Morgans and not enough on learning the track. Oh, and a special mention should go to a tintop driver, Mr. Calder IIRC, who for some reason had been placed in our session. I'd gone out fairly close behind him in the first testing session, and could see the immense clouds of tyre smoke on the first two laps as he comprehensively locked up his brakes into Druids. Somewhat predictably, he locked up once again on the third lap and parked it in the gravel trap. Cue one red flag while the marshals went and recovered Mr. Numpty from the gravel. |
| Still, session one was reasonably uneventful. I discovered that Paddock
Hill, while still pretty awe-inspiring, isn't actually that hard to do. The braking point (just over the crest)
is fairly clear, the turn-in point (the end of the service road on the left) is clearly visible and while the apex
is blind it's actually fairly easy to hit. The exit is also fairly easy - point the car at the exit kerb and keep
the steering wheel as straight as possible and the throttle flat. Druids I never really felt I got the hang of,
largely due to braking too early and then turning in too early, but the real problem was (and remains Clearways).
This is a long, long right hander with a lot of elevation changes. Getting it right, however, is the key to a good
lap time as the exit will determine your speed on the straight. Never really felt I got the hang of it, largely
because (as with Coram at Snett') I was too keen on keeping the car on the black stuff and wouldn't let it run
to the outside of the track. My lap times did start falling eventually, however, with a few laps in the low 55 seconds range and a single lap in the 54s - albeit only just, with a 54.99s. However, I was confident that I could take a good half a second off that in the afternoon, and the only mechanical issue I had in the morning session was a few wisps of smoke/steam coming up through the transmission tunnel at the end of one of the sessions. I took the transmission tunnel top off, but could see nothing amiss, so carried on. Even more happily, Project Continence seemed to be proceeding satisfactorily, with the cleaned-up oil fitting sealing nicely - I'd zip-tied a rolled-up bit of kitchen towel round it for the first session, but it was dry as a bone afterwards and that fitting stayed oil-tight for the whole weekend. One leak down, quite a few to go... Sadly, the good mechanical reliability in the morning sessions didn't continue. In the first of the two afternoon sessions I noticed a grinding noise and slight vibration. It's difficult to describe, as it was difficult to pin-point exactly what was wrong, but I felt that something wasn't quite right with the car. I was concerned that it might be a wheel bearing problem as it had that sort of 'grumbly' feel to it, so I jacked each end up of the car in turn and wobbled the wheels to check all was well. There didn't appear to be any problem with the wheel bearings - however, it was almost impossible to turn the front left wheel because the brake had jammed on. The front right wheel was not as free-turning as I'd have liked, but nowhere near as bad as the front left. I, with help from other RGBers, tried fixing it throughout the rest of the day, but to no avail. My first thought was that the bias bar linkage might be stopping the master cylinders from retracting fully, so that the brakes jammed on when hot (the problem certainly appeared to be temperature related) but if this was the case then both sides would be affected equally. I adjusted and greased the bias bar - no difference. We also wondered if the pistons in the calipers were sticking - the pads (Wilwood Smart pads) were surprisingly worn (only about 4mm of friction material left, after 400 miles of running) and the pistons didn't seem terribly keen to retract into the caliper housing. Tony Gaunt very kindly helped give the pistons a good going over with brake cleaner (thanks Tony!) and we hoped that this would clear the problem, but unfortunately it didn't - the grumbly grinding came back after a few laps in the last afternoon session. More in hope than expectation, Tim and I fitted a new set of pads in the evening (one set of pads owed to Tim) in the hope that the pistons were sticking only when pushed out quite a way due to the worn pads and that fitting less worn pads would allow them to travel in their non-sticky bit of their travel. In order to bed the pads in, and to test this theory, I left the circuit in the FuryRacer first thing in the morning (well, it was first thing for me - everyone else had apparently been up for hours by then) and gave the brakes a good workout on the A20. One of the joys of having a road-legal car... When I got back, the front left had gone almost completely solid, so again this hadn't worked. But I'm getting ahead of myself, because this all happened on the Saturday... |
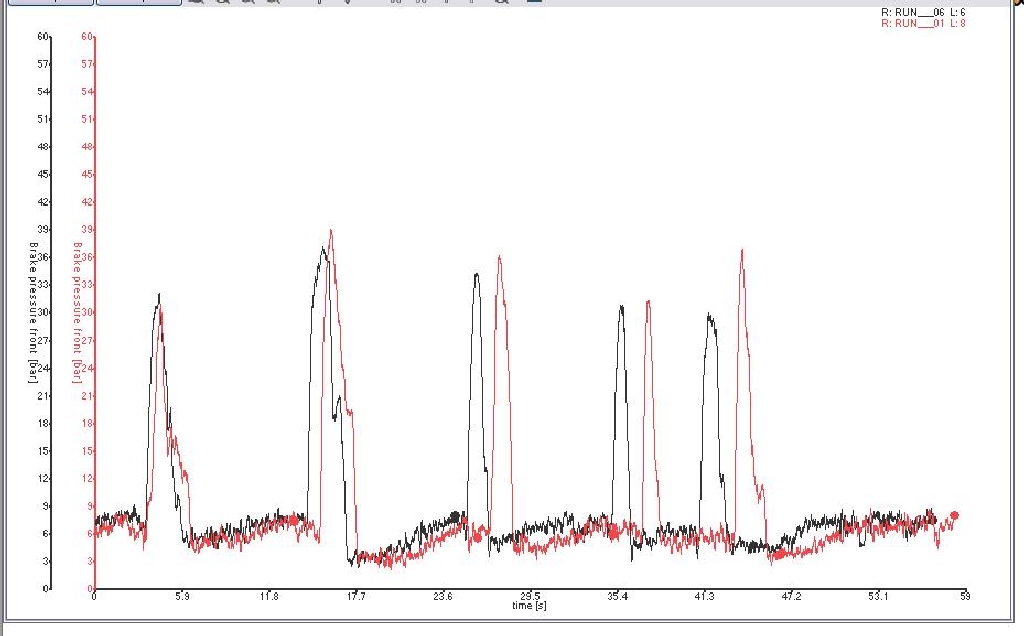 |
The brake problems were obviously either hydraulic (i.e. the master cylinder) or mechanical (the caliper). Just to help rule out the possibility that the problems were caused by a master cylinder not releasing line pressure in the brake lines, I compared the brake pressure logs for one lap from the first session (red line) and one from the last on Friday evening (black line). You can see I'm going faster in the later session - the braking points are earlier. However, the overall shape of the curves looks very similar, and there's certainly no increase in the baseline pressure. Ignore the fact that it reads as if there's always pressure in the lines - there's a bias in the sensor which I haven't compensated for yet in the Analysis software and the algorithm used to generate the numbers. Anyway, it looks like it's a mechanical rather than a hydraulic issue then... |
| The chap on the gate at the paddock entrance seemed a bit confused to see one of the race cars heading off onto the public highway, but I pointed at the tax disc mounted on the dashboard and he seemed happy enough. I'd remembered to tape over the race numbers, since it's a well-known fact that no-one can recognise numbers if there's two thin strips of insulating tape covering them... Still, it's apparently enough to satisfy the MSA rule that you can run a car on the road with race numbers still attached, so hey ho. Once I'd found out that the new pads hadn't solved my braking woes, I had only a few options left. The one I decided to adopt was to push the pistons in the front left caliper in by hand, go and get scrutineered (without using the foot brake too much), and then hope that I could do enough laps to qualify (minimum of 3 required, with the fastest two counting as qualifying times for Saturday and Sunday) before the problem returned. Scrutineering was fine, apart from the fact the brake lights didn't go off when they should have at first (which made me wonder again about the bias bar linkage). So that just left qualifying. |
| To be honest, I don't really remember that much about qualifying apart
from the fact that I went out of my way to let anyone past who was running faster than I was, and the fact that
the brakes were all over the place. The grumbly grindy problem didn't seem to reappear, but the pedal biting point
was all over the place. Sometimes it'd be really high - no free travel and then a solid pedal - and sometimes the
pedal would go to the bulkhead and I'd have to pump it up. If I so much as touched the kerbs then the very least
I could expect was a long pedal, and on a few occasions no brakes at all before a good 2 or 3 pumps of the pedal.
Quite exciting but not exactly confidence-inspiring. Despite all this, the competitive element obviously worked its usual magic as I ended up lapping half a second faster than in testing, putting in sub 54.5 second laps for both qualifying laps, and stayed out for the entire session rather than doing 3 laps and then coming in. This was only good enough for 25th and 24th on the grid, out of 29, but it was nonetheless still progress in the right direction. And it was great fun, which is after all the main thing. |
| As usual, a crap start which meant that going into Paddock Hill I was
in last place. I then set about catching up with Ben, and got past him after a few laps under braking into Paddock.
Next in line was James Fowley in his yellow and orange Fury, the back of which I'd already seen quite a bit of
in qualifying, but I got past him under braking into Druids. I was able to catch up with James quite quickly with
a bit of help from Tony Gaunt, who'd spun his Wolfe on the way into Graham Hill bend, and was left stranded on
the exit, broadside onto the track. James had to slow down much more than I did to avoid Tony, which meant I pulled
back a few car lengths on him. I did notice that once I'd got past James he disappeared from my mirrors - it turns out that just after my overtaken, after Graham Hill bend, his engine had let go in a very big way (there was a large hole in the crankcase and the crankshaft was clearly visible). Bob Mortimer was, I think, the next car up the road but realistically I didn't have enough laps (or, I suspect, enough speed) to catch up with him so I tried concentrating on just putting some decent lap times in and keeping out of the way of the leaders. Sure enough, the leaders soon appeared and I tried not to get in their way. When the last lap board came out, I was busy telling myself just to drive it home, not take any silly risks, and do the bare minimum necessary to keep Ben behind me, as he was still pretty visible in my mirrors. I then promptly cocked up Druids in a big way, allowing Ben to close right up. Unfortunately, Ben's engine started misfiring (it turns out the generator wasn't charging the battery due to a dodgy connector) and he pulled off the track. So, I started fourth from last on the gird (not all the qualifiers made the start), got overtaken by all three cars behind me off the start, overtook 2 cars, both of whom then broke down, and finished second last of the finishers with only Tony, recovering from his spin, behind me. So of the 29 people who'd entered the race, 26 started, 18 finished, and I was 17th. So I'll pretend that's 17th out of 29, which makes it sound almost respectable. The brakes had been all over the place once again, but in a way I was almost getting used to it... |
Race 2 was a bit, erm, interesting. This time I was third from last on the grid, and once again I got a woeful
start which resulted in me being at the back of the pack going into Paddock. By way of variety, this time I had
Phil Alcock ahead on me in his Pulsar. After a couple of laps I managed to get past him under braking into Druids,
and foolishly started thinking about how long it would take me to close up to the next car along. I then promptly
got Surtees/McLaren all wrong and fell off the track, and went bouncing around the outside of McLaren on the grass.
Phil, of course, got back in front and I was back to being last. Er, bother.
Things got rather more interesting as the undertray on Phil's car started coming loose. Apparently on the one corner
at which it was still attached to the rest of the car it was in fact secured by a sturdy bolt and so there was
never any real prospect of it coming off. However, I of course didn't know that was I was following. And having
spent a goodly part of the Snett race wondering when I was going to get Bob's wheel and tyre in the face, the prospect
of being guillotined by Phil's undertray was no more appealling.
Mind you, my mind was taken off the prospect of decapitation by the fact that not only was my car getting a bit
whiffy in the burning oil department, there was smoke coming out of the holes in the top of the transmission tunnel
for the handbrake and reverse gear lever. Not lots of it, it was just wisps along the straights, but even so this
didn't seem like a particularly welcome development.
| So, I was in last place, my car was smoking rather ominously and Phil
was about to inadvertently decapitate me. Then, turning onto the pit straight, I saw a black and orange flag. To
non-motor-racing-geeks, that's a black flag with an orange circle in the middle and means 'you have a mechanical
problem you may not be aware of'. The marshals put a number underneath it corresponding to the number of the car
with the problem, and you're supposed to come into the pits PDQ when you see it. I didn't see the number although I did see the flag - which itself a pretty tall order as exiting Clearways generally involves one's mind concentrating on other matters, such as not parking the sliding car in the gravel trap. Now, the chances were it was for Phil, who had a fairly obvious mechanical problem and one which possibly he wouldn't be aware of. But equally my car was, if not belching, then certainly wafting smoke out. And of course, the marshals might be able to see a problem with my car that I couldn't... Anyway, after half a lap of indecision, I slowed down, trundled round for the rest of the lap and went into the pitlane. Having mimbled down to the end of the pitlane, it turned out the black and orange flag was for Phil after all, not me, so I zoomed off again. However, I slotted in behind Ben, who'd just lapped me along with the rest of the field. Feeling it would be a bit rude to unlap myself, I spent the rest of the race trundling round, and finished dead last, at 18th. Still, I did finish and so wasn't once of the 6 cars which DNF'd, and hence Operation Finish The Damned Race was deemed a success. Operation Continence, however, was not... TBC. P.S. Thanks to Austen's friend Dan Sayles for the photos. |
 |
The cause of the smoke emanating from the FuryRacer was fairly obvious after the race - the whole of the nearside
of the engine bay was, once again, covered in oil. Unlike the leak from the remote oil filter fittings, this leak
had covered the cam-cover and the exhaust primaries - hence the smoke. There's fairly obvious marks on the exhaust
manifold where oil has got onto it.
So, another clean up operation was in order. First, washing the outside of the car which was covered in streaks
of oil from Phil's car, and secondly swabbing down the inside of the car where my own oil leak had done its worst.
| Happily, the cause of this particular leak was fairly obvious and the fix fairly simple. What had happened was that the hose fitted onto the home-made breather on the cam-cover had come loose. This meant that the cam-cover, rather than breathing its mixture of oil and air down into the air/oil separator and then into the sump or catch-tank depending on whether it's oil or air, had been lobbing the whole lot down the side of the engine. |  |
 |
In order to make sure it doesn't happen again, I've added a barbed end to the home-made fitting (just added a ring of TIG weld round the top and filed it down into shape). With the jubilee clip nice and tight, I can now pull on this as hard as I like and it doesn't come off. In case fixing this would simply make another part of the breather system the weak link, I've added blobs of weld to the end of all of the aluminium pipes making up the breather system so that they can't go anywhere either. Hopefully that's this particular problem fixed. With that done, there are only two remaining continence issues that I'm aware of - the sump, and the external sight glass, which is weeping oil slightly. |
I think I've also worked out the root cause of the braking problems
I had at Brands - the front left caliper isn't square with the brake disc. Both front brake discs have some run-out
- 13 thou on the front left and 5 thou on the front right, although according to Wilwood that's just within acceptable
tolerances.
You can make out from the photo that the caliper isn't at right angles with the brake disc, but its clearer with
the assistance of a steel square angle...
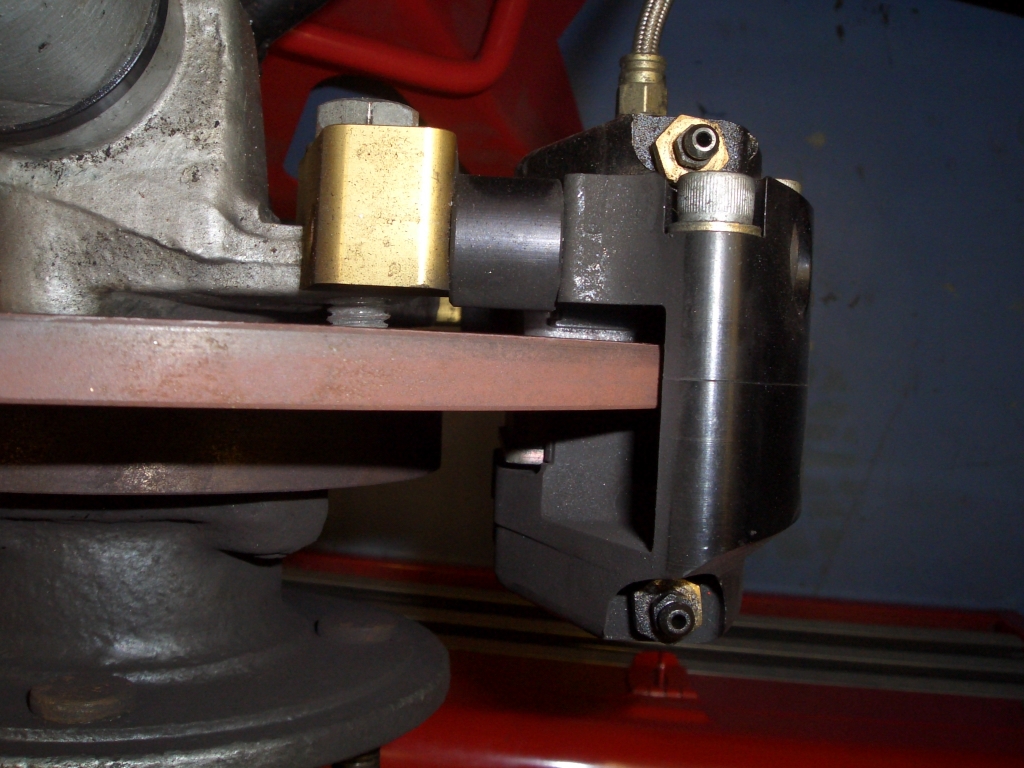
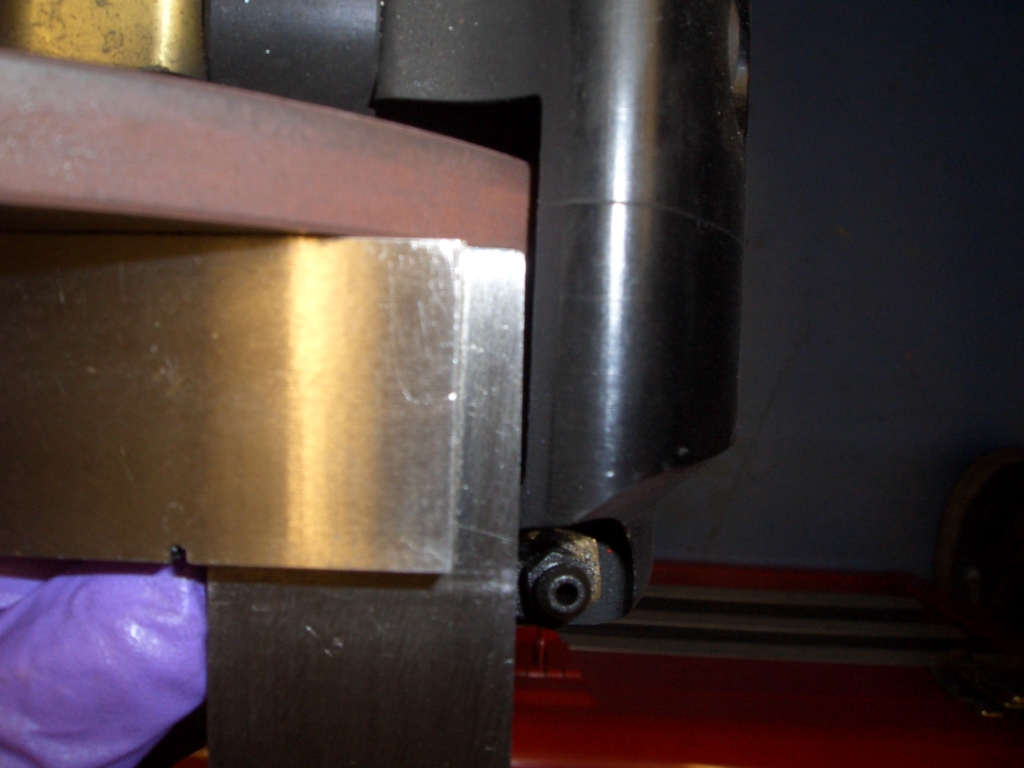
It's pretty clear (particularly from the larger version of the photo) that the end of the steel square isn't parallel
with the edge of the caliper, which of course means that the caliper isnt square. Not surprisingly, this is cited
in various places as being a potential cause for brakes to drag.
The reason why the calipers aren't straight is historic - these front uprights were originally fitted to my old
Blackbird-powered Fury and in order to get a set of Wilwood Dynalite calipers to fit (the same ones that are now
fitted to the Striker) I needed to take some of the mounting faces of the uprights off. Since at the time I didn't
have the sort of workshop facilities I have now, I ended up doing the job with an angle grinder. Evidently, despite
my best efforts at the time to make sure that the mounting faces remained true and level, they're not.
Of course, the difficulty now is working out how to machine them flat again. The only sensible reference plane
to use (other than the axis of the upright spindle, which is a bit tricky to clamp since it's an axis of rotation)
is the disc, so I'm working out an elaborate clamping set-up which will allow me to clamp the entire disc/hub/upright
assembly onto the milling machine and tweak the caliper mounting faces. Watch this space...