4th July 2007

Yes, I'm a bad, bad person - not even a single update during June. This month's excuse is Le Mans - not only did it rain the whole time, the Striker broke down and getting it repatriated was a nightmare. Still, once again, some progress has been made on the racer, along with yet more partsr-related annoyances.

Making and fitting brake line flexis

  With the discs and calipers in place, pretty much the only thing that was left to do on the brakes was to make up and fit the flexible lines connecting the kunifer brake pipes to the calipers. The kunifer lines on the rear axle are actually the ones which I originally fitted when I first built the Furybird but they seemed fine so I couldn't think of any reason to replace them.

The flexi from the rear axle to the brake pipe on the chasis is a bit long (hence the rather flamboyant curve it goes through). This is because it to is a part originally off the Furybird, and it's intended for use with the axle much lower. Can't see that it'll be a problem in practice though (apart, of course, from all that extra weight) and since I couldn't be bothered to take it apart, chop it down, and reassemble it, I left it as it was...

Panhard rod fitting

With the Panhard road coated liberally in POR15, it was time to fit it. The original Furybird chassis had a length of tubing welded on the lower left hand corner of the rear bulkhead, with a length of tubing stick out to the rear of the bulkhead, and the Panhard road mounted onto that, in order to space it out from the chassis. The new chassis doesn't have that - it just has a threaded bush welded flush with the rear bulkhead.

So a little spacer was necessary to get the Panhard rod in alignment. Easy job to do on the lathe, and with careful measuring to make sure everything was lined up square, I fitted the Panhard rod. The threaded bush fitted to the chassis was tapped with an M12 thread. I'm using 1/2" rosejoints, and hence 1/2" UNF bolts, so this needed to be re-tapped out to 1/2" UNF. This doesn't leave much thread left, given an M12 thread to start with, so I've fitted a 4" long bolt and stuck a nyloc on the other end to make sure the Panhard rod doesn't start getting any ideas about making a bid for freedom.
 

  I think this picture shows why the chassis mods were necessary - with the rear axle centralised there's only ~7mm between the trailing arm and the new chassis tube. Since the old chassis plate (the remains of which can be seen on the right hand side of the picture) was just over 10mm further out, it clearly wasn't ever going to work properly as it was...

Front brake flexis

Having finished off the rear flexi hoses, the front ones were next. The length of these is a bit more critical than for the ones at the rear - if they're too short then bad things happen when you try and get full lock. If they're too long they start bumping into things when you're at full lock with the caliper close to the chassis. With a bit of trial and error I soon got them as short as possible without stressing the hose at full lock on either side.

The flexis are made up from the Euroquip fittings available from
Rally Design. They're extremely easy to make up, requiring no specialist tools - just a hacksaw and some spanners.
 

Fuel hoses - engine bay

  With the kunifer fuel lines already in place down the transmission tunnel, connecting everything up to the fuel rail was simple enough. The 2006 R1 engine has a conventional fuel rail with a (really tiny) regulator on one end, unlike some bikes which have no return fuel feed and a regulator integrated with the in-tank fuel pump.

In fact, the only minor problem was that once again I'd thought for some reason that 8mm is roughly 1/4" whereas it's really roughly 5/16". So I had to make up some 6mm/8mm adaptors to go from the kunifer lines to the 8mm hose onto the fuel rail. These were just steel bar, turned down to 8mm and 6mm with some ridges for the hose clamps to grip onto, and a 4mm hole up the middle.

Naturally, all the hose is rated for injection pressure, and all the clamps are proper fuel clamps and not jubilee clips.

Oil pressure sender adaptor

Recent experience with the Striker suggests that I don't notice the oil pressure warning light coming on even if I'm just mimbling along the autoroute, never mind battling for position on track. Nonetheless, I still want an oil pressure warning light on the dash. I also want an oil pressure sender to attach to the data-logger so that I can log oil pressure and make sure that the engine's not suffering oil surge.

The trouble is, the R1 has no oil pressure sender as standard - just an oil level switch which is useless with the baffle in place as you're supposed to overfill the engine considerably. By the time the oil level warning light comes on, it really is too late...

The R1 manual sets out how to test oil pressure by removing a threaded bung from the end of one of the oil galleries and fitting an adaptor with a pressure gauge attached. It turned out the threaded bung was an M16x1.5 thread, and happily
Think Auto sell an M16x1.5 to JIC -4 adaptor. With a JIC -4 right angle fitting and some -4 hose, the engine end was in place. The other end will have to wait for a while...
 

Fuel stuff - the other end

  Now that the fuel connections at the engine end were all sort out, I turned to the other end, where things are a wee bit more complicated. In order to help the pump be as self-priming as possible I decided to put it at the back of the car, next to the fuel tank, and the large flat panel behing the rear bulkhead on the passenger side looked an inviting space to fit everything.

From the left to the right there's the pre-filter, the pump (a Rover V8 EFI pump) and the post filter (from a Cavalier). And before you ask, no, the axle won't hit them when it moves, and yes, there is room for everything. Just.

The only bit of hosework left to do is the pre-filter to the pump (because I don't have any 12mm fuel hose yet) and the pre-filter to the fuel tank (because I don't have a fuel tank yet). And at some point I'll have to wire up the fuel pump, but I'm putting off doing the wiring for as long as possible...

Loud pedal

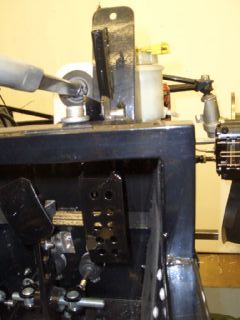
The box of random assorted pedal box components that Martin Bell sent me sadly, while it had a surfeit of brake pedals, lacked a throttle pedal. Upon mature reflection, I decided that having two brake pedals wasn't likely to help my lap times, so I had to make a throttle pedal. A short bit of 10mm steel tube, with a bend in it, some 2mm plate curved into a gentle curve (hit with hammer, lots), some holes for added lightness, and the customary coating of POR15, and it's all in place.

It's held in place with the standard M6 bolt fitting that Furies have as standard, although because M6 bolts running through a hole in some thin-wall steel tubing aren't the best bearings around, there's a fair bit of movement side to side. The Furybird suffered from the same thing, and I can't say I ever noticed it when driving. It's still tempting to do it properly and have the throttle pedal on proper bearings, but then it's also tempting to do it really properly and make a lightweight throttle pedal from billet ali...
 

Steering

  First job - fit the steering column. This is the column off the Furybird, with a Racetech QR boss and Momo steering wheel. It's fitted using the standard Fisher bracket, which needed a bit of adjusting (hit with hammer) to make the steering column run at the correct angle for the bottom to go through...

...the bottom mount. I'd made it years ago for the FurybirdII, but that now has a machined unit with a proper ball bearing in it, whereas this uses the standard Ford Sierra part. It's a bit taller than standard, so that the other end of the steering column, and hence the steering wheel, is a bit lower.

You can also see in this picture the brake fluid reservoir (again recycled from the remains of the Furybird). I spent ages working out the best place to fit it, minimising the bends in the hoses to the MCs, making sure it would clear the steering column UJ etc. It was only after I fitted it that I realised it's slap bang in the way of where the throttle cable would naturally want to be. Still, I've got a plan to get round that problem...

The hoses from the reservoir to the MCs are proper brake fluid resistant ones - seemingly the only place that sells them is Merlin Motorsport - and only in 7.6mm I/D size. So I got some 5/16" kunifer and drilled out the brass 7/16" fittings that go in the MC to take the 5/16" pipe.
 

  The intermediate steering column, that goes from the modified Sierra column to the steering rack, is a modified Fisher unit. The standard Fisher unit has a big block of rubber on the end which acts as a sort of limited angularity UJ. It's big, nasty and heavy, so I chopped it off and welded some splined bar in the end of the column (needed a little steel adaptor sleeve which I made on the lathe). The splined bar is also pinned to the column, just in case my welding isn't as good as it ought to be, and then fits into a Group IV steering knuckle. With that all tightened up, the steering was done.

The Last Engine Mount

Because I'd cocked up making one of the engine mounts I needed to make another one, and preferably one which fitted this time. And here it is in its unpainted nastiness. Usual thing - 7/8" CDS tubing, 2mm plate, a gusset and plenty of weld.

And yes, it's now covered in black POR15 too.
 

PAIR valve blanking plates

  The R1, like most bike engines, has a system for injecting clean air directly into the exhaust ports to burn any unburnt fuel and stop the HC readings going off the scale on emissions tests. However, these only really do anything on the overrun, and insofar as they do anything at idle I can (hopefully) compensate by tweaking the Powercommander which I'll have to get.

So the PAIR valve system comes off, and gets replaced by a couple of 5mm ali plates. I've nearly finished off using my supplies of this 5mm ali plate, thank God. It's horrible stuff - it's so soft it won't machine properly, it clogs drill bits and cutting it's unpleasant as it just sticks to the blade. It's a nightmare to weld, and it's not structurally strong. I can't work out what its redeeming feature is, but it must be a corker to make up for the fact that it's absolutely useless for everything else...

Gear shift paddles

The paddles themselves were a part I'd made years ago for the FurybirdII, but decided to fit on the racer. The brackets are the bits I've made up now (much easier to do that if you don't have column stalks). There's a split clamp to go round the column, and two plates to go from the split clamp to the paddles. It's sufficiently sturdy that if you swing up and down on the paddles, the steering column moves.

Next job on the gear shift front is to make up the rods and bell-crank which will connect the paddles to the linkage on the engine.
 

And disaster strikes again...

  The next job was to fit the dampers properly. This meant machining up some little 4mm spacers (boring but straightforward), fitting the springs, and then fitting the dampers. However, when I was winding up one of the spring seats on the front dampers, the end sheared off.

I think it's fairly obvious what the problem is - the weld (pretty but not much penetration) has failed where the mount has been welded to the body of the shock. It may be fixable - and then again it may not.