17th November 2008

Dashboard wiring

  Now this took a while to finish. From left to right, we have:

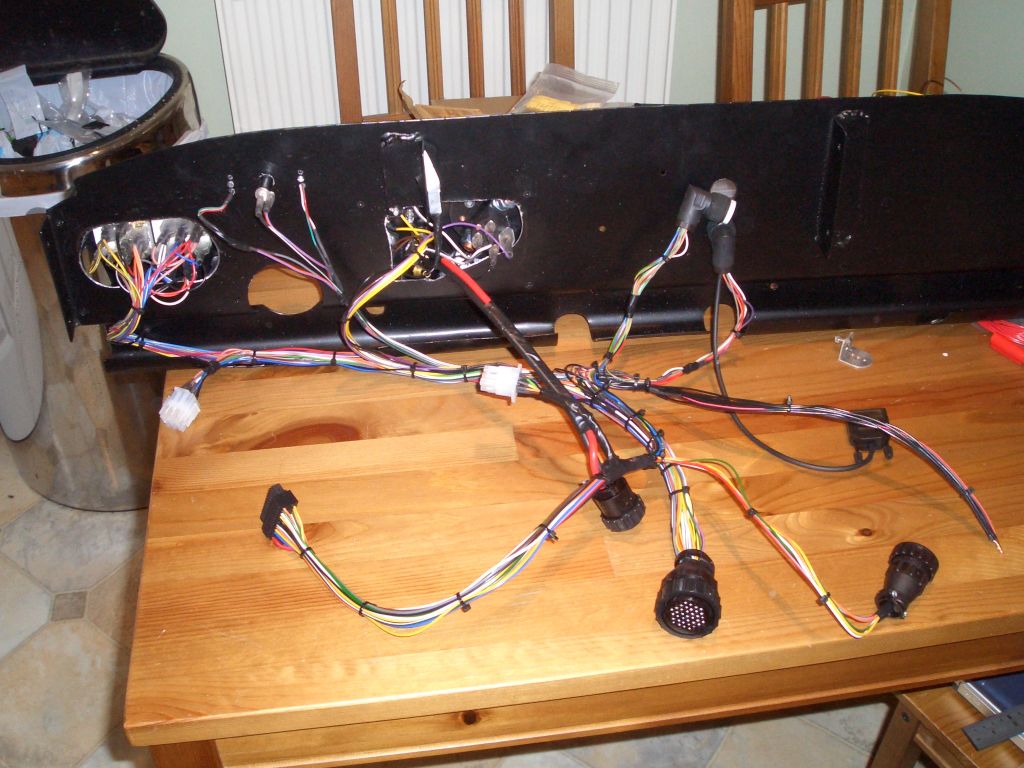
9 way white connector to sub-dash (essentially the buttons for the DL1 and DASH2)

DL1 connector

6 way white connector to and from wheel speed sensors

2 way high current (or if you're Tim, amperage) connectors for the main power switch

37 way multipole connector (various stuff)

2 round multipole connectors for the DASH2

16 way multipole connector (only partially populated, I ran out of space on the 37 way connector and thought I'd leave myself with some spares)

Serial port connector linking DASH2 to DL1

I've used multipole round connectors for most of the wiring so that the dashboard can be removed (relatively) easily and to try and maintain the scuttle as a firewall without having any open holes in it. In practice, installing and removing the dashboard will be an absolute nightmare and a GRP firewall is something of an oxymoron...

Radiator

Fitting the radiator, on the other hand, should have taken all of 5 minutes. Line up radiator, drill holes, tap radiator bosses to M6, fit. However, the radiator mounting legs on the chassis were too long and as a result there wasn't actually room between the bonnet (when open) and the radiator mounting plate for the radiator.

So I ended up cutting off the radiator mounting plates (5mm steel? Is that really necessary?) making up some new ones (less than half the weight, happily), welding them into place and breaking out another little can of POR15 to paint them before I could get round to fitting the radiator.

To quote Coldplay - 'Nobody said it was easy. No-one ever said it would be this hard...'
 

Header tank

  To give myself the impression of having achieved something, I've fitted the coolant header tank (made for me by Allyfab) and the ECU. I've since had to remove both in order to fit the dashboard... Ah well... ;)

Bonnet thingies

The Fury bonnet has a tendency for the lower edges to pull inwards. At the back of the bonnet they're held in place by the bonnet pins, but I'm not fitting any sort of catch at the front edge by the front wheels. So, in an attempt to avoid having to do any more work on making up the loom for the dashboard, I've made up these plates which make sure the bonnet edges stay roughly in line with the sides of the sidepods.  

Battery location

  With the big day when I finally start the engine getting ever closer, I've started looking at where to fit the battery. It's a weeny bike battery which is the same as that fitted in the R1 bike. This is the favoured location at present, although as you can see there's not exactly bucket loads of clearance. In face, between the battery and the brakes MCs, the engine mount, and the side panels on the chassis there's about 1mm clearance all round.

However, I don't think there are any other realistic options. The scuttle's too full of wiring, sensors, relays and a rectified and there's nowhere else obvious in the engine bay unless I mount it right at the very front of the car by the dampers, which will mean battery cables of awesome and undesirable length.

I'll just have to hope that the footwell bulkhead doesn't flex too much when I engage in vigorous braking.